

Federated access to Amazon Athena using AWS IAM Identity Center
Create one Identity Center group for sensitive data and another for non-sensitive data to provide distinct access to different classes of data sets… To use the Athena JDBC driver, you must specify the driver class from the JAR file… Additionally, you must pass in some parameters to change the a…
Managing Amazon Athena through identity federation allows you to manage authentication and authorization procedures centrally. Athena is a serverless, interactive analytics service that provides a simplified and flexible way to analyze petabytes of data.
In this blog post, we show you how you can use the Athena JDBC driver (which includes a browser Security Assertion Markup Language (SAML) plugin) to connect to Athena from third-party SQL client tools, which helps you quickly implement identity federation capabilities and multi-factor authentication (MFA). This enables automation and enforcement of data access policies across your organization.
You can use AWS IAM Identity Center to federate access to users to AWS accounts. IAM Identity Center integrates with AWS Organizations to manage access to the AWS accounts under your organization. In this post, you will learn how you can integrate the Athena browser-based SAML plugin to add single sign-on (SSO) and MFA capability with your federation identity provider (IdP).
Prerequisites
To implement this solution, you must have the follow prerequisites:
- An AWS account.
- IAM Identity Center enabled. See Enabling AWS IAM Identity Center.
- Access to SQL client tools (such as SQL Workbench/J, Pycharm, and so on) that support JDBC connections.
- An Amazon Simple Storage Service (Amazon S3) bucket to store Athena query results.
- Knowledge of using AWS Lake Formation and enabling Lake Formation to manage permissions to a set of tables.
- A Lake Formation administrator role. See Lake Formation personas and IAM permissions reference for information on creating a data lake administrator.
- Tables and databases are populated in your AWS Glue Data Catalog.
- Create two Athena workgroups (for example: sensitive and non-sensitive).
Note: Lake Formation only supports a single role in the SAML assertion. Multiple roles cannot be used.
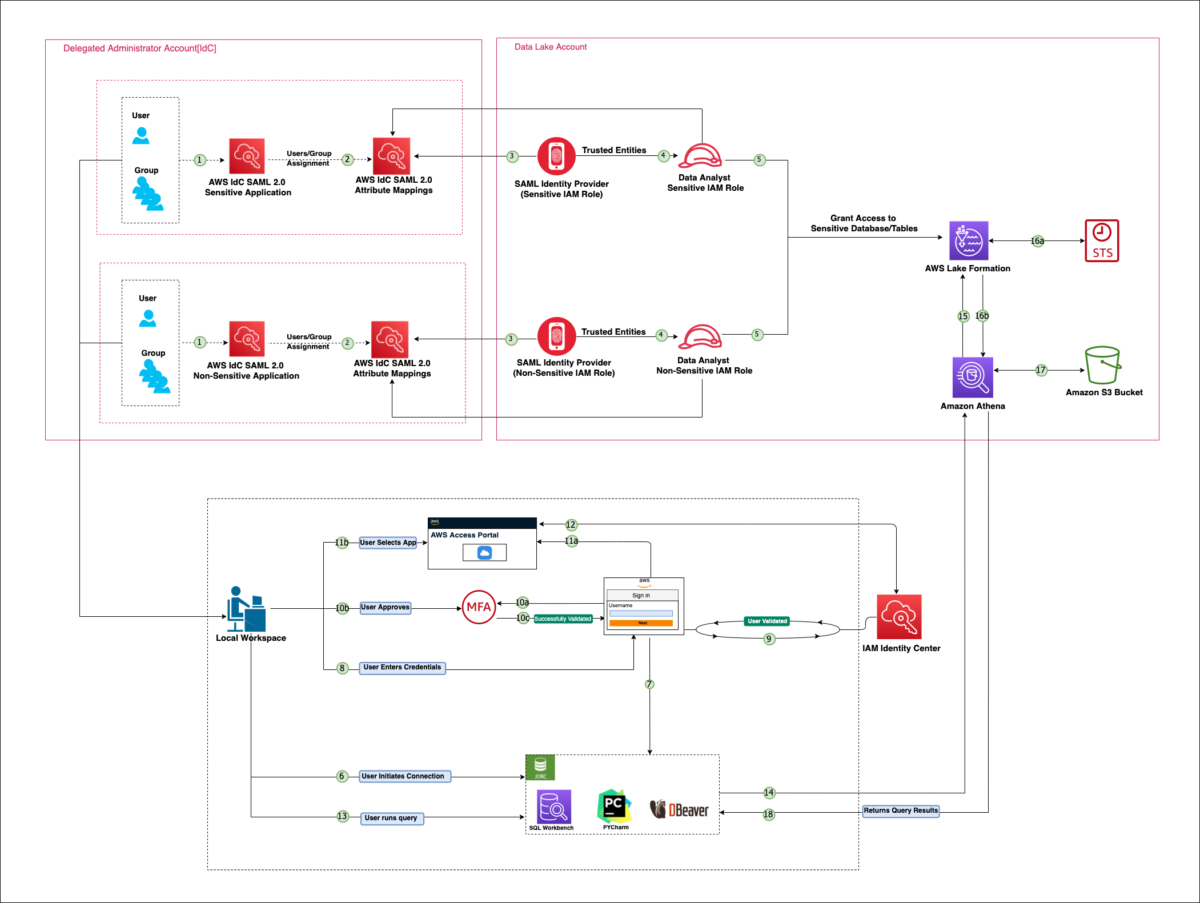
Solution overview

Figure 1: Solution architecture
To implement the solution, complete the steps shown in Figure 1:
- An IAM Identity Center administrator configures two custom SAML applications.
- An IAM Identity Center administrator configures the attribute mappings and custom attribute mappings for each SAML application and then grants users or groups access to the SAML applications.
- An IAM administrator sets up an IAM IdP and uploads corresponding metadata document for each SAML application in their AWS account.
- An IAM administrator sets up two IAM roles (sensitive and non-sensitive) and permissions in their AWS account.
- A Lake Formation administrator grants two IAM role permissions to the corresponding database and tables.
The solution workflow consists of the following high-level steps as shown in Figure 1:
- A user initiates a connection through SQL client.
- The SQL client redirects the user to the AWS access portal URL, which is configured in the JDBC client tool for the user authentication.
- The user enters workforce identity credentials (username and password). Then selects Sign in.
- The AWS access portal verifies the user’s identity. IAM Identity Center redirects the request to the Identity Center authentication service to validate the user’s credentials.
- If MFA is enabled for the user, then they are prompted to authenticate their MFA device.
- MFA is initiated.
- The user enters or approves the MFA details.
- The user’s MFA is successfully completed.
- The user selects an application.
- After successful authentication, the user will be signed in to the AWS access portal. Under the applications tab, they can view available assigned applications.
- The user selects a SAML application.
- IAM Identity Center redirects the request to the Identity Center authentication service to validate the user’s access to a SAML application.
- The user uses the client to run a SQL query.
- The client makes a call to Athena to retrieve the table and associated metadata from the Data Catalog.
- Athena requests access to the data from Lake Formation.
- Lake Formation invokes the AWS Security Token Service (AWS STS).
- Lake Formation invokes AWS STS. Lake Formation obtains temporary AWS credentials with permissions of the defined IAM role (sensitive or non-sensitive) associated with the data lake location.
- Lake Formation returns temporary credentials to Athena.
- Athena uses the temporary credentials to retrieve data objects from Amazon S3.
- The Athena engine successfully runs the query and returns the results to the client.
Solution walkthrough
The walkthrough includes eight sections that will guide you through the process of configuring an identity provider and SAML applications, defining roles, managing access to those roles using Lake Formation, and setting up third party SQL clients such as SQL Workbench to connect to your data store and query your data through Athena.
Step 1: Federate onboarding
Federating onboarding is done using a customer managed application. The steps occur within the IAM Identity Center account. As part of federated onboarding, you need to create Identity Center groups. Groups are a collection of people who have the same security rights and permissions. You can create groups and add users to the groups. Create one Identity Center group for sensitive data and another for non-sensitive data to provide distinct access to different classes of data sets. You can assign access to Identity Center applications to a user or group.
To federate onboarding:
- Open the AWS Management Console using the IAM Identity Center account and go to IAM Identity Center. Select Applications from the navigation pane and then choose Add Application.

Figure 2: Add an IAM Identity Center application
- Select I have an application I want to set up set up, select SAML 2.0 application type, and then choose Next.
Figure 3: IAM Identity Center application types
- Under configure application, enter an application Display name (such as Athena Sensitive Application) and Description. Leave the application properties empty.
- To download the SAML metadata file, go to the IAM Identity Center metadata section and choose Download. You will need to have this file available in step 4 when configuring a SAML IdP.
- Under the Application properties, add the following:
- Enter http://localhost:7890/athena/ as the Application ACS URL.
- Enter urn:amazon:webservices as the Application SAML audience.
- Choose Submit.
- Select Application and then select your application name under Customer managed.
- Choose Action, and then select Edit attribute mappings.
Figure 4: Configuring SAML application attribute mappings
- Update attributes as listed in the following table:
Attribute Map Format Subject ${user:email} emailAddress https://aws.amazon.com/SAML
/Attributes/RoleSessionName${user:email} unspecified https://aws.amazon.com/SAML
/Attributes/Role<Athena IAM Role Name from Target Account (e.g. Sensitive-IAM-Role or Non-Sensitive-IAM-Role)>, <saml- IdP ARN> For example:
arn:aws:iam::account-number:role/sensitive,arn:aws:iam::account-number:saml-provider/provider-name
unspecified - Choose Assign users and groups to assign groups to the Custom SAML 2.0 applications.
Figure 5: Assigning user and groups to SAML application
- Repeat steps 2 through 9 for the non-sensitive data group using Athena Non-Sensitive Application as the application display name.


Step 2: Create a SAML IdP
You must create a SAML IdP that points to the federated service. Before you can create a SAML IdP, you must obtain the SAML metadata document from the federated service’s onboarding section. This involves uploading some metadata about the federated service and naming the new provider.
To create an IdP:
- From the IAM console, choose Identity providers, then choose Create Provider.
Figure 6: Create IAM IdPs
- Select SAML as the configure provider type.
- Enter your provider name, for example FederateDemo, for a testing IdP.
- From Metadata document, choose File, and browse to where you saved the Federate metadata file from step 4 of Federate onboarding.
- Verify the configuration and choose Add provider.
- Write down the IdPs Amazon Resource Name (ARN).

Step 3: Create IAM roles and policies
For this step, create two IAM roles (sensitive-iam-role and non-sensitive-iam-role), along with custom identity-based policies and a trust policy for both IAM roles. The trust policy defines which principals can assume the role and under which conditions. Additionally, you must create custom identity-based policies for both IAM roles. These policies can be attached to an IAM role to specify the actions that the principal can perform on the specified resources.
To create IAM roles:
- Using the data lake administrator account, go to the IAM console
- In the navigation pane of the console, select Roles, and then choose Create role.
- Select Custom trust policy as the type. Paste the following custom trust policy for the role. Replace the federated ARN(<account-id>) with the ARN of the IdP from step 6 of Create a SAML IdP (<idp-federation-name>).
- Choose Next.
- Enter sensitive-iam-role as the custom role name.
- Review the role and then choose Create role.
- Repeat steps 1 through 6 and enter non-sensitive-iam-role at step 4.
To create IAM policies:
- From the data lake administrator account, select IAM, and then choose Policies.
- Choose Create Policy. The following are the custom policies for sensitive-iam-role and non-sensitive-iam-role.
- Insert the following policy and update the S3 bucket name (<3-bucket-name>), AWS Region (<region>) account ID (<account-id>), CloudWatch alarm name (<AlarmName>), Athena workgroup name (sensitive or non-sensitive) (<WorkGroupName>), KMS key alias name (<KMS-key-alias-name>), and organization ID (<aws-PrincipalOrgID>).
- Update the custom policy to add the corresponding Athena workgroup ARN for the sensitive and non-sensitive IAM roles.
Note: See the documentation for information about AWS global condition context keys.
- Choose Create policy to save your new policy. Create one policy for the sensitive IAM role and another for the non-sensitive IAM role.
Step 4: Attach identity-based policies to IAM roles
You can add and remove permissions for an IAM user, group, or role by attaching and detaching IAM policies to that identity. Policies define the permissions that determine what actions an identity can perform on which AWS resources. Attaching a policy grants the associated permissions.
To attach IAM policies to an IAM role:
- Attach the custom policy to the corresponding IAM roles.
- Referring back to step 9 of the Federate onboarding for the IAM Identity Center custom application, update the attribute mappings ARNs for both the IAM roles and the SAML IdPs. Perform this step for both the sensitive and non-sensitive custom applications.
Step 5. Grant permissions to IAM roles
A data lake administrator has the broad ability to grant a principal (including themselves) permissions on Data Catalog resources. This includes the ability to manage access controls and permissions for the data lake. When you grant Lake Formation permissions on a specific Data Catalog table, you can also include data filtering specifications. This allows you to further restrict access to certain data within the table, limiting what users can see in their query results based on those filtering rules.
To grant permissions to IAM roles:
In the Lake Formation console, under Permissions in the navigation pane, select Data Lake permissions, and then choose Grant.
To grant Database permissions to IAM roles:
- Under Principals, select the IAM role name (for example, Sensitive-IAM-Role).
- Under Named Data Catalog resources, go to Databases and select a database (for example, demo).
Figure 7: Select an IAM role and database
- Under Database permissions, select Describe and then choose Grant.
Figure 8: Grant database permissions to an IAM role


To grant Tables permissions to IAM roles:
- Repeat steps 1 and 2.
- Under Tables – optional, choose a table name (for example, demo2).
Figure 9: Select tables within a database to grant access
- Select the desired Table Permissions (for example, select and describe), and then choose Grant.
Figure 10: Grant access to tables within the database
- Repeat steps 1 through 6 to grant access for the respective database and tables for the non-sensitive IAM role.


Step 6: Client-side setup using JDBC
You can use a JDBC connection to connect Athena and SQL client applications (for example, PyCharm or SQL Workbench) to enable analytics and reporting on the data that Athena returns from Amazon S3 databases. To use the Athena JDBC driver, you must specify the driver class from the JAR file. Additionally, you must pass in some parameters to change the authentication mechanism so the athena-sts-auth libraries are used:
- aws credentials provider class – Specifies which provider to use, for example, BrowserSaml.
- S3 output location – Where in S3 the Athena service can write its output. For example, s3://path/to/query/bucket/.
To set up PyCharm
- Install Athena JDBC 3.x driver from Athena JDBC 3.x driver.
- In the left navigation pane, select JDBC 3.x and then Getting started. Select Uber jar to download a .jar file, which contains the driver and its dependencies.
Figure 11: Download Athena JDBC jar
- Open PyCharm and create a new project.
- Enter a Name for your project
- Select the desired project Location
- Choose Create
Figure 12: Create a new project in PyCharm
- Configure Data Source and drivers. Select Data Source, and then choose the plus sign or New to configure new data sources and drivers.
Figure 13: Add database source properties
- Configure the Athena driver by selecting the Drivers tab, and then choose the plus sign to add a new driver.
Figure 14: Add database drivers
- Under Driver Files, upload the custom JAR file that you downloaded in the Step 1. Select the Athena class dropdown. Enter the driver’s name (for example Athena JDBC Driver). Then choose Apply.
Figure 15: Add database driver files
- Configure a new data source. Choose the plus sign and select your driver’s name from the driver dropdown.
- Enter the data source name (for example, Athena Demo). For the authentication method, select User & Password.
Figure 16: Create a project data source profile
- Select the SSH/SSL tab and select Use SSL. Verify that the Use truststore options for IDE, JAVA, and system are all selected.
Figure 17: Enable data source profile SSL
- Select the Options tab and then select Single Session Mode.
Figure 18: Configure single session mode in PyCharm
- Select the General tab and enter the JDBC and SSO URL. The following is a sample JDBC URL based on the SAML application:
- Choose Apply.
- Choose Test Connection. This will open a browser and take you to the IAM Identity Center console. Select the account and role that you want to connect with.
Figure 19: Test the data source connection
- After the connection is successful, select the Schemas tab and select All databases and All schemas.
Figure 20: Select data source databases and schemas
- Run a sample test query:
SELECT <table-names> FROM <database-name> limit 10; - Verify that the credentials and permissions are working as expected.


To set up SQL Workbench
- Open SQL Workbench.
- Configure an Athena driver by selecting File and then Manage Drivers.
- Enter the Athena JDBC Driver as the name and set the library to browse the path for the location where you downloaded the driver. Enter com.amazonaws.athena.jdbc.AthenaDriver as the Classname.
- Enter the following URL, replacing <us-east-1> with your desired Region and <name-of-the-WorkGroup> with your workgroup name.
Choose OK.
- Run a test query, replacing <table-names> and <database-name> with your table and database names:
- Verify that the credentials and permissions are working as expected.
Conclusion
In this post, we covered how to use JDBC drivers to connect to Athena from third-party SQL client tools. You learned how to configure IAM Identity Center applications, defining an IAM IdP, IAM roles, and policies. You also learned how to grant permissions to IAM roles using Lake Formation to create distinct access to different classes of data sets and connect to Athena through an SQL client tool (such as PyCharm). This same setup can also work with other supported identity sources such as IAM Identity Center, self-managed or on-premises Active Directory, or an external IdP.
If you have feedback about this post, submit comments in the Comments section below. If you have questions about this post, contact AWS Support.
Author: Ajay Rawat