

How to help prevent hotlinking using referer checking, AWS WAF, and Amazon CloudFront
First, you validate whether the request contains the expected header, and if it does not, you apply the second validation, which checks to see whether it has a URL style Referer header… Figure 1 illustrates this process… Figure 1: Request – response flow showing instances of a cache-mis…
Note: This post was first published April 21, 2016. The updated version aligns with the latest version of AWS WAF (AWS WAF v2) and includes screenshots that reflect the changes in the AWS console experience.
AWS WAF Classic has been deprecated and will be end-of-life (EOL) in September 2025. This update describes how to use the latest version of AWS WAF (WAFv2) to help prevent hotlinking. Updates have been made to the screenshots to reflect the changes in the AWS Management Console for AWS WAF.
Hotlinking—also known as inline linking—is a form of content leeching where an unauthorized third-party website embeds links to resources originally referenced in a primary site’s HTML. The third-party website doesn’t incur the cost of hosting the content, which means that your website can be charged for the content other sites use. It also results in slow loading times, lost revenue, and potential legal issues.
Now, you can use AWS WAF to help prevent hotlinking. AWS WAF is a web application firewall that’s closely integrated with Amazon CloudFront—a content delivery network (CDN)—and can help protect your web applications from common web exploits that could affect application availability, compromise security, and consume excessive resources. In this blog post, I show you how to help prevent hotlinking by using header inspection in AWS WAF, while still taking advantage of the improved user experience from a CDN such as CloudFront.
Solution overview
You can address hotlinking in various ways. For instance, you can validate the Referer header (sent by a browser to indicate to the server which page the visitor was referred from) at your web server (for example, by using the Apache module mod_rewrite), and either issue a redirect back to your site’s main page or return a 403 Forbidden error to the visitor’s browser.
If you’re using a CDN such as CloudFront to speed up your site’s delivery of content, validating the Referer header at the web server becomes less practical. The CDN stores a copy of your content in the edge of its network of servers, so even if your web server validates the original request’s headers (in this case, the referer), additional requests for that content must be validated by the CDN itself, because they are unlikely to reach the origin web server.
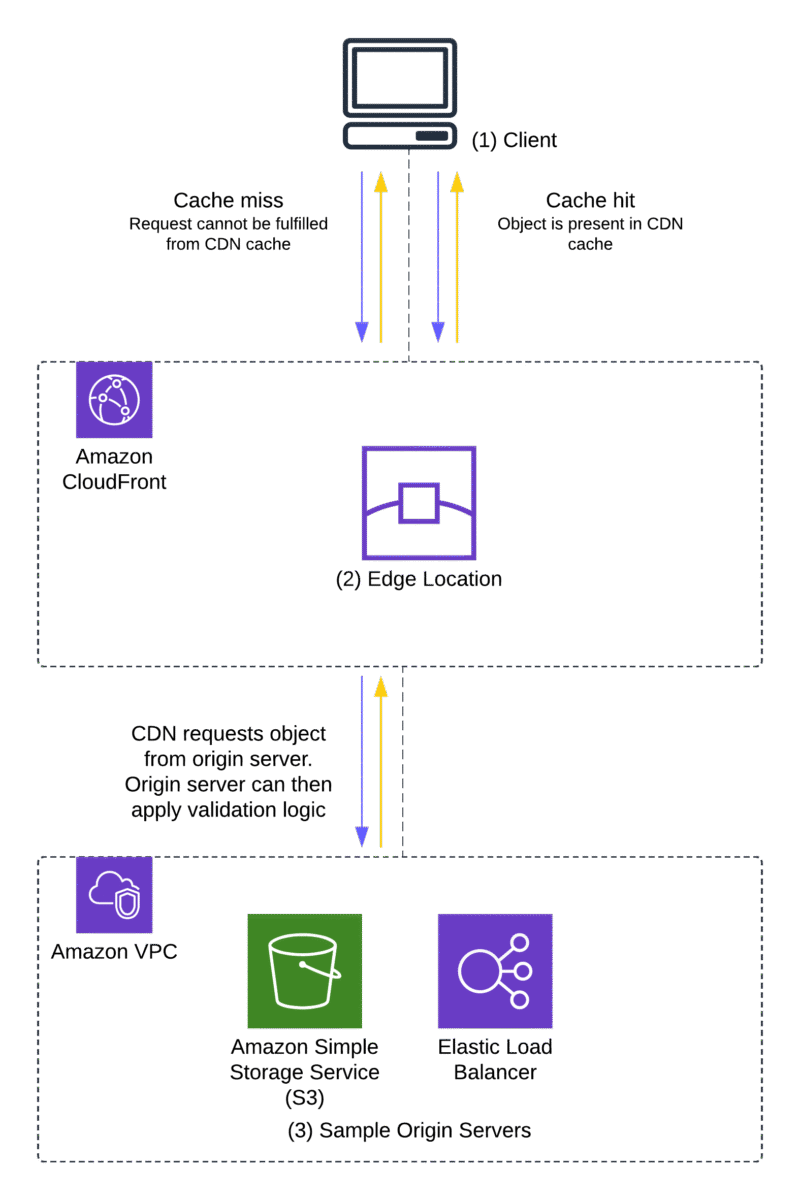
Figure 1 illustrates this process.
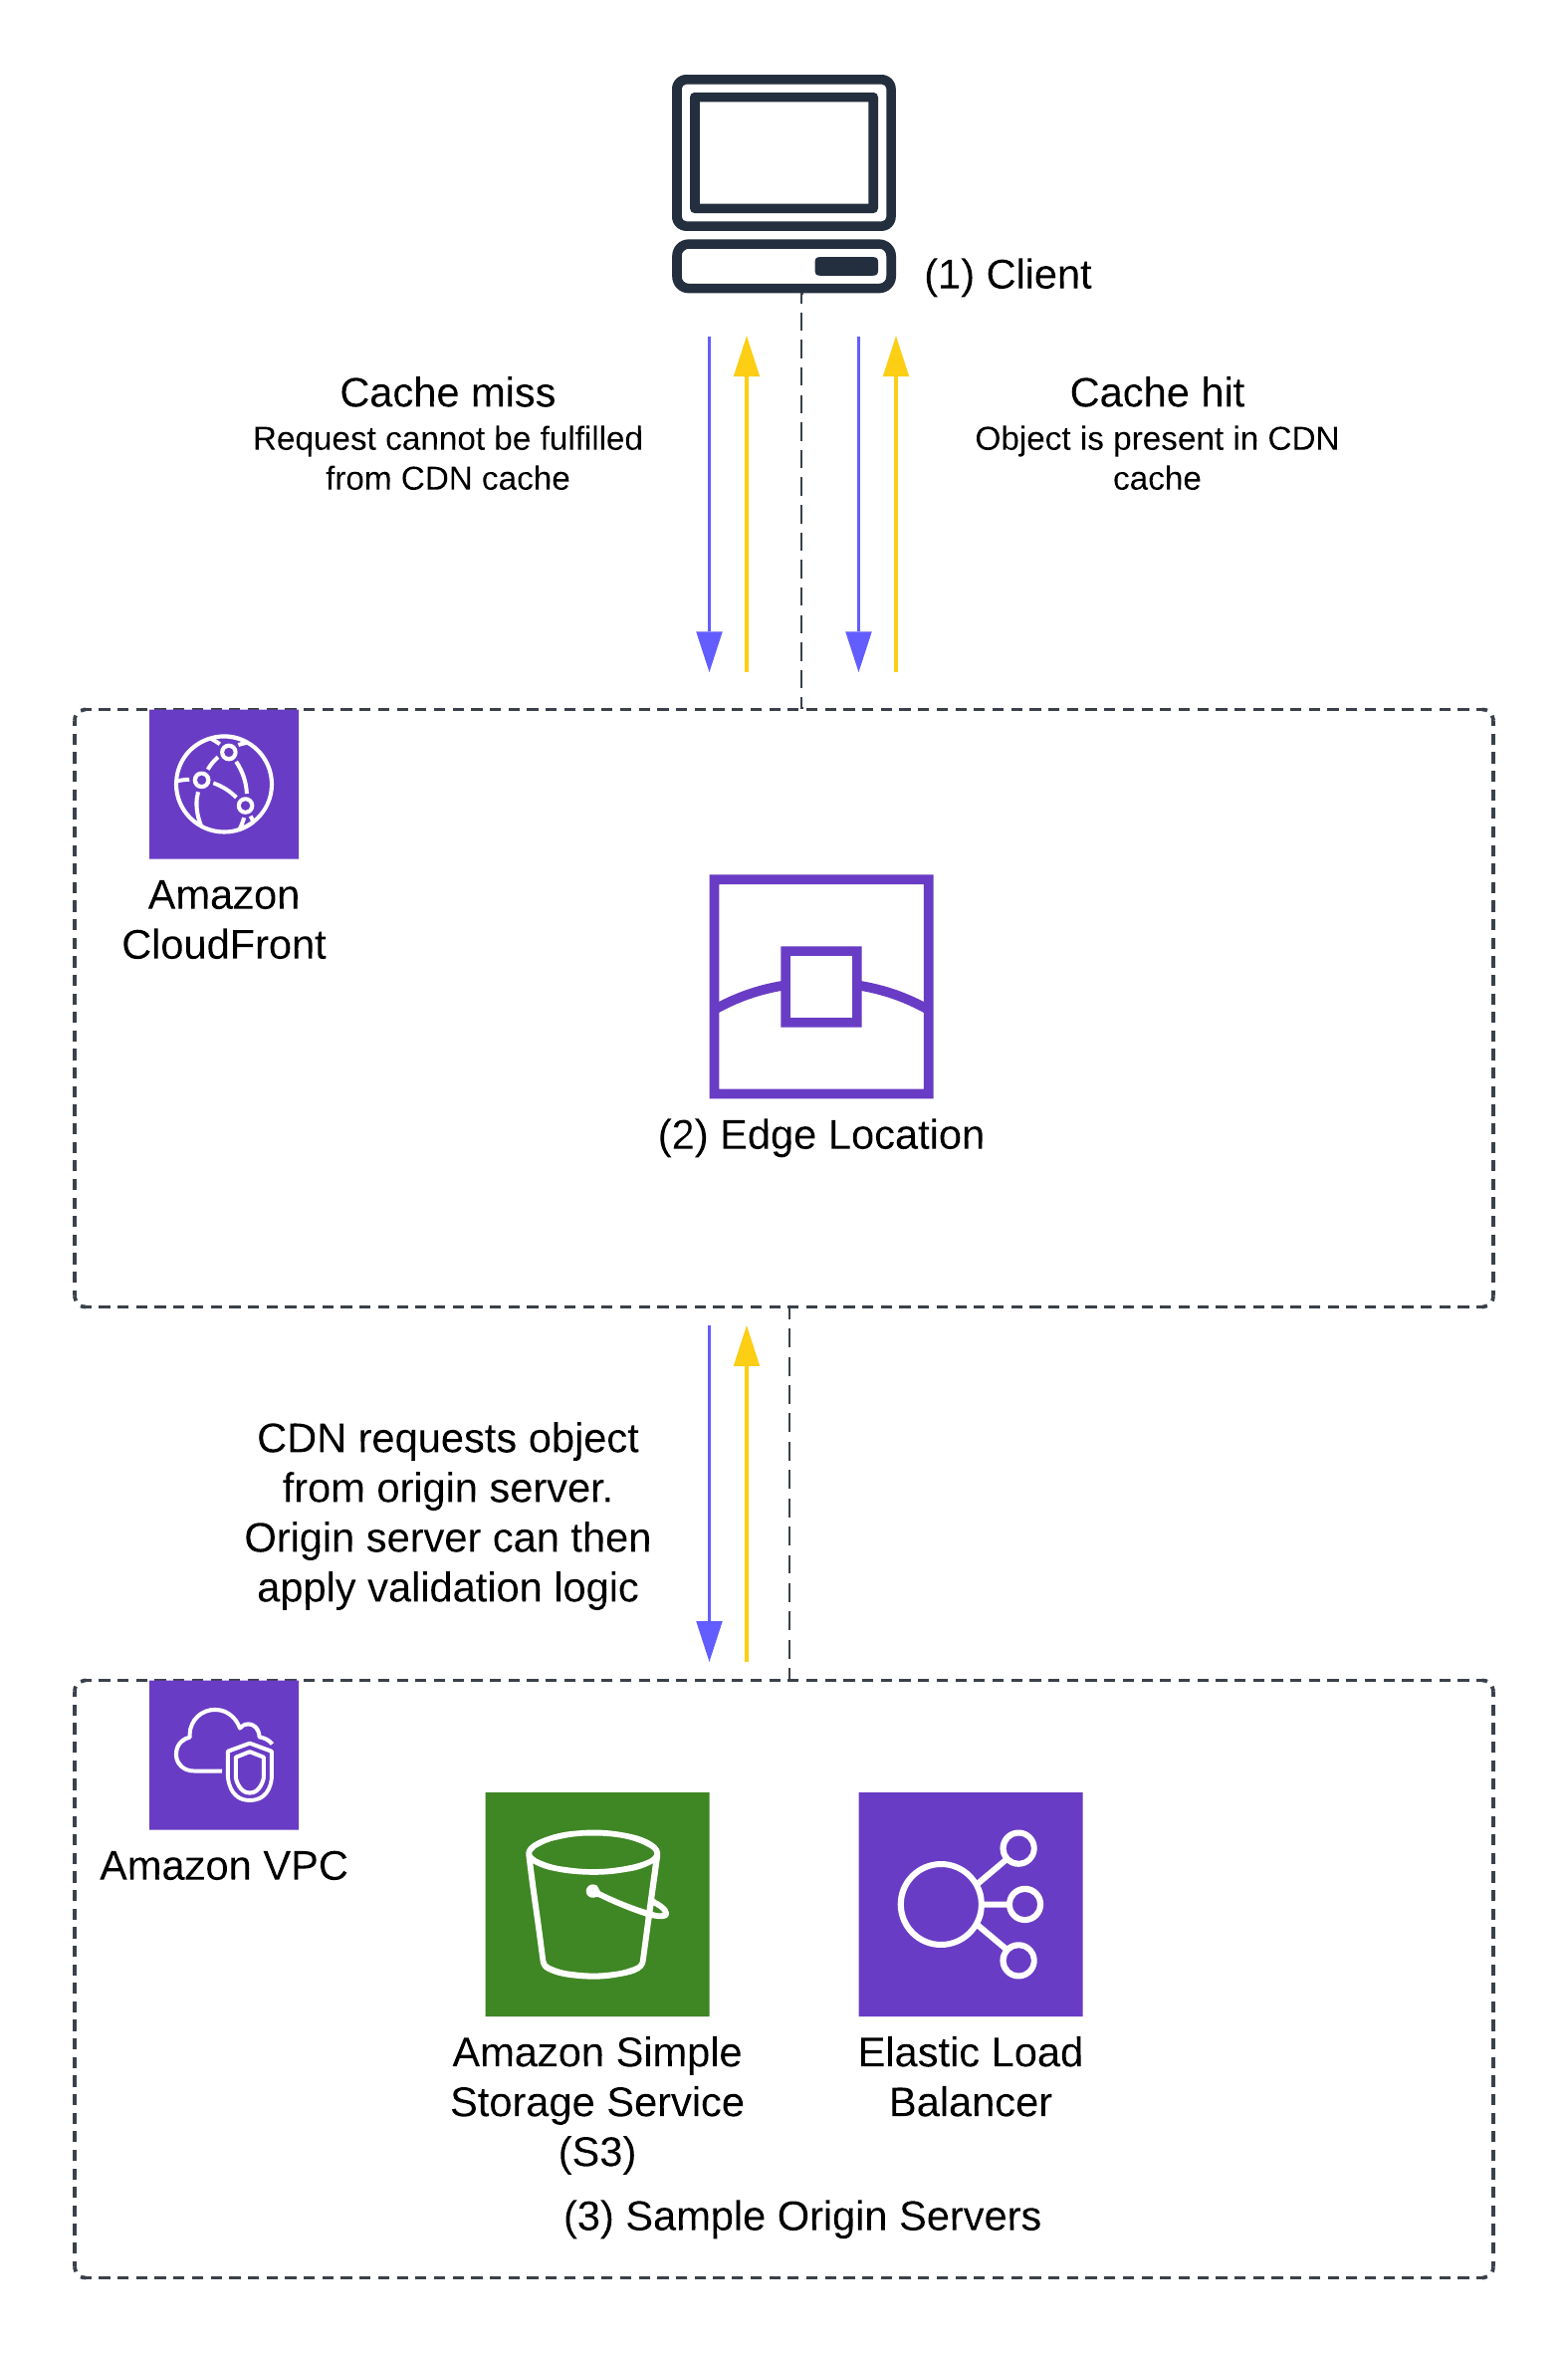
Figure 1: Request – response flow showing instances of a cache-miss and a cache-hit
The process shown in Figure 1 is as follows:
- A request is received from a user client (1) at a CloudFront edge location (2).
- The edge location attempts to return a cached copy of the file requested. This request, if fulfilled from the cache, is considered a cache hit.
- In the case of a cache miss—when the content is either not in the edge or is not valid (for example, if the content is out of date)—the request is forwarded to the origin (3) (such as an Amazon Simple Storage Service (Amazon S3) bucket) for a new copy of the object.
- In the case of a cache hit, the origin cannot apply validation logic to the user’s request, because the edge server doesn’t need to contact the origin to fulfil the user’s request.
In the next section, I show you how to inspect the client-request headers using AWS WAF to allow or block requests at the CDN.
Solution implementation—two approaches
This post includes two ways to set up AWS WAF to help prevent hotlinking:
- Using a separate subdomain: Static files (such as images or styling components) to be protected are moved to a separate subdomain such as
static.example.comso that you only need to validate the Referer header. - Using the same domain: Static files are located under a directory on the same domain. This solution includes how to extend this example to check for an empty Referer header.
The choice of approach will depend on how your site is structured and the level of protection you want to implement. The first approach enables you to set up a Referer header check to make sure that requests for the images only come from an allowlisted sub-domain, while the second approach has an additional check for an empty Referer header. The second approach extends the first approach and allows for some flexibility for users to share direct links to the image while still preventing unaffiliated third-party sites from embedding the image links on their websites.
Terms
The following list includes key terms used in this post:
- AWS WAF configurations consist of a web access control list (web ACL), associated with a given CloudFront distribution.
- Each web ACL is a collection of one or more rules, and each rule can have one or more match conditions.
- Match conditions are made up of one or more filters, which inspect components of the request (such as its headers or URI) to match for certain conditions.
- Case-sensitivity: HTTP header names are case-insensitive. Referer and referer point to the same HTTP header. HTTP header values, however, are case-sensitive.
Prerequisites
You must have a CloudFront distribution set up before configuring an AWS WAF web ACL. For information about how to set up a CloudFront distribution with an S3 bucket as an origin, see Configure distributions.
Approach 1: A separate subdomain
In this example, you create an AWS WAF rule set that contains a single rule with a single match condition, which in turn has a single filter. The match condition checks the Referer header and verifies that it contains a given value. If the request matches the condition specified in the rule, the traffic is allowed. Otherwise, the AWS WAF rule blocks the traffic.
For this example, because all the static files are on a separate subdomain (static.example.com) accessed only from the site example.com, you will block hotlinking for any file that don’t have a referer that ends with example.com.
Use the following steps to set this up using the AWS WAF console.
Step 1: Create and name a new web ACL
- Sign in to the AWS WAF console.
- If you have not created a web ACL before, Choose Create web ACL on the AWS WAF console landing page.
- Because you want to associate the web ACL with a CloudFront distribution, select Amazon CloudFront distributions as the Resource type.
- Enter a Name for the web ACL that you’re creating. For this example, I used the name
sample-webacl. The page will automatically populate an associated Amazon CloudWatch metric name. CloudWatch is a monitoring service that allows you to gather and report on metrics of various services. This CloudWatch metric can be used later to report on how your newly created AWS WAF configuration is being used. - After you have supplied the name of the web ACL, you can select the available AWS resources to be protected by this web ACL. In this example, you will fill that in later, so leave this field blank for now.
- By default, AWS WAF can inspect up to 16 KB of the web request body with additional values of 32, 48, and 64 KB for an additional cost. Leave the web request Body size limit at the default value of 16 KB.
- Choose Next.
- Enter a Name for the web ACL that you’re creating. For this example, I used the name

Figure 2: Describing the web ACL and associating it to resources
Step 2: Create a string match condition on Referer header
AWS WAF ACLs can use AWS managed rule groups, rule groups from AWS Marketplace providers, or you can write your own rules and rule groups. For this example, you will create your own rules and rule groups.
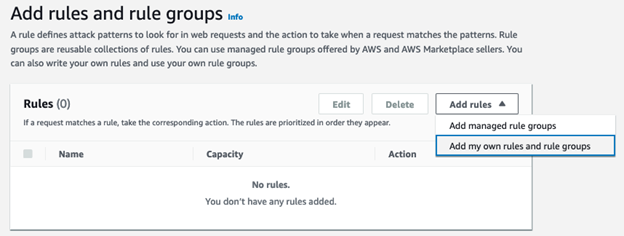
- In the AWS WAF console, choose Add rules, and select Add my own rules and rule groups to create the string match condition.

Figure 3: Add rules and rule groups
- This will bring you to the Rule visual editor page. The default Rule type will be set to Rule builder which you can leave unchanged. In the Rule builder section, select Regular rule.

Figure 4: Rule type and Rule builder
- The next step is to construct a string match condition to match on the Referer header. Under Name, enter a name for the rule, such as
Referer-check. Make sure that If a request is set to doesn’t match the statement (NOT). The string match condition is a negative match which means that if the Referer header field value does not match the value specified in the rule, the request will be blocked. This makes sure that requests forstatic.example.comwhich only originate fromexample.comare allowed. In the Statement section, use the following settings:- Inspect: Select Single header.
- Header field name: Enter
refereras the value. - Match type: Select Exactly matches string.
- String to match: Enter
example.comas the value. - Text transformation: Select Lowercase. This isn’t required for most modern browsers, but is a good practice because HTTP header field values are case sensitive.

Figure 5: Rule name and statement
- In the Action section, select Block as the Action. Choose Add Rule.

Figure 6: Rule Action
In the preceding rule statement, you’re configuring AWS WAF to inspect a header with the name Referer and checking if the value of the header matches the static string
example.com. If the value of the Referer header is notexample.com, then the request is blocked. - The next page is Add rules and rule groups. It shows the following attributes of the web ACL:
- AWS WAF rules that have been added to the web ACL.
- Web ACL capacity units (WCUs).
- Default web ACL action.
- Token domain list.
- Because you’re only adding one rule to this web ACL, choose Next.

Figure 7: Rules and rule groups, WCUs, and default web ACL action
- On the next page, you will set the rule priority. Because you added only one rule, you will not need to adjust the rule priority. If there is more than one rule, you can select a particular rule and use the Move up or Move down options to organize the rule order. Choose Next.

Figure 8: Set rule priority
- The Configure metrics page details can be left at the default values. Choose Next to proceed to the final step.

Figure 9: Configure metrics
- The final step is to review the web ACL details. If you need to change one of the settings of the web ACL, you can choose Edit step for the corresponding step. Choose Create web ACL to finalize creating the AWS WAF web ACL.

Figure 10: Review and create web ACL


Step 3: Associate the new rule with the relevant CloudFront distribution
You can now associate AWS resources with the web ACL that you created in the previous steps. In this case, the AWS resource is a CloudFront distribution.
- In the AWS WAF console, choose Web ACLs in the navigation pane. Select the web ACL named sample-webacl that you created previously.

Figure 11: Select a Web ACL to configure
- Choose Add AWS resources.

Figure 12: Add AWS resources
- Eligible AWS resources will be displayed in the pop-up page. Select the CloudFront distribution from the Resources list. Choose Add to associate the ACL sample-webacl with the CloudFront distribution.

Figure 13: Select CloudFront distribution to associate with sample-webacl
- The next page is the Web ACLs page, which will show the CloudFront distribution selected in the previous step in the Associated AWS resources section.

Figure 14: Web ACLs and Associated AWS resources


Test the referer check rule
You’re ready to test the web ACL that you created by issuing a cURL command from the command line and confirming that the referer check is matched correctly. When you request files without the allowlisted Referer header, the requests are blocked at the CDN. However, valid requests still are allowed through.
When a third party embeds your content (request blocked at the CDN)
When you embed your content (request allowed through the CDN)
Note: With Approach 1, you must make the request with an allowlisted Referer header. In this example, all paths are filtered.
Approach 2: All content under the same domain, with filtering by path
In the second approach, you allow a blank Referer header and filter by a given URL path. To do this, you will create an AWS WAF web ACL that contains multiple rules with additional match conditions, which in turn are comprised of multiple filters. As with the first approach, the match condition looks at the Referer header; however, you will validate the header in two ways. First, you validate whether the request contains the expected header, and if it does not, you apply the second validation, which checks to see whether it has a URL style Referer header. This enables you to access the assets directly in a browser when the assets aren’t embedded elsewhere in a website but still provides protection against hotlinking.
Accessing an image directly in the browser can be useful in situations where users might want to share the link to the image directly, thus helping to prevent a negative user experience when sharing the image link with other users. This approach makes it an improvement over the first approach where requests for the images must originate from the sub-domain.
You will also validate the path used in the request (in this example /wp-content), which allows AWS WAF to protect individual folders under a single domain name.
Step 1: Decide what to protect
As in the first approach, rather than filter on everything under a domain, you will filter based on the path. In this case, /wp-content. This allows you to protect your uploaded content that sits under /wp-content, but without having to put the content into a separate subdomain.
Step 2: Create and name a new web ACL
You can use the web ACL that you created for Approach 1, or you can repeat Step 1 of Approach 1 to create a new web ACL.
Step 3: Create string match conditions on the referer
For Approach 2, the assumption is that everything exists under a single domain, so instead of using the catch-all example.com, use the more secure https://example.com/ and mark the header as Starting with https://example.com.
Because you’re explicitly filtering on one header, you must watch out for two things:
- Switching between
www.example.comandexample.comin your application. - Switching between
https://andhttp://in your application.
If either of these switches occurs, you will see a 403 Forbidden error returned instead of your embedded files. In this example, all content is delivered directly through https://example.com/.
For this example, you will construct two rules, each of which will contain multiple string match conditions. AWS WAF allows for conditional match conditions within a rule so you can create nested logic statements. For example, a rule evaluation is true if all the statements within a rule statement are evaluated to true.
First rule: Validate a Referer header:
For this rule, you will set the following match conditions and AWS WAF actions:
Rule name:
Validate-Referer-headerIf Referer header value starts with
https://example.comAND
If URI path starts with
/wp-contentTHEN
ALLOW request
- Open the AWS Management Console for AWS WAF and navigate to WAF & Shield.
- Choose Web ACLs in the navigation pane and select Global (CloudFront) as the AWS Region.

Figure 15: Web ACLs and AWS Regions
- The page will refresh to show the Web ACL sample-webacl that you created in the preceding Step 2. Select sample-webacl.

Figure 16: Web ACLs list
- Select the Rules tab.

Figure 17: Web ACL rules
- Choose Add rules and select Add my own rules and rule groups. If you’re reusing the web ACL created in Approach 1, delete the Referer-check rule before adding new rules.

Figure 18: Add rules and rule groups
- For Rule type, select Rule builder.

Figure 19: Rule type
- In the Rule section, use the following settings:
- Name: Enter
Validate-referer-headeras the value. - Type: Select Regular rule.
- If a request: Select matches all the statements (AND).

Figure 20: Rule name and match condition
- Name: Enter
- In the Statement 1 section, use the following settings:
- Inspect: Select Single header.
- Header field name: Enter
refereras the value. - Match type: Select Starts with string.
- String to match: Enter
https://example.comas the value. - Text transformation: Select Lowercase.

Figure 21: First string match condition
- Create the second string match condition (Statement 2). For the URL itself, you want to protect content under
/wp-content, so you will create a string match to validate that case using the same steps as for the first string match condition, with two changes:- For Inspect, select URI path.
- For String to match, enter
/wp-contentas the value.

Figure 22: Second string match condition
- Change the Action to Allow and choose Add Rule at the bottom of the page.

Figure 23: Set the Action to Allow
- In the Set rule priority page, choose Save.

Figure 24: Save the rule


Second rule: Validate without a Referer header
For the second rule, you will set the following match conditions and rule actions:
Rule name:
Validate- with-no-Referer-headerIf Referer header contains
://AND
If URI path starts with
/wp-contentTHEN
BLOCK request
The second rule is similar to the first rule, but it matches when the Referer header value includes ://. You use this match condition to check whether the Referer header has been set at all. If it has, you block the request.
- In the Web ACL page, choose Add rules and select Add my own rules and rule groups to be taken to the Rule type page.

Figure 25: Create the second rule
- For Rule type and Rule builder, use the following settings:
- Rule type: Select Rule builder.
- Name: Enter
Validate-with-no_Referer-headeras the value. - Type: Select Regular rule.
- If a request: Select matches all the statements (AND).

Figure 26: Set the rule type and matching
- For Statement 1, use the following settings:
- Inspect: Select Single header.
- Header field name: Enter
Refereras the value. - Match type: Select Contains string.
- String to match: Enter
://

Figure 27: Configure Statement 1
- For Statement 2, use the following settings:
- Inspect: Select URI path.
- Match type: Select Starts with string.
- String to match: Enter
/wp-contentas the value.

Figure 28: Configure Statement 2
- For Action, keep the default setting of Block and choose Add Rule.

Figure 29: Add rule
- The resulting Set rule priority page will list the rules in the
sample-webaclweb ACL and will look like the following figure. It shows the name of the rule, the rule priority, the web capacity units (WCUs) and the AWS WAF response. Choose Save.
Figure 30: Rule priority and web ACL units used the web ACL.


The Rules tab will now show both of the rules that you added with their corresponding AWS WAF actions in addition to the default action of Allow for requests that don’t match one of the rules.
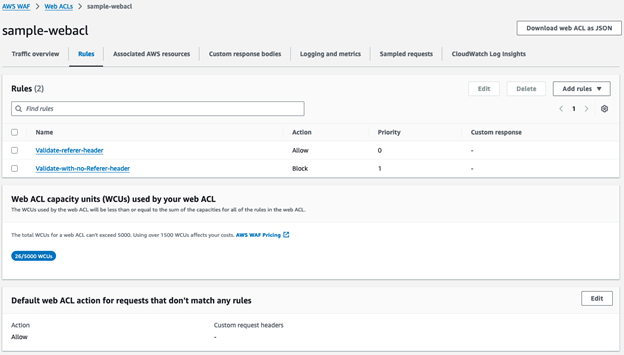
Figure 31: Rules tab of sample-webacl web ACL
Step 4: Associate the new rules with the relevant CloudFront distribution
- Select the Associated AWS Resources tab and choose Add AWS resources.

Figure 32: Add AWS resources
- Select the relevant CloudFront distribution and choose Add.

Figure 33: Select the CloudFront distribution
- The web ACLs page will show the CloudFront distribution in the Associated AWS resources tab.

Figure 34: Associated AWS resources


Test the rules
Similar to Approach 1, you have filtering at the CDN, but this time the filtering is based on the path and direct linking is allowed (without a Referer header).
You can use cURL to verify that the new AWS WAF web ACL correctly protects your content. Use the –H argument to send a different Referer header to the CloudFront distribution, which allows you to test as if you are embedding the website content in an unauthorized page.
When a third party embeds your content
When your content is directly linked (with no Referer)
When you embed your content
Conclusion
AWS WAF is a web application firewall that lets you monitor and control the HTTP(S) requests that are forwarded to your protected web application resources. In this post, you saw how to use the AWS WAF custom rule builder feature to prevent content hotlinking to protect your website’s content hosted in an Amazon S3 bucket.
The two approaches demonstrated in this post provide you with ways to implement a robust referer check solution that helps prevent unauthorized third-party websites from linking back to static assets on your website, thus helping to prevent increased bandwidth costs, bad user experience, and degraded performance because of resource leeching. Following the concept of least privilege, you can further restrict the AWS WAF rules to apply only to certain image file extensions (such as .jpg or .png).
While referer checking helps prevent unaffiliated sites from backlinking to your site’s images and benefitting by using your site’s bandwidth, more sophisticated exploits can carefully craft a request to bypass the referer check. Other web request mechanisms, such as web browser plugins, server-to-server requests that forge referer header values, or privacy-based web browsers may also cause inconsistencies in accurately evaluating the referer header value. Be aware of such inconsistencies and consider using additional private content mechanisms such as signed URLs and token authentication.
Web browsers don’t have a mechanism to validate if a Referer header has been tampered with. Referer checking should be implemented as part of a broader web application security strategy by using AWS WAF application protection rules, Bot Control, Fraud Control, and Distributed Denial of Service (DDOS) protection. Effective web traffic monitoring using AWS WAF logs, Amazon CloudWatch metrics, and web ACL traffic dashboards will help ensure that bad actors aren’t bypassing the AWS WAF rules that you have set up to protect your web traffic.
You can use AWS WAF to build on top of the referer check to implement more advanced content protection solutions such as rate-limiting, bot mitigation, and DDOS mitigations to further secure your website against a wide range of exploits.
If you have feedback about this post, submit comments in the Comments section below. If you have questions about this solution or its implementation, start a new thread on the AWS WAF forum.
Alex Smith was the original author of this post in 2016.
Author: Alex Smith