

Run custom MCP proxies serverless on Amazon Bedrock AgentCore Runtime

This post shows you how to deploy a serverless MCP proxy on Amazon Bedrock AgentCore Runtime that gives you a programmable layer to implement these controls… Others operate across multiple systems or hybrid environments where running controls as a standalone MCP server offers more portability tha…
When AI agents connect to tools through the Model Context Protocol (MCP), they gain access to capabilities that range from database queries and API calls to file operations and third-party service integrations. In production, these interactions need proper governance, controls, and observability aligned with an organization’s security policies. This includes sanitizing tool inputs before they reach backend systems, generating audit trails in specific formats, or redacting sensitive data at the protocol layer. These requirements are shaped by internal governance standards, industry regulations, and the specifics of each production environment. This post shows you how to deploy a serverless MCP proxy on Amazon Bedrock AgentCore Runtime that gives you a programmable layer to implement these controls.
Amazon Bedrock AgentCore Gateway provides centralized governance and control for agent-tool integration, including semantic tool discovery, managed credentials, and policy enforcement. For organizations that need to embed custom logic in the Gateway request path, Gateway supports Lambda interceptors. These interceptors let you run validation, transformation, or filtering code as AWS Lambda functions on every tool invocation. This allows you to keep your custom logic self-contained and managed alongside your Gateway configuration.
However, some organizations have invested in custom MCP filtering logic that is tightly coupled with internal libraries or on-premises compliance systems. They want to reuse that logic on AgentCore Runtime without refactoring it into Lambda functions. Others operate across multiple systems or hybrid environments where running controls as a standalone MCP server offers more portability than a system-specific interceptor. In these cases, a serverless MCP proxy running on AgentCore Runtime can provide a complementary pattern.
AgentCore Runtime is a fully managed compute environment for deploying AI agents and MCP servers. It provides serverless infrastructure with automatic scaling, built-in observability through Amazon CloudWatch and OpenTelemetry, and AgentCore Identity for authentication and authorization. Because Runtime natively supports the MCP protocol, it allows you to host MCP servers, including MCP proxies that add custom controls to MCP traffic.
We show you how to build and deploy a stateless MCP proxy on AgentCore Runtime that allows you to add programmable controls to MCP traffic. The proxy runs as a serverless workload on Runtime, discovers tools from an upstream MCP server at startup, re-exposes them with your custom logic applied, and forwards requests transparently. The upstream MCP server can be your choice of MCP-compatible endpoint, including MCP servers running on AgentCore Runtime, self-hosted MCP servers, or third-party MCP services. You can also connect this proxy to Amazon Bedrock AgentCore Gateway. This lets you take advantage of Gateway’s managed tool discovery, credential management, and policy enforcement across MCP servers, Lambda functions, and SaaS integrations.
Using an open source GitHub implementation as a foundation, we walk you through the architecture, explain how authorization works at each layer, deploy the proxy with an automated script, and test the end-to-end flow with a sample agent. By the end, you have a working deployment pattern for adding custom controls to MCP traffic using AgentCore Runtime.
Solution overview
The custom MCP proxy runs on AgentCore Runtime and acts as an intermediary between MCP clients and upstream MCP servers. MCP clients interact with the proxy as they would with other MCP servers; the proxy applies your specialized logic and forwards requests to the upstream server. This separation allows you to introduce custom controls at the protocol layer without modifying the upstream MCP server or the client.
Architecture components
The solution involves three logical layers that work together through MCP: the MCP client, the MCP proxy on AgentCore Runtime, and the upstream MCP server. The request flow moves through these layers sequentially: the client sends MCP requests to the proxy, the proxy applies your custom logic and forwards the request to the upstream MCP server, and the upstream server processes the request and returns the response back through the same path.
The upstream MCP server can be hosted anywhere, including on AgentCore Runtime, on your own infrastructure, or as a third-party service. In this post, we use an AgentCore Gateway as the upstream MCP server because it provides a ready-made, MCP-compatible tool endpoint with registered targets, letting you follow the walkthrough end-to-end without standing up a separate MCP server. The proxy pattern applies to other MCP-compatible upstream endpoints, and we discuss alternatives throughout the post, including upstream MCP servers running on AgentCore Runtime.
The following diagram shows the architecture, including both the request and authentication flows:
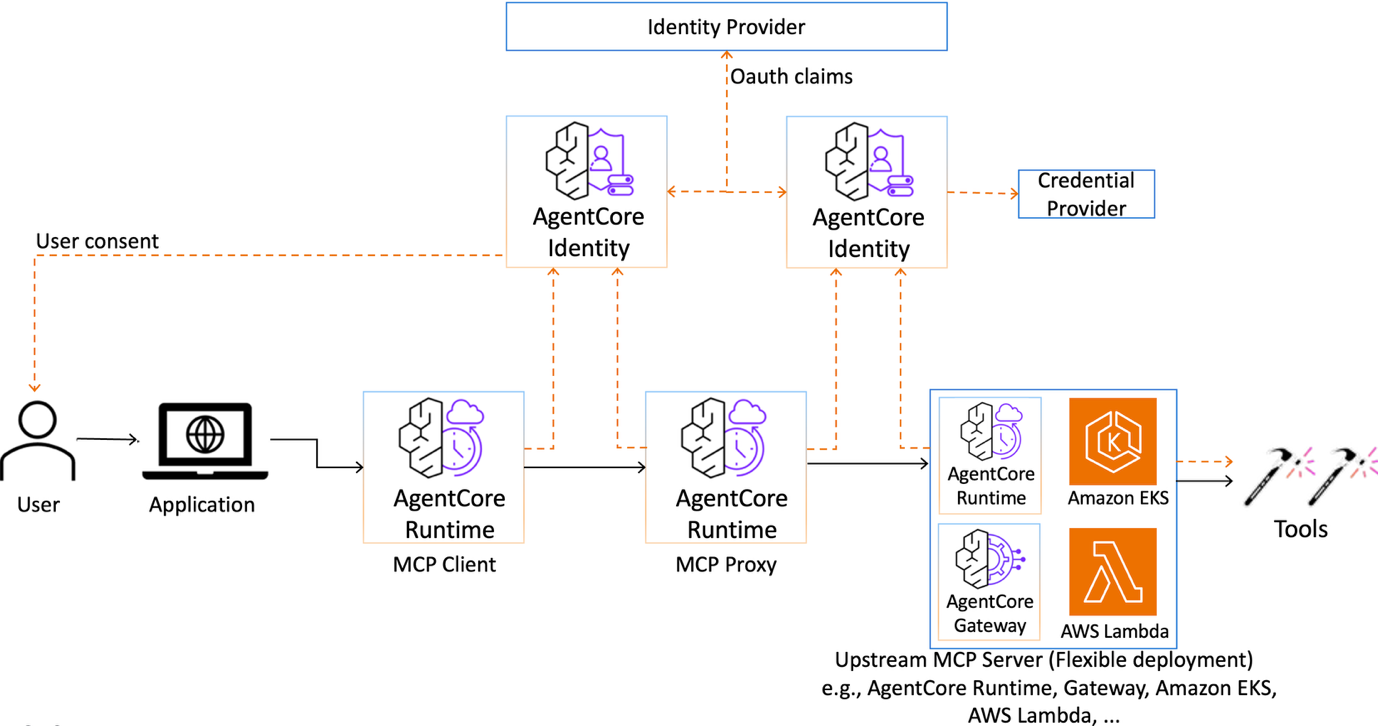
Figure 1: Architecture diagram showing the request and authentication flows. This walkthrough uses AgentCore Gateway as the upstream MCP server.
The MCP client in Runtime treats the custom MCP proxy as its tool server, sending standard MCP requests to discover and invoke tools. From the client’s perspective, the proxy is indistinguishable from other MCP servers. AgentCore Runtime provides managed compute, automatic scaling, and built-in observability for the client workload.
The MCP proxy acts as an intermediary between the client and the upstream MCP server. It receives MCP requests from the client, applies your custom logic, and forwards the requests to the upstream server. The proxy runs as a separate MCP server in Runtime, using the same serverless managed infrastructure as the client itself.
The proxy connects to the upstream MCP server as a standard MCP client. The upstream server treats the proxy as an authenticated MCP client, no different from other authorized callers. The upstream server handles access to downstream services and MCP tools.
The tools themselves, whether hosted as MCP servers, AWS Lambda functions, or third-party SaaS integrations, are registered with and managed by the upstream server. For organizations looking for a fully managed path to tool integration, AgentCore Gateway provides a straightforward and secure way for developers to build, deploy, discover, and connect to tools at scale.
How the MCP proxy works
We implement the proxy using FastMCP to discover tools from the upstream MCP server at startup and forward every client request at runtime. The proxy does not define tools of its own and has no prior knowledge of what the upstream server exposes.
When the proxy process starts, it sends a standard MCP tools/list request to the upstream server. The server returns the full catalog of available tools. For each tool, the proxy dynamically registers a local FastMCP tool with the same name and description. Each tool is backed by a handler function that forwards tools/call requests to the upstream server and returns the response. MCP clients connecting to the proxy see the same tool catalog and get the same results as if they were connecting to the upstream server directly.
Because the proxy is a standard Python MCP server that you own and deploy, you can insert custom logic before forwarding a tool call or after receiving the response. The upstream server handles tool execution, while the proxy adds a programmable layer in front without replacing the upstream server’s native capabilities.
Authorization between components
Authorization is enforced independently at each layer of the architecture, creating distinct trust boundaries throughout the flow.
- Agent to MCP proxy: When an agent connects to the MCP proxy, it uses AgentCore Identity for authentication and authorization. The proxy uses the capabilities that AgentCore Identity provides, including centralized management of agent identities and secure credentials storage. You control which agents and principals can invoke the proxy using the same identity framework you use for your other workloads in AgentCore Runtime.
- Proxy to upstream MCP server: The proxy must authenticate to the upstream MCP server it connects to. The authentication method depends on the upstream server’s requirements. AgentCore Identity provides inbound authorization for workloads hosted on AgentCore Runtime through both AWS Identity and Access Management (IAM) using AWS Signature Version 4 (SigV4) and JSON Web Token (JWT)-based authorization using OAuth 2.0 client credentials. With JWT-based authorization, you configure the upstream server with a discovery URL, allowed audiences, and allowed clients. AgentCore Identity validates the bearer token on every request. The proxy obtains tokens through the OAuth 2.0 client credentials grant and includes them as
Authorization: Bearerheaders.
For IAM-based authorization, the proxy signs requests using AWS SigV4 with the IAM execution role it inherits from AgentCore Runtime. The specific permissions differ by upstream server type. If the upstream MCP server is hosted on AgentCore Runtime, you scope the bedrock-agentcore:InvokeAgentRuntime permission to control which callers can reach it. Alternatively, if the upstream server is an AgentCore Gateway, as in this walkthrough, you scope the bedrock-agentcore:InvokeGateway permission to specific gateways and caller identities. This ensures that only trusted proxies can access the tool catalog.
The accompanying GitHub project uses IAM-based authorization as the default method. The deployment script also supports JWT-based authorization for this integration.
- Upstream server to tools: The upstream MCP server authenticates to downstream tools using AgentCore Identity credential providers, which manage OAuth 2.0 tokens, API keys, and credential rotation transparently. Outbound authorization operates the same way regardless of whether requests originate from the proxy or from a direct client.
Each layer in this architecture authenticates independently. You inject custom logic at the MCP protocol layer through the proxy, while the upstream server continues to handle tool execution and its own authorization. The result is an architecture where custom controls and upstream capabilities operate in separate, well-defined layers.
Prerequisites
To implement the solution, you must have the following:
- A Linux or macOS development environment with Python 3.12 or later installed. It can be a local machine or a cloud instance.
- AWS Command Line Interface (AWS CLI) installed and configured with credentials for an AWS Identity and Access Management (AWS IAM) principal that has permissions to create IAM roles, interact with Amazon Elastic Container Registry (Amazon ECR), and invoke Amazon Bedrock AgentCore APIs. If you don’t have an AWS account, refer to How do I create and activate a new Amazon Web Services account?
- The AgentCore starter toolkit installed on your development environment. This tool packages and deploys agents to AgentCore Runtime. If you don’t have the AgentCore starter toolkit, refer to Get started with the Amazon Bedrock AgentCore starter toolkit in Python.
- Docker installed on your development environment. The AgentCore CLI uses Docker to build the container image that runs on AgentCore Runtime.
- An upstream MCP server endpoint that the proxy will connect to. In this walkthrough, we use an Amazon Bedrock AgentCore Gateway with at least one target registered. If you don’t have an AgentCore Gateway, refer to Create an Amazon Bedrock AgentCore gateway. Note the Gateway MCP endpoint URL after creation. You use this URL to configure the proxy.
- (If your upstream server uses OAuth inbound authorization) An Amazon Cognito user pool with a configured domain and an app client that uses the client credentials grant with a client secret. If you created your Gateway using the AgentCore starter toolkit with OAuth authorization, these resources are provisioned automatically during Gateway creation.
Deploy the solution
Complete the following steps to deploy the project in your AWS account:
- Start by cloning the GitHub repository and reviewing the project structure.
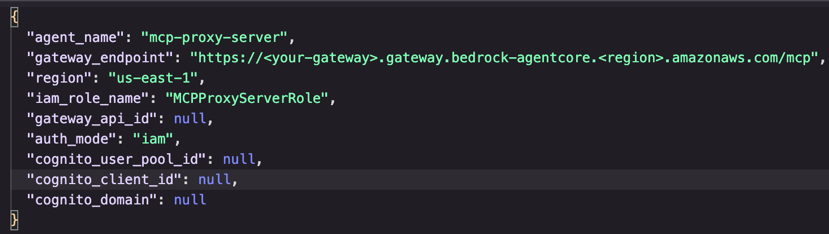
- Open
deploy_config.jsonand set the values for your environment:

Figure 2: Configuration screenshot showing deployment settingsReplace the value ingateway_endpointwith the MCP endpoint URL of your upstream MCP server (AgentCore Gateway in this example). Setregionto the AWS Region where the upstream server is deployed. Thegateway_api_idfield is optional. If your upstream server is an AgentCore Gateway and you provide its Amazon Resource Name (ARN), the deployment script scopes the IAM permissions to that specific resource. If you leave it as null, the script grants permissions to invoke all Gateways in the account.The
auth_modefield determines how the proxy authenticates to the upstream server and defaults to"iam"for IAM-based authentication. If you setauth_modeto"jwt"for OAuth-based authentication, you must configure the Cognito fields (cognito_user_pool_id, cognito_client_id, and cognito_domain) with values from your Cognito user pool. Then pass the Cognito client secret through the--cognito-client-secretflag when running the deploy script. When using IAM authentication, leave all Cognito fields asnull. - Run the automated deployment script
setup_and_deploy.py, from the project root. It automates the full deployment workflow, which performs the following steps in sequence:- Validates prerequisites — checks that the AWS CLI, Python, and Docker are available, and that AWS credentials are configured.
- Creates an IAM execution role — creates a role with a trust policy that allows
bedrock-agentcore.amazonaws.comto assume it. The role includes permissions for invoking the Gateway, writing to Amazon CloudWatch Logs, and pulling images from Amazon ECR. - Configures the agent with the AgentCore CLI — runs
agentcore configurewith the MCP protocol, pointing to the proxy entrypoint atmcp_proxy/main.py. During this step, the CLI prompts you to select an ECR repository and confirm the authentication mode. - Launches the agent to AgentCore Runtime — runs
agentcore launchand passes the upstream server endpoint as an environment variable (GATEWAY_ENDPOINT). AgentCore Runtime builds the container image, pushes it to Amazon ECR, and starts the agent.
- Check the MCP proxy agent status:
agentcore status --agent mcp_proxy.
Note the agent ARN from the output. You use this ARN in the test client agent to later invoke the proxy.
How to configure the proxy authentication method
The authentication mode between the MCP proxy and the upstream server depends on how the inbound authorization to the upstream server is configured. AgentCore Identity supports both IAM and JWT inbound authentication for workloads hosted on AgentCore. The proxy code on GitHub implements each mode in a single function _send_gateway_request, where outbound HTTP calls to the upstream server are made.
IAM authorization
The proxy signs every outbound request to the upstream server using AWS SigV4. Because the proxy runs on AgentCore Runtime, it inherits the IAM execution role you specified during deployment. The deployment script grants this role bedrock-agentcore:InvokeGateway permissions, with the Resource field scoped to the Gateway. No additional credentials or tokens are required. The proxy uses the runtime’s boto3 session to sign requests automatically.
OAuth authorization
If your upstream server uses a JWT authorizer, the proxy replaces SigV4 signing with a bearer token obtained through the OAuth 2.0 client credentials grant. This mode is built into the proxy and requires no code changes. You need to set auth_mode to jwt in the deployment configuration and provide your Cognito user pool details.
When you select JWT, the script collects the Cognito user pool ID, app client ID, app client secret, and domain prefix. These values are passed to the AgentCore Runtime container as environment variables during the agentcore launch step. You can also set these values directly in deploy_config.json to skip the interactive prompts.
At startup, the proxy reads the AUTH_MODE environment variable. When set to jwt, the proxy requests an access token using HTTP authentication with the client credentials. The token is cached in memory and refreshed automatically when it approaches expiration. Each outbound request to the upstream MCP server includes the token as an Authorization: Bearer header instead of SigV4 signature headers.
The rest of the proxy (tool discovery, tool forwarding, and the FastMCP server) operates identically regardless of the authentication mode. The only difference is how _send_gateway_request authenticates its outbound calls.
Test the solution
The repository includes test_agent.py, a Strands Agents script that connects to the MCP proxy running on AgentCore Runtime and uses the discovered tools.
The agent connects to the proxy, not the upstream server, by invoking the AgentCore Runtime endpoint for the deployed proxy. It sends MCP JSON-RPC requests to discover tools and call them. The following screen recording demonstrates a CLI session where the agent discovers tools from the proxy and uses them to answer questions interactively.
In this example, the upstream server (an AgentCore Gateway) exposes tools to operate arithmetic operations, and the agent acts as a calculator that uses those tools to do basic math.
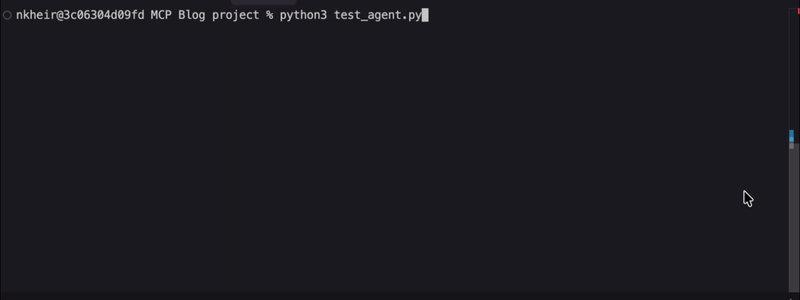
Figure 3: Testing screen recording showing CLI interaction
Customization opportunities
The proxy architecture allows you to intercept and transform MCP traffic between the client and the upstream MCP server. The following examples demonstrate two common customization patterns:
Tokenization
Tool call arguments may contain personally identifiable information (PII) that should not reach backend systems in cleartext. The proxy’s forwarding flow gives you a natural interception point to add tokenization.
Here’s how the flow works: when a client calls a tool, the proxy’s _make_tool_handler function in main.py receives the arguments as a kwargs dictionary, passes them to _send_gateway_request which wraps them in a JSON-RPC payload and sends them (SigV4-signed) to the upstream MCP server, then formats the response back to the client. The relevant code path looks like this:
You can add tokenization in two places inside the handler closure. Before the call to _send_gateway_request, you scan the kwargs values for PII patterns and replace them with reversible tokens (refer to Guidance for Tokenization to Improve Data Security and Reduce Audit Scope on AWS). After _send_gateway_request returns, you reverse the tokens in the response content before returning it to the client. This keeps PII out of the backend targets while preserving the end-to-end data flow for the agent.
Tool-level access control
You may want to restrict which tools a given caller can invoke, even though the upstream server exposes the full catalog. You can implement this by adding a policy check at the beginning of the handler function created by _make_tool_handler. The proxy already receives the tool name as a parameter when the handler is constructed. Before forwarding the tools/call request to the upstream server, the handler evaluates the caller’s identity against an access policy. The identity can be extracted from the inbound request headers or the MCP session context. If the caller is not authorized for that tool, the handler returns an error response without contacting the upstream server. You can also filter the tools/list response in the register_gateway_tools function to expose only the tools that match a given policy. This way, unauthorized tools never appear in the client’s tool catalog.
Clean up
To avoid recurrent charges, delete the resources created if you no longer need them beyond testing this solution. The AgentCore CLI provides a destroy command that removes the agent and its associated resources. Run the following commands from the project root:
- Delete the AgentCore Runtime agent and its ECR images:
agentcore destroy --agent <agent-name> --delete-ecr-repo --force - Delete the inline IAM policy and the execution role:
- If you created an AgentCore Gateway specifically for this walkthrough and no longer need it, delete the Gateway and its targets:
Replace the agent name, role name, and Gateway name with the values you used during deployment.
Conclusion
This post demonstrated how to build and deploy a serverless MCP proxy on Amazon Bedrock AgentCore Runtime that adds custom controls to MCP traffic. The proxy dynamically discovers tools from an upstream MCP server at startup, re-exposes them as a standard MCP server, and forwards tool invocations at runtime. This gives you a programmable layer where you can apply custom logic such as input validation, logging, rate limiting, or response enrichment.
We walked through the end-to-end workflow using an AgentCore Gateway as the upstream server, and covered how to adapt the proxy for gateways configured with either IAM or JWT inbound authorization. The proxy is stateless and runs as a standard container on AgentCore Runtime. You can connect it to other MCP-compatible upstream server, chain multiple upstream endpoints, or add middleware logic specific to your workload. The full source code, deployment scripts, and test agent are available on GitHub.
To get started, clone the repository, configure your upstream MCP server endpoint, and run the automated deployment script. To learn more about building and deploying agents on AgentCore and using Strands Agents framework, explore the Amazon Bedrock AgentCore documentation and the Strands Agents SDK.
About the authors
Author: Nizar Kheir