

Automating customer retention workflows in Amazon Quick
Automating customer retention workflows in Amazon Quick can turn a five-day churn-response cycle into one that takes minutes… Last quarter, a mid-size SaaS company lost 12% of its at-risk accounts because the retention team took five days to identify and contact dissatisfied customers… By the ti…
Automating customer retention workflows in Amazon Quick can turn a five-day churn-response cycle into one that takes minutes. Last quarter, a mid-size SaaS company lost 12% of its at-risk accounts because the retention team took five days to identify and contact dissatisfied customers. By the time someone manually reviewed CSAT spreadsheets and call transcripts, those customers had already churned. Amazon Quick shortens that response window from days to minutes.
This post walks through building an automated retention pipeline in Amazon Quick. The pipeline detects dissatisfied customers from structured data. It analyzes sentiment from call transcripts and scores customers by retention priority. It then generates retention offers tailored to each situation. In this post, you learn how to:
- Configure a Quick Space with contact center datasets and call transcripts.
- Create and register a custom MCP Action for customer scoring.
- Build a Chat Agent that combines quantitative key performance indicators (KPIs) with qualitative transcript analysis.
- Convert the analysis into a reusable Quick Flow.
- Orchestrate the full pipeline with Amazon Quick Automate.
Solution overview
The retention pipeline connects four Amazon Quick components in sequence. Quick Dashboard monitors contact center KPIs, including CSAT (Customer Satisfaction Score, a 1–5 rating customers give after each call), FCR (First Call Resolution, whether the team resolved the issue in a single call), and AHT (Average Handle Time). It identifies customers with CSAT scores at or below 2.
Quick Chat Agent uses natural language to query structured data and unstructured call transcripts. It combines quantitative scores with qualitative sentiment signals. This surfaces why a customer is at risk, not just that they are.
Amazon Quick Flows turns the repeatable Chat-based analysis into a scheduled or on-demand automation that runs without manual intervention. Its final step formats the results as a structured list of at-risk customers that downstream automation can consume directly.
Quick Automate executes a multi-step pipeline. It ingests the structured at-risk customer list that the Flow produces and scores those customers through a custom MCP Action. An MCP Action is a serverless endpoint that extends Quick Automate with custom business logic. Refer to the Quick Automate MCP developer guide for details. The pipeline then ranks customers by priority, generates retention letters, and uploads them to Amazon Simple Storage Service (Amazon S3) for distribution.
You run the workflow on AWS infrastructure and can access audit trails, breakpoints, and role-based access controls.
Automate pipeline architecture
The pipeline executes five sequential steps. It downloads the list of at-risk customers and contact center data from Amazon Simple Storage Service (Amazon S3). A scoring step ranks those customers by retention priority (based on CSAT and how recently each customer had an issue) and picks the top two highest-priority cases. The pipeline then drafts bonus-credit letters that reference each customer’s specific issues, saves them as a PDF, and uploads the finished letters to Amazon S3 for delivery and archival.
The following table summarizes each step:
| Step | Action | Details |
| 1 | Download at-risk customers and contact center dataset | Download the at-risk customers file (Negative Sentiment.doc) as well as the structured dataset contact_center_data.csv from Amazon S3. |
| 2 | Retention scoring | Score each customer on CSAT and issue recency through the custom MCP Action, and pick the top two highest-priority cases. |
| 3 | Retention letter generation | Draft bonus-credit letters that reference each customer’s specific issues. |
| 4 | PDF creation | Save the generated letters as a PDF document. |
| 5 | Upload to Amazon S3 | Store the generated letters in Amazon S3 for delivery and archival. |
This solution uses Amazon S3, Amazon Quick (Dashboard, Chat, Flows, Automate), and custom MCP Actions.
Prerequisites
To follow this walkthrough, you need:
- An AWS account with Amazon Quick activated (Dashboard, Chat, Flows, and Automate)
- A structured contact center dataset in CSV format named contact_center_data.csv (columns: customer_id, csat_score, call_date, call_reason, team_id). A sample dataset is provided with this post.
- Call transcript documents named Call_transcripts.docx in PDF or TXT format.
- An Amazon S3 bucket for pipeline input and output (example: amzn-s3-demo-bucket)
Solution walkthrough
The following sections walk through the build end to end, from preparing your Quick Space and registering the MCP Action connector to assembling the Chat Agent, Flow, and Automate workflow. Complete them in order, because each step builds on the components created before it.
To prepare your Quick Space
A Quick Space is the data layer that gives the Chat Agent access to both structured datasets (for filtering and aggregation) and unstructured documents (for sentiment analysis). Creating the Space first helps verify that every downstream component draws from the same source of truth.
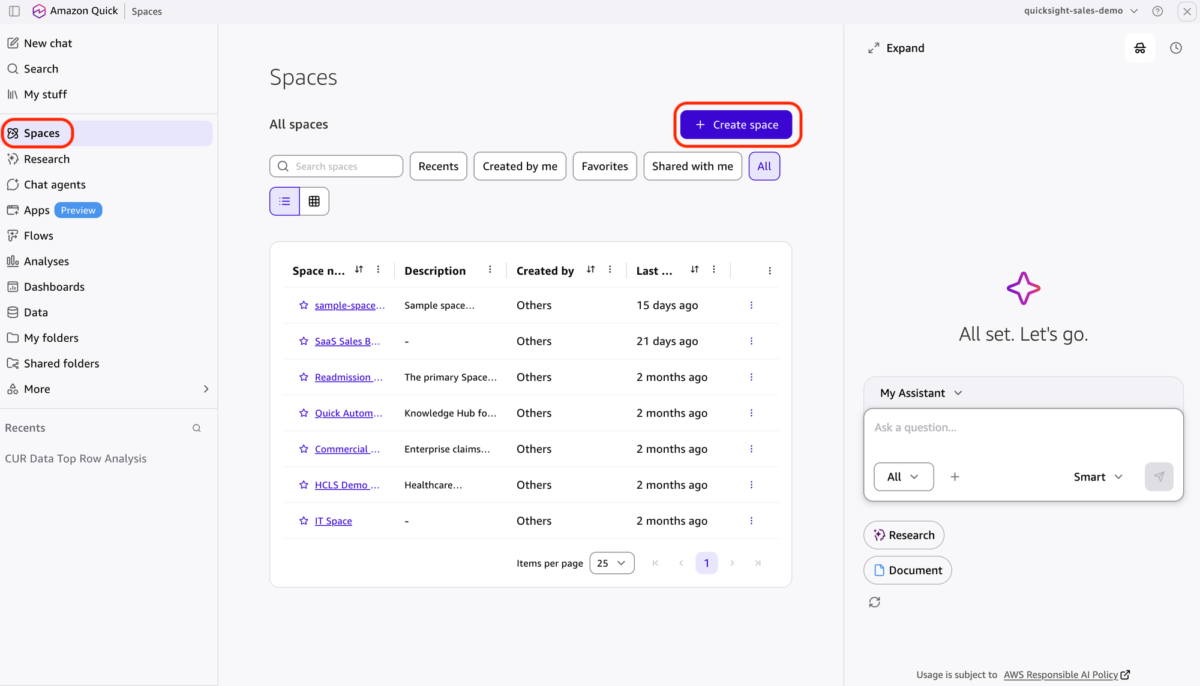
- From the Quick console, select Spaces.
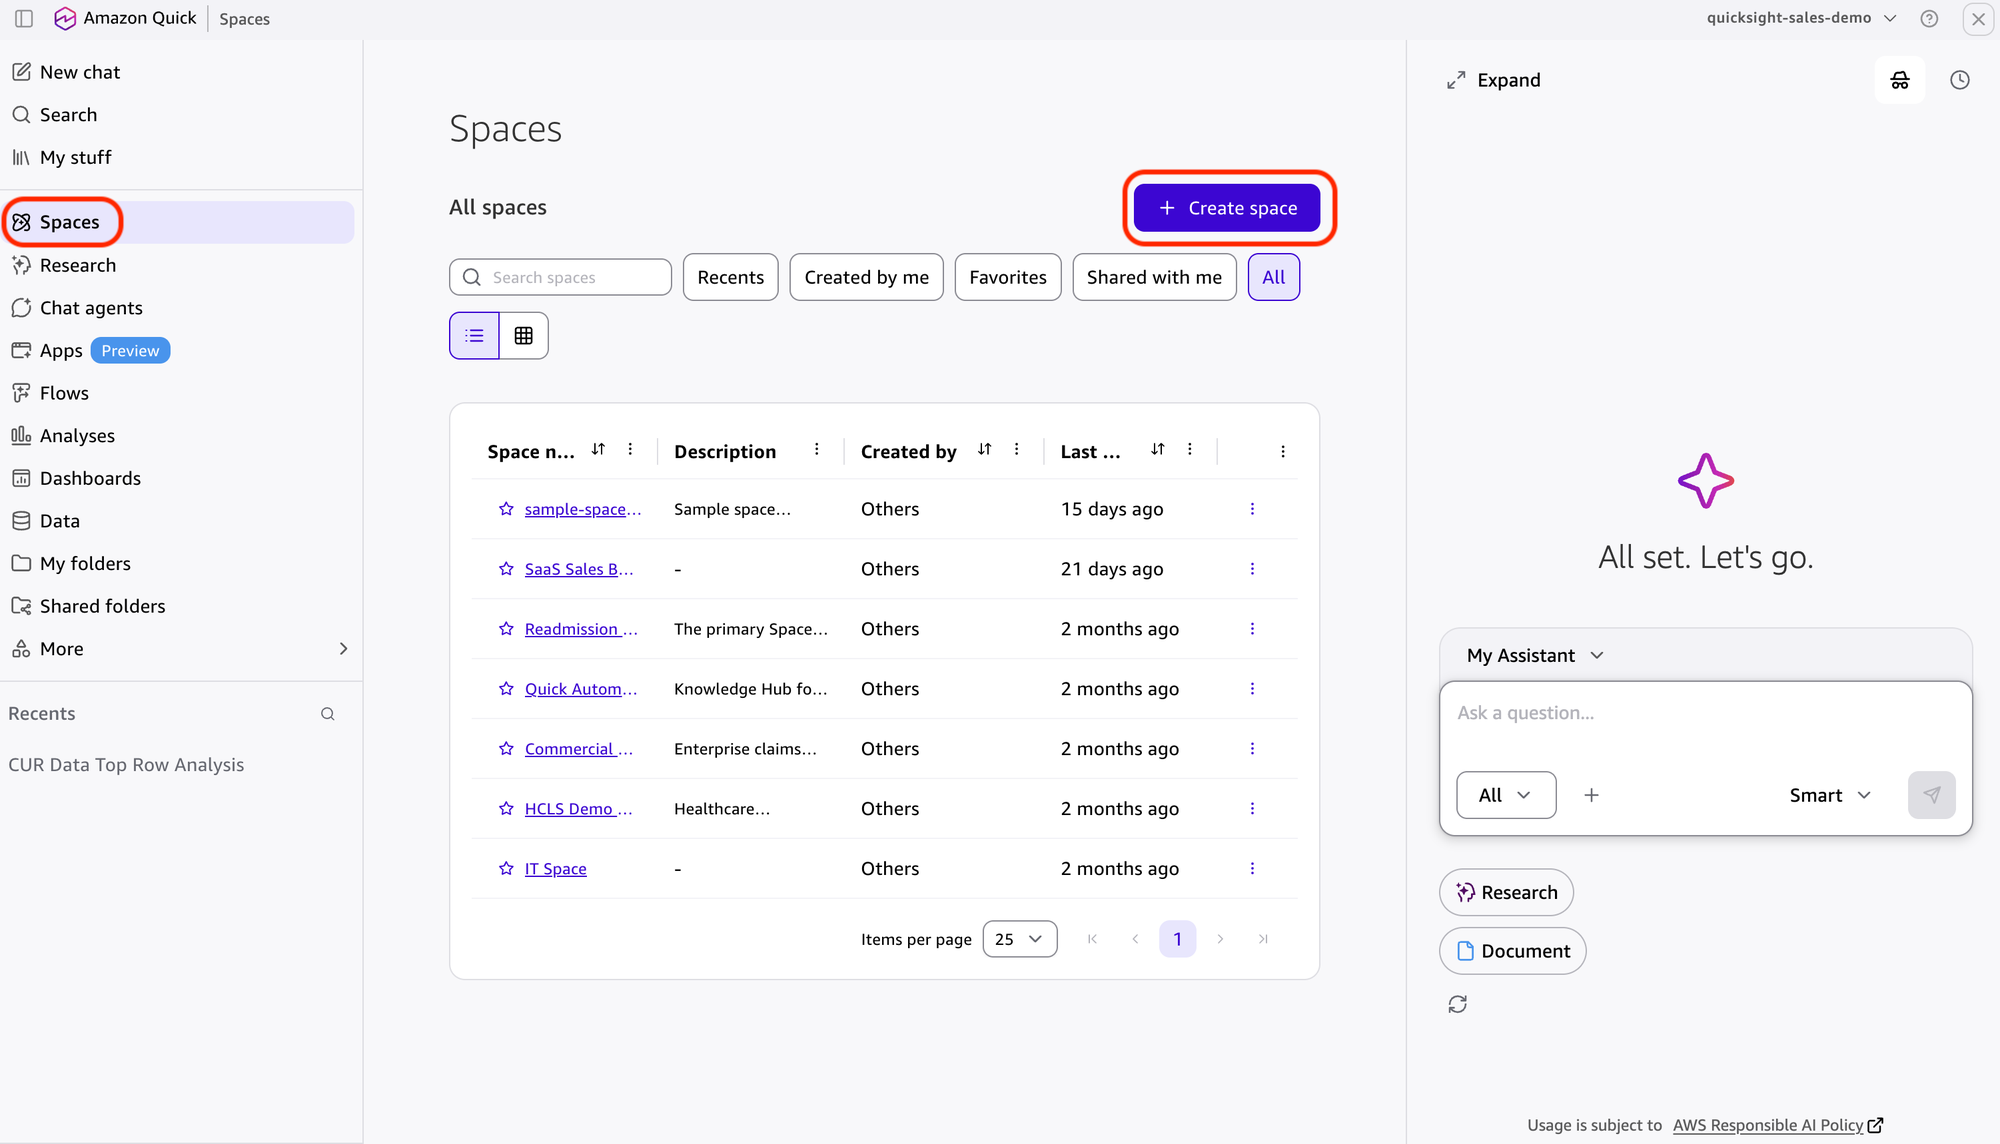
- Select “Create space”.
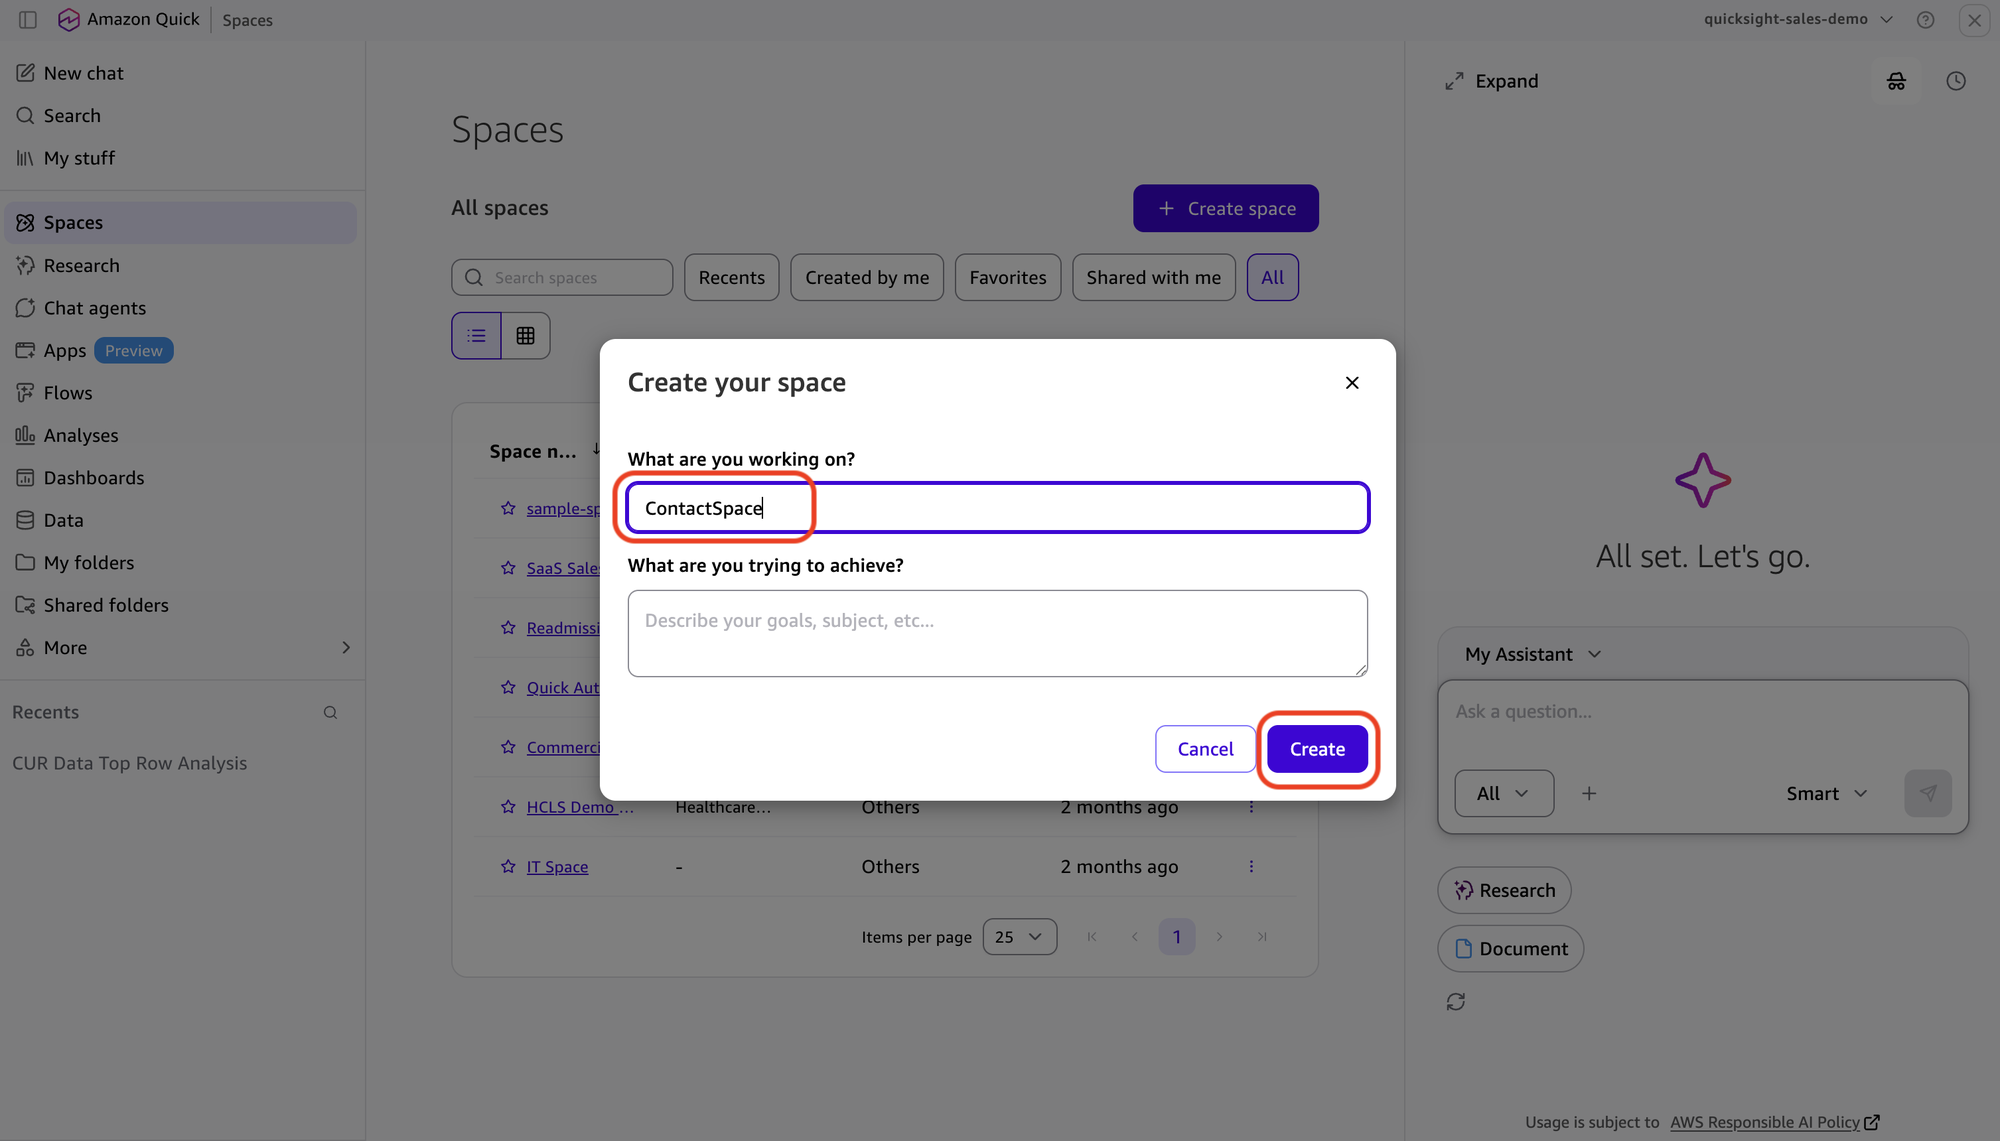
- For Space name, enter ContactSpace.
- In the screen that follows, select Datasets.
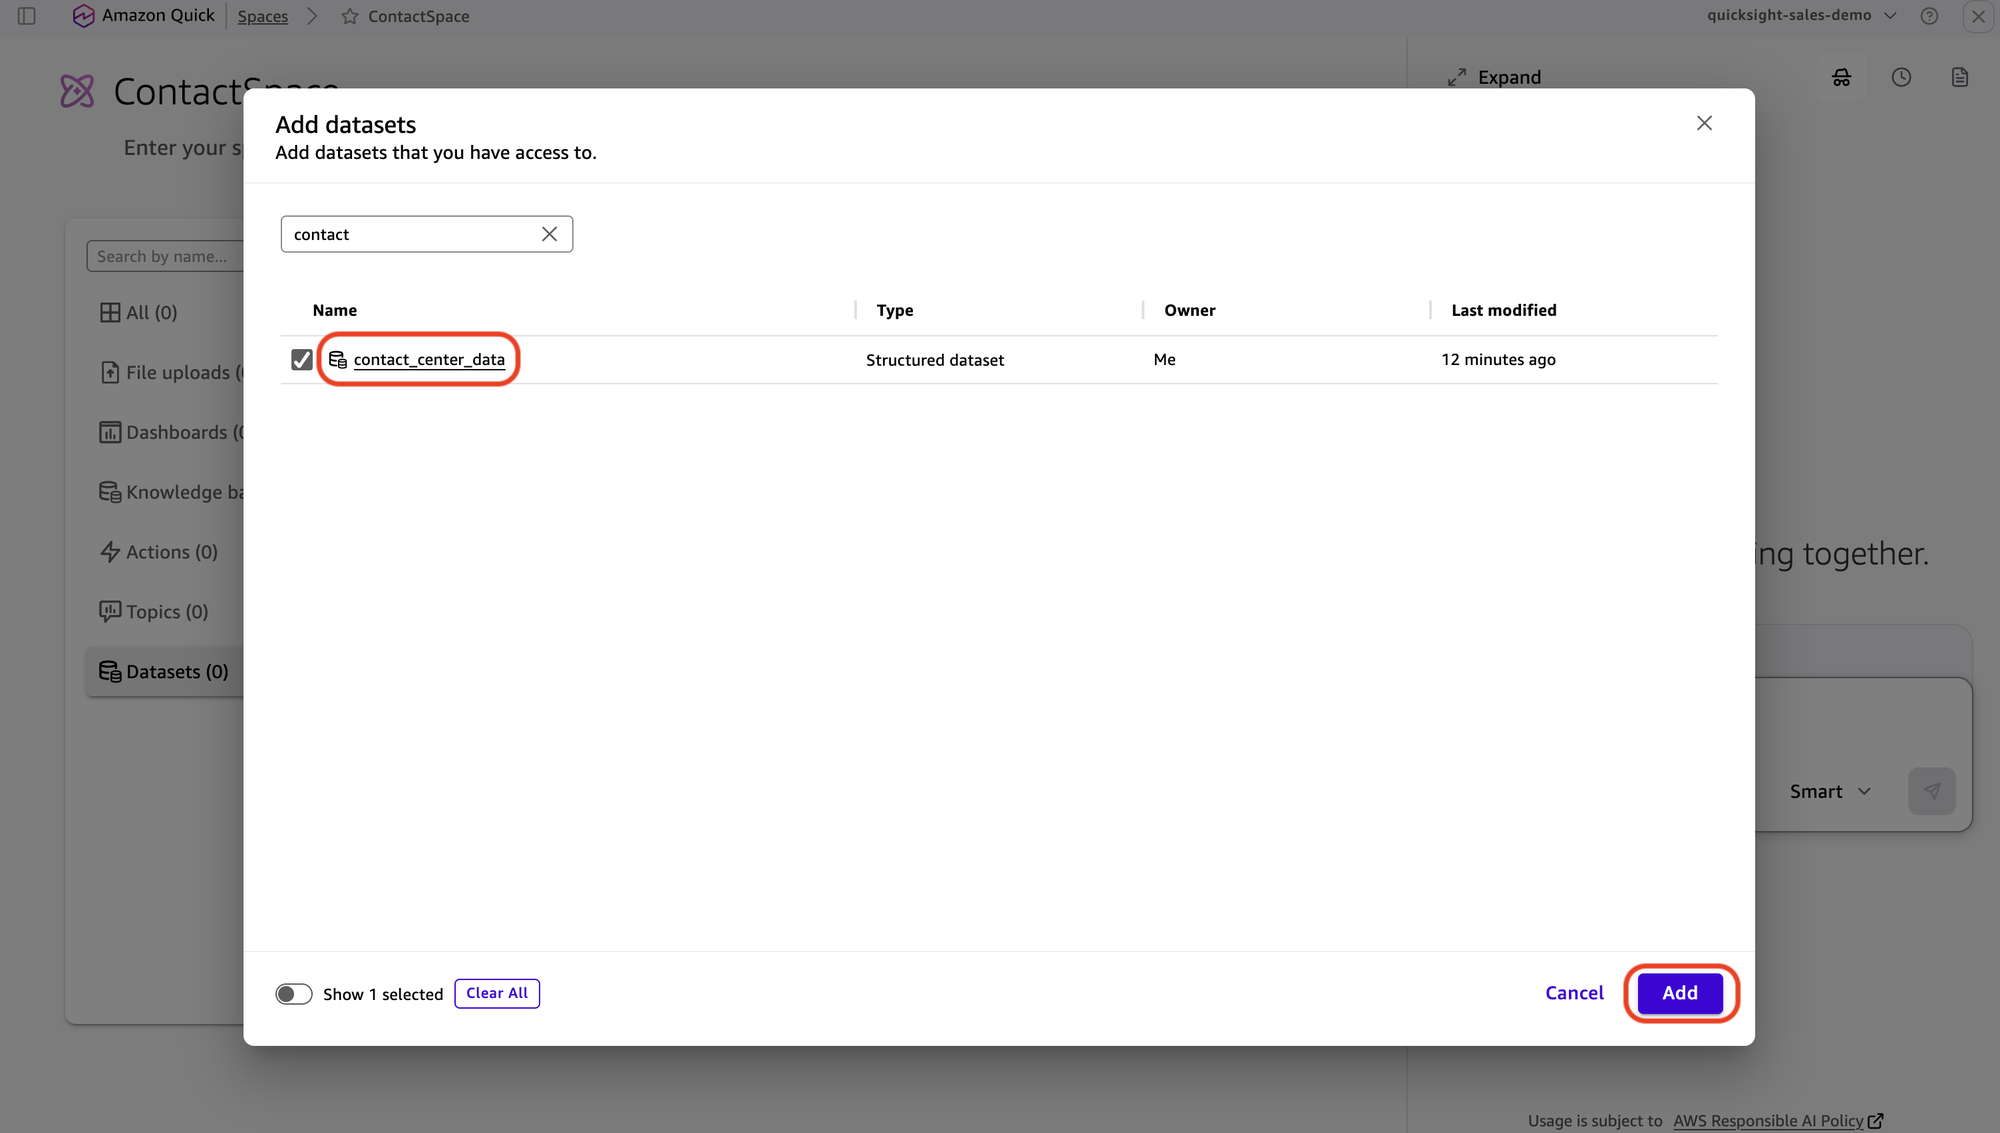
- Then select Add datasets. Search for and select the checkbox next to your contact_center_data dataset, then choose Add.
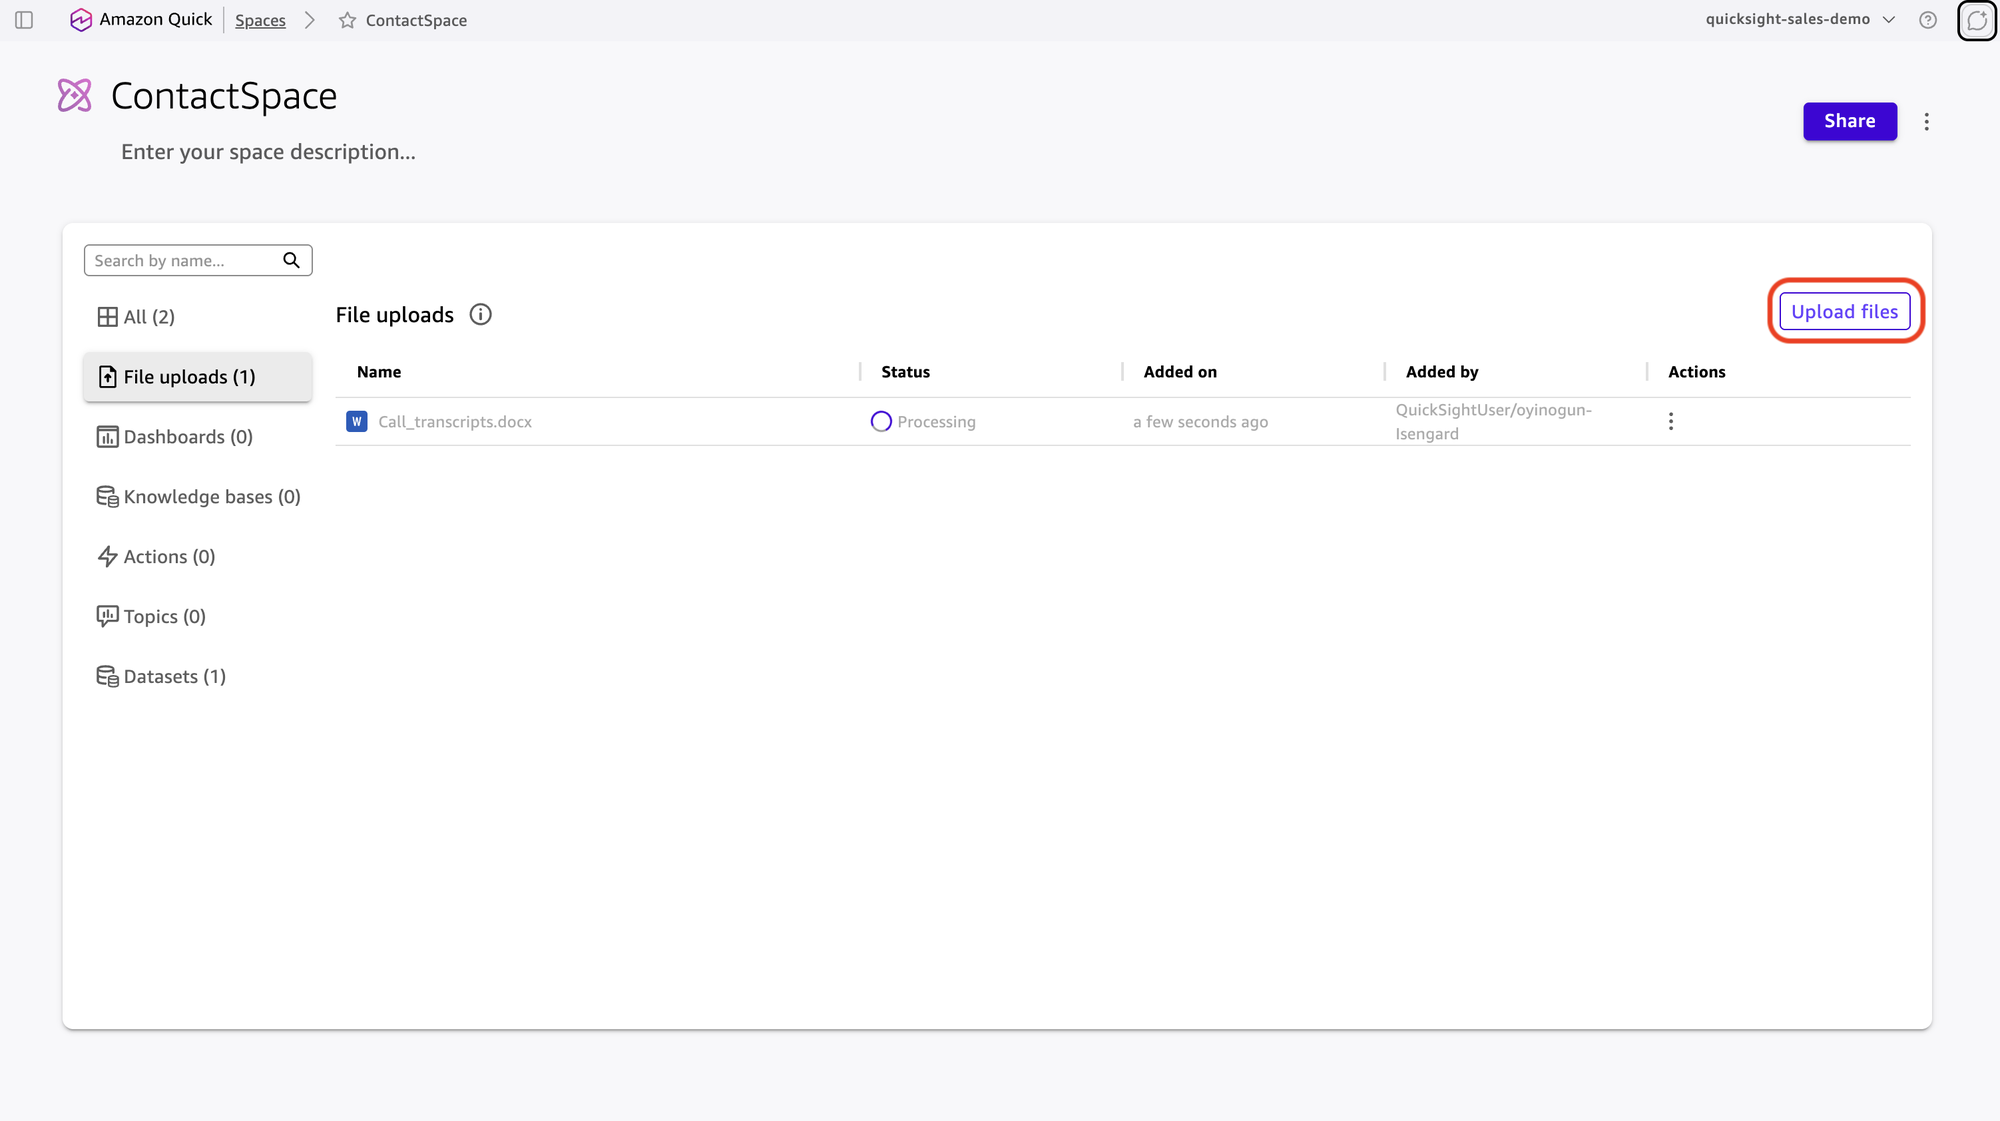
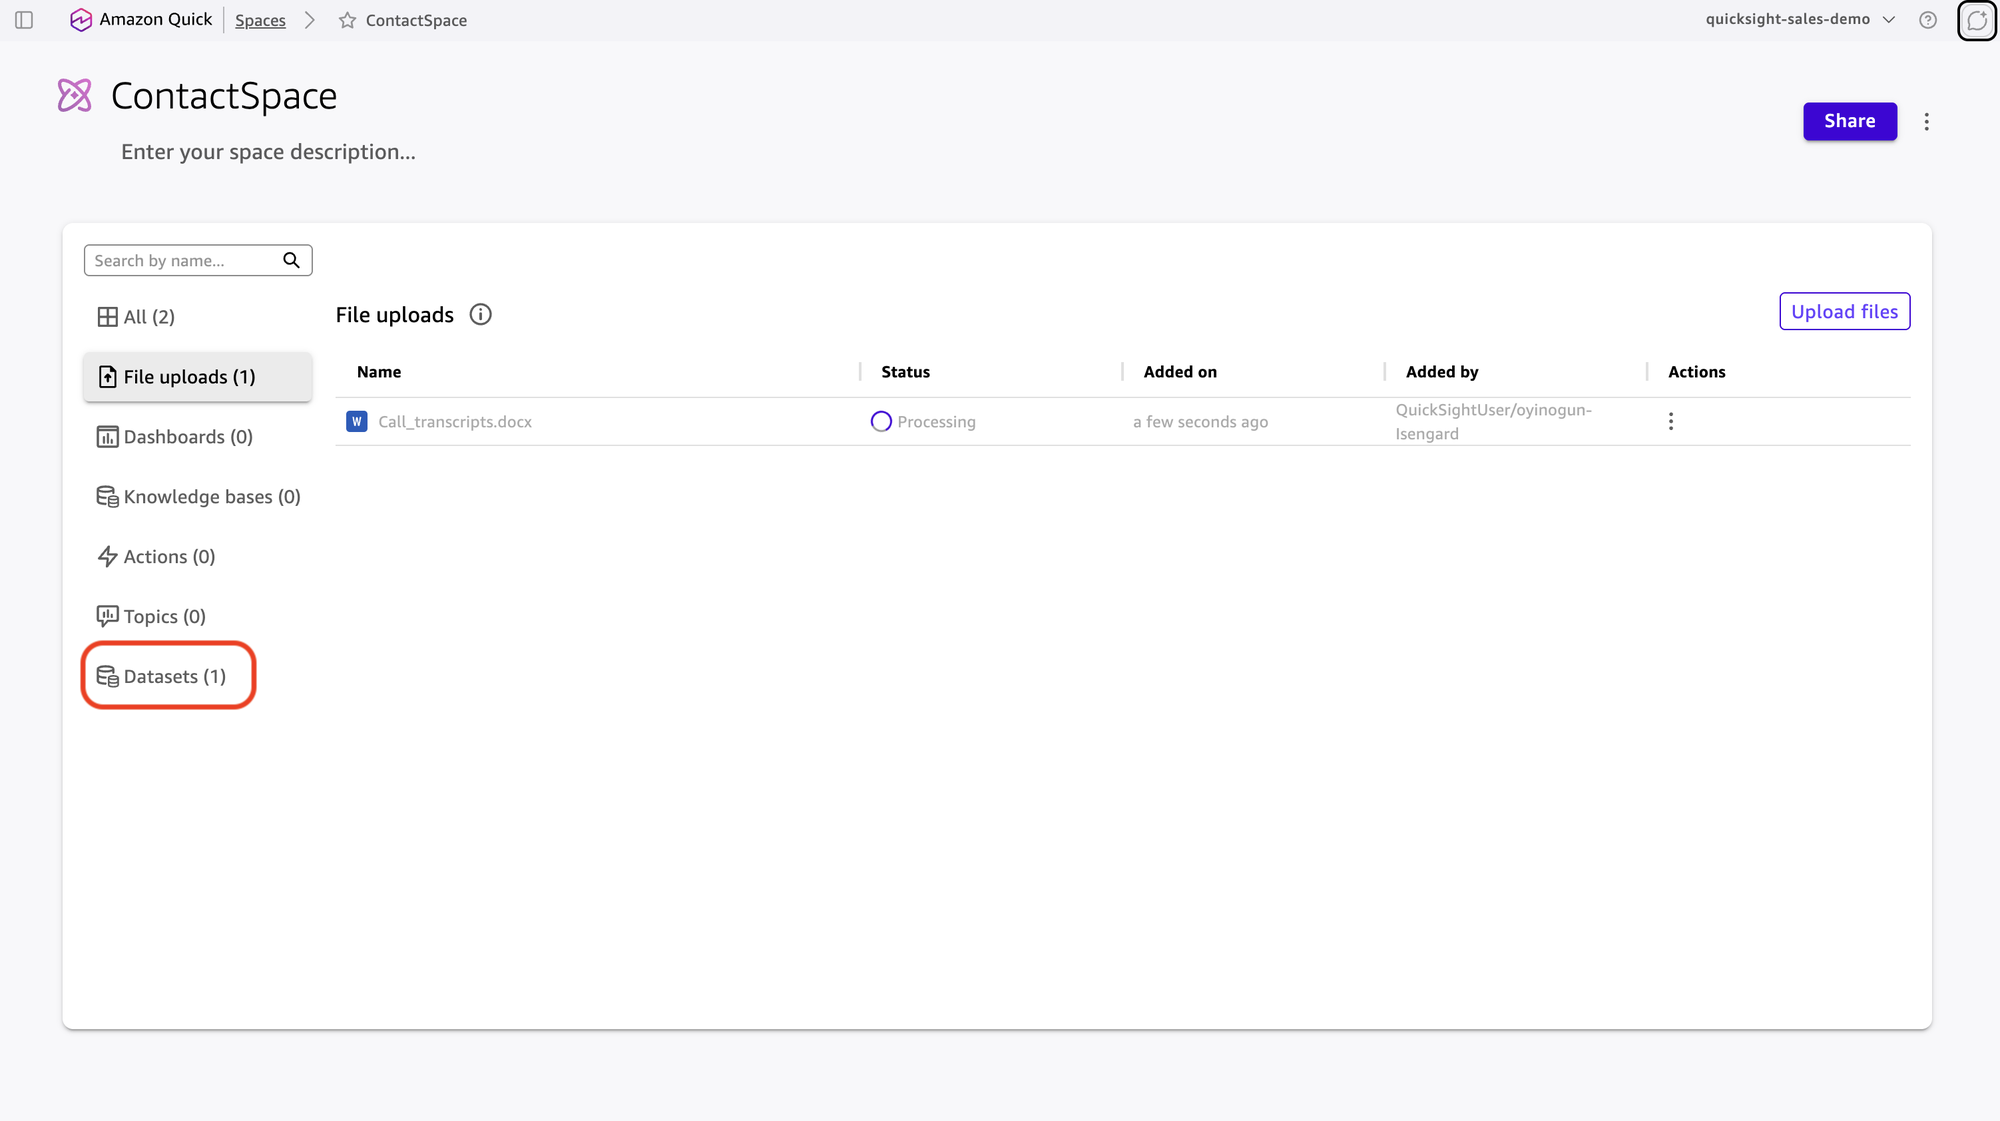
- Select File Uploads, then select Upload Files, and upload your Call_transcripts.docx transcript file, then choose Open.
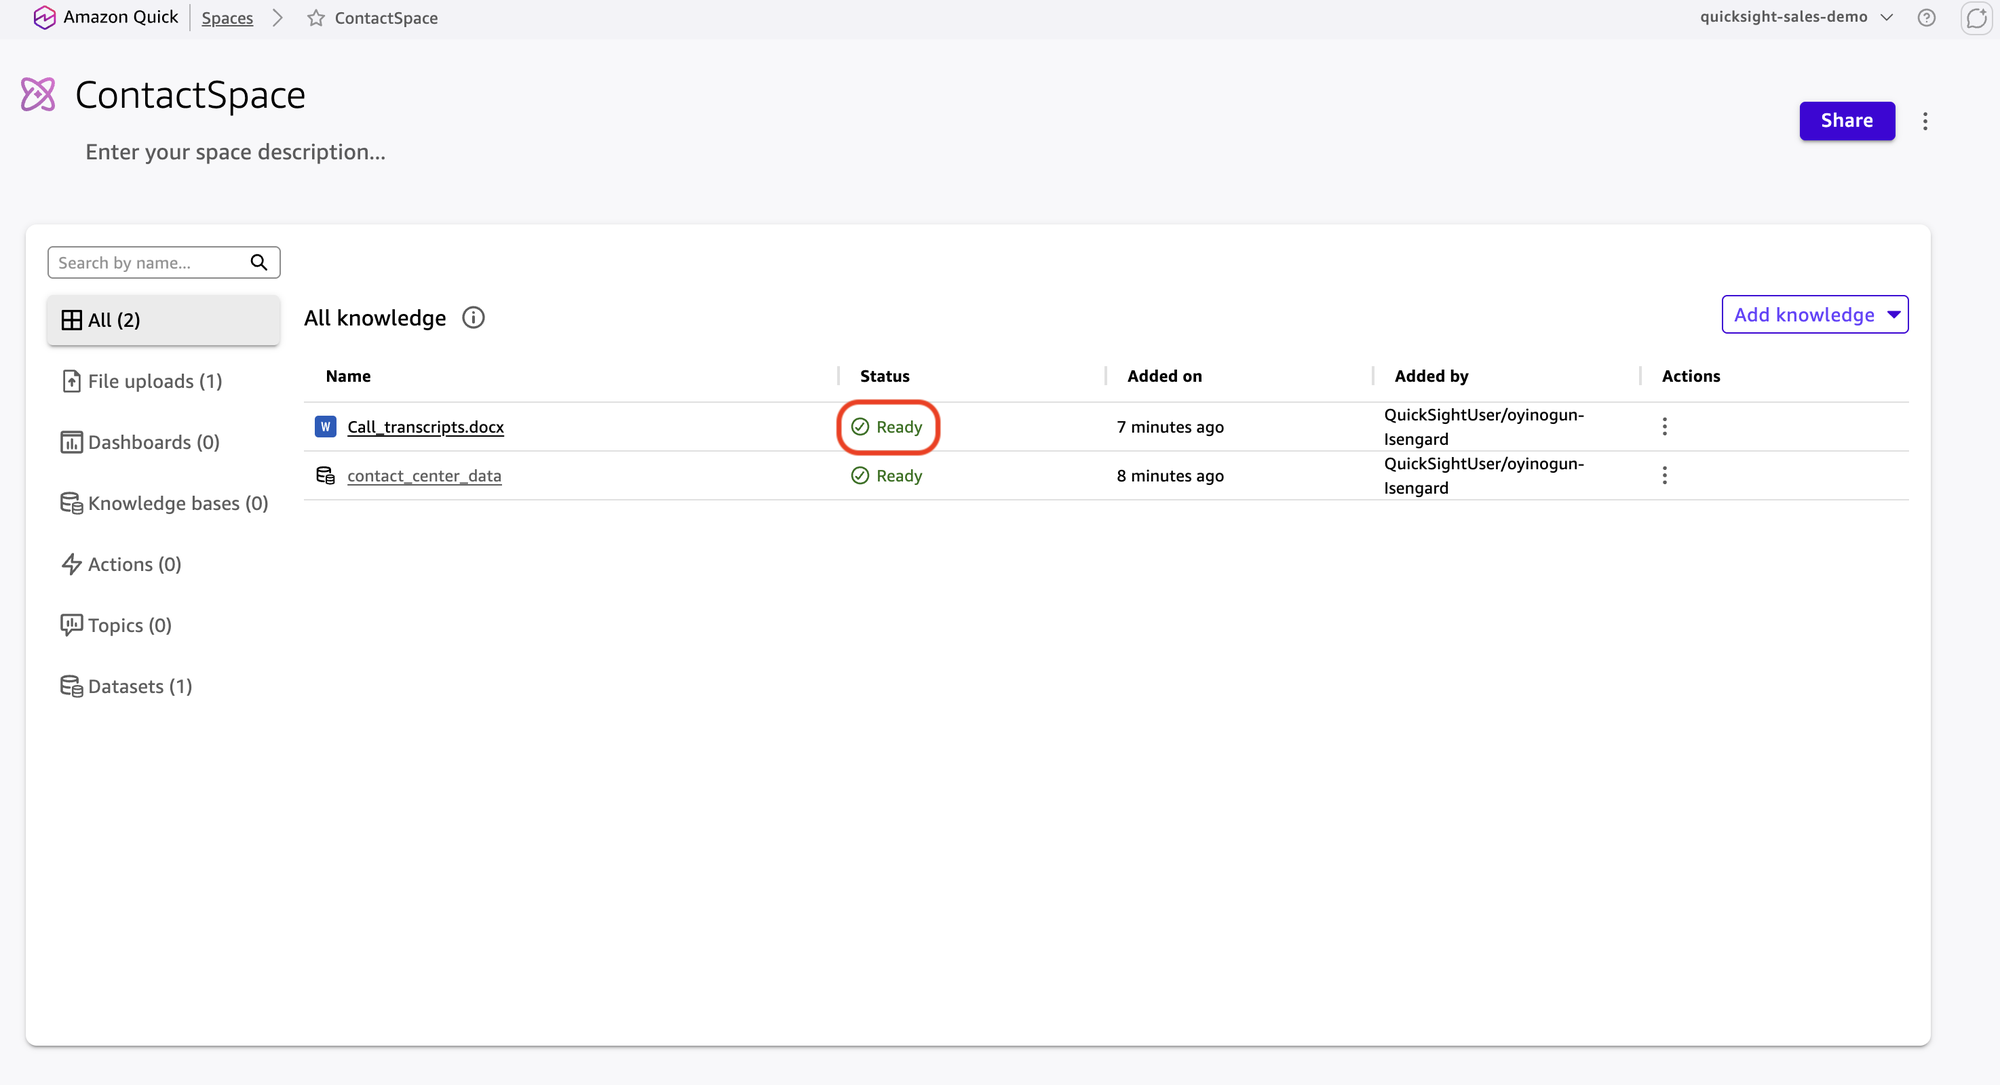
- Wait for indexing to complete. The Status column shows Ready for both the dataset and the document.
To create the MCP Action connector
An MCP Action connector bridges Amazon Quick and your custom business logic. It defines the connector and makes it available as an HTTP endpoint. You write an AWS Lambda function that contains your scoring algorithm wrapped in the MCP protocol, make it available through Amazon API Gateway, and register that endpoint in Amazon Quick.
The Model Context Protocol (MCP) is an open standard that lets AI assistants such as Amazon Quick call external tools in a consistent request-and-response format. If you are new to these services, AWS Lambda lets you run code without provisioning servers, and Amazon API Gateway exposes that code as a web address (an HTTP endpoint) that Amazon Quick can call. You first create the Lambda function, then put an API Gateway endpoint in front of it, and finally register that endpoint in Amazon Quick.
The following Lambda function implements a minimal MCP server. It handles the three JSON-RPC methods Amazon Quick calls during connection: initialize (the handshake), tools/list (which advertises the score_customers tool so Amazon Quick can discover it), and tools/call (which runs the scoring when the tool is invoked). The tool’s inputSchema follows JSON Schema Draft 7, which Amazon Quick requires at publish time:
Deploy this function to AWS Lambda:
- Open the AWS Lambda console and choose Create function. Select Author from scratch.
- For Function name, enter customer-scoring. For Runtime, choose a recent supported Python version (for example, Python 3.13). Choose Create function.
- In the Code tab, replace the default code with the function shown earlier, then choose Deploy.
With the function deployed, create an API Gateway endpoint in front of it using the following AWS Command Line Interface (AWS CLI) commands. If you prefer, you can perform these same steps in the API Gateway console. Run the commands in order. Each one produces a value (such as the API ID) that you use in the next.
Replace the placeholder values (, , , ) with your own:
The create-deployment command returns a deployment id and timestamp. Construct the endpoint URL yourself using your API ID and Region in the following format: https://<API_ID>.execute-api.<REGION>.amazonaws.com/prod/mcp. Note this URL. You use it when registering the connector in Amazon Quick.
Production consideration: This walkthrough uses API Gateway directly in front of Lambda for simplicity. For production workloads, consider using Agentcore gateways in front of Lambda, which provide built-in, agent-level authentication, throttling, and observability out of the box.
To register the MCP Action connector in Amazon Quick
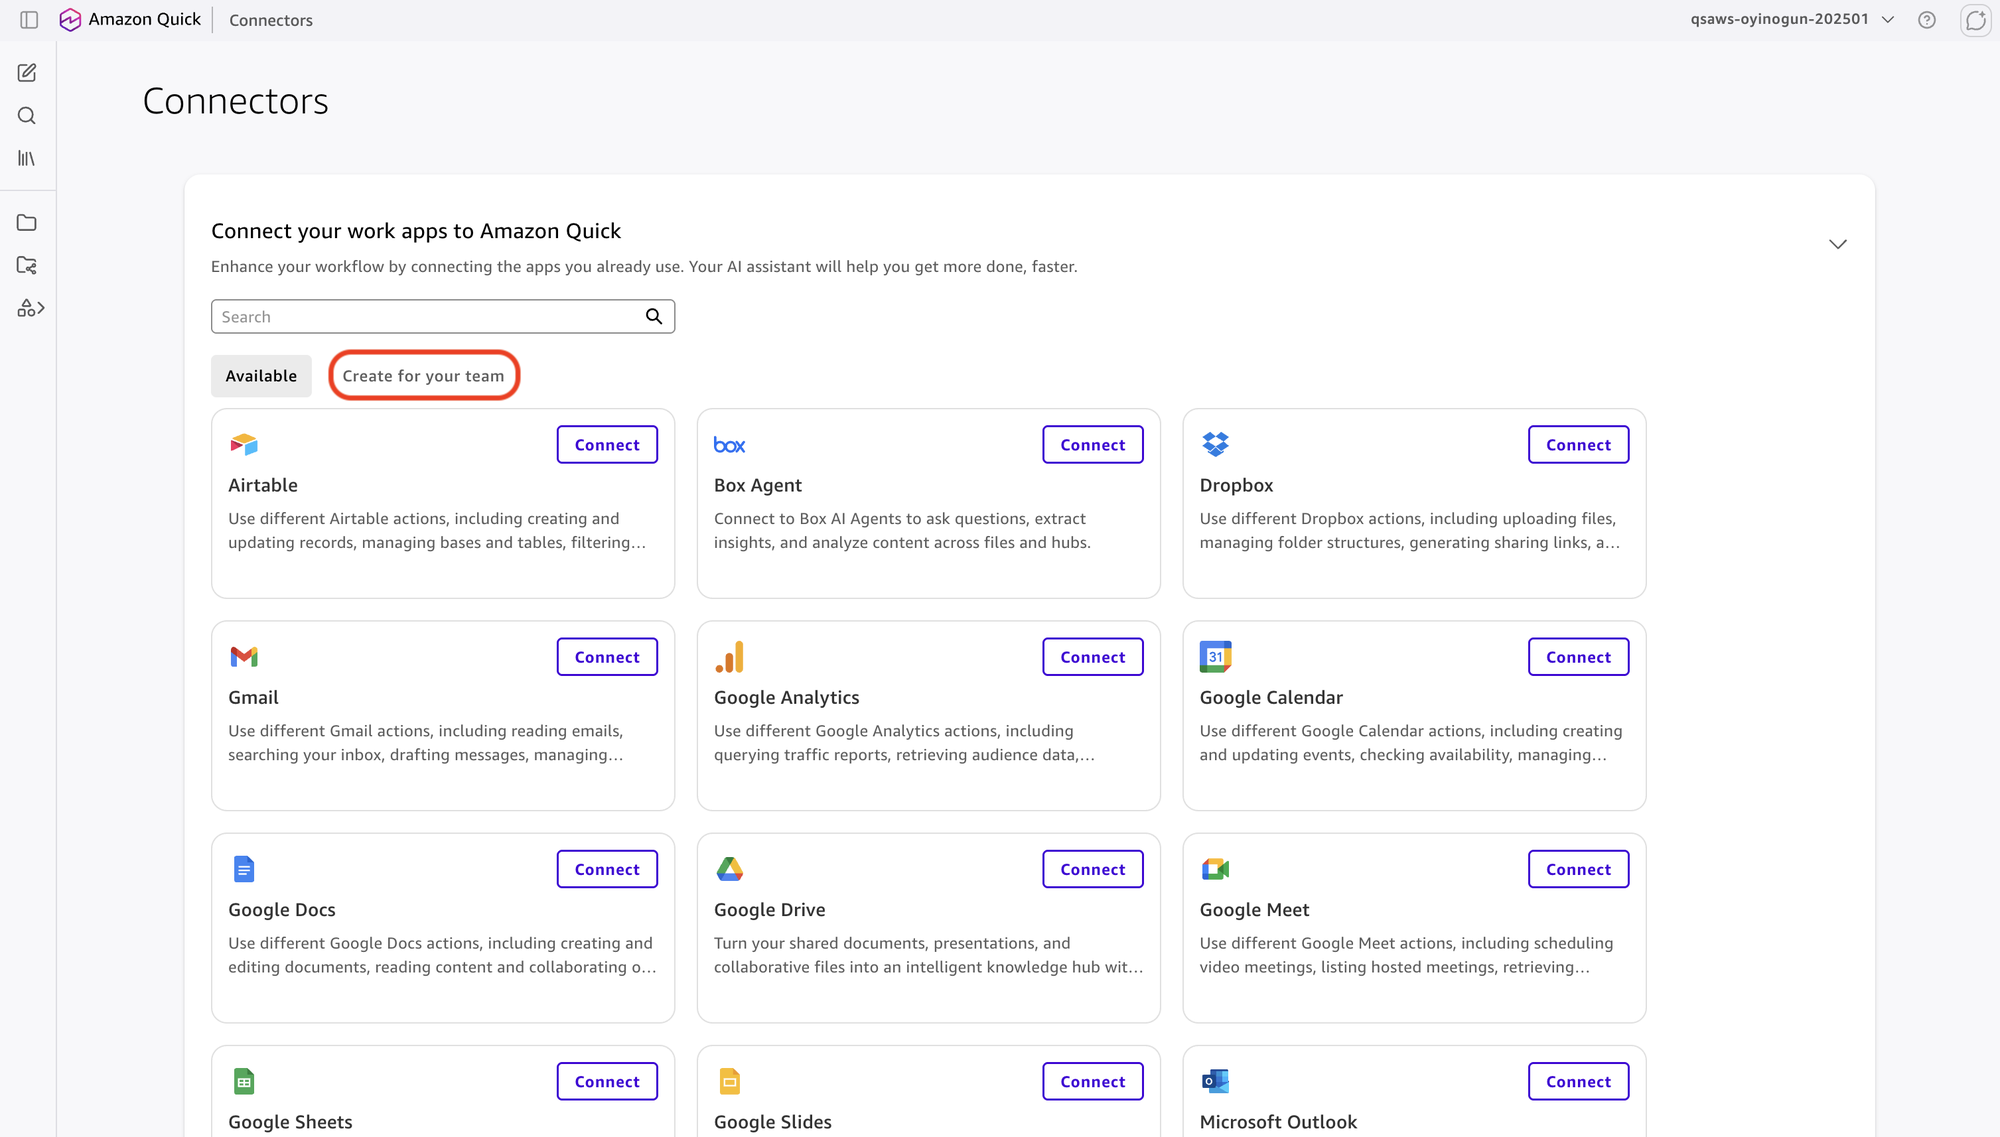
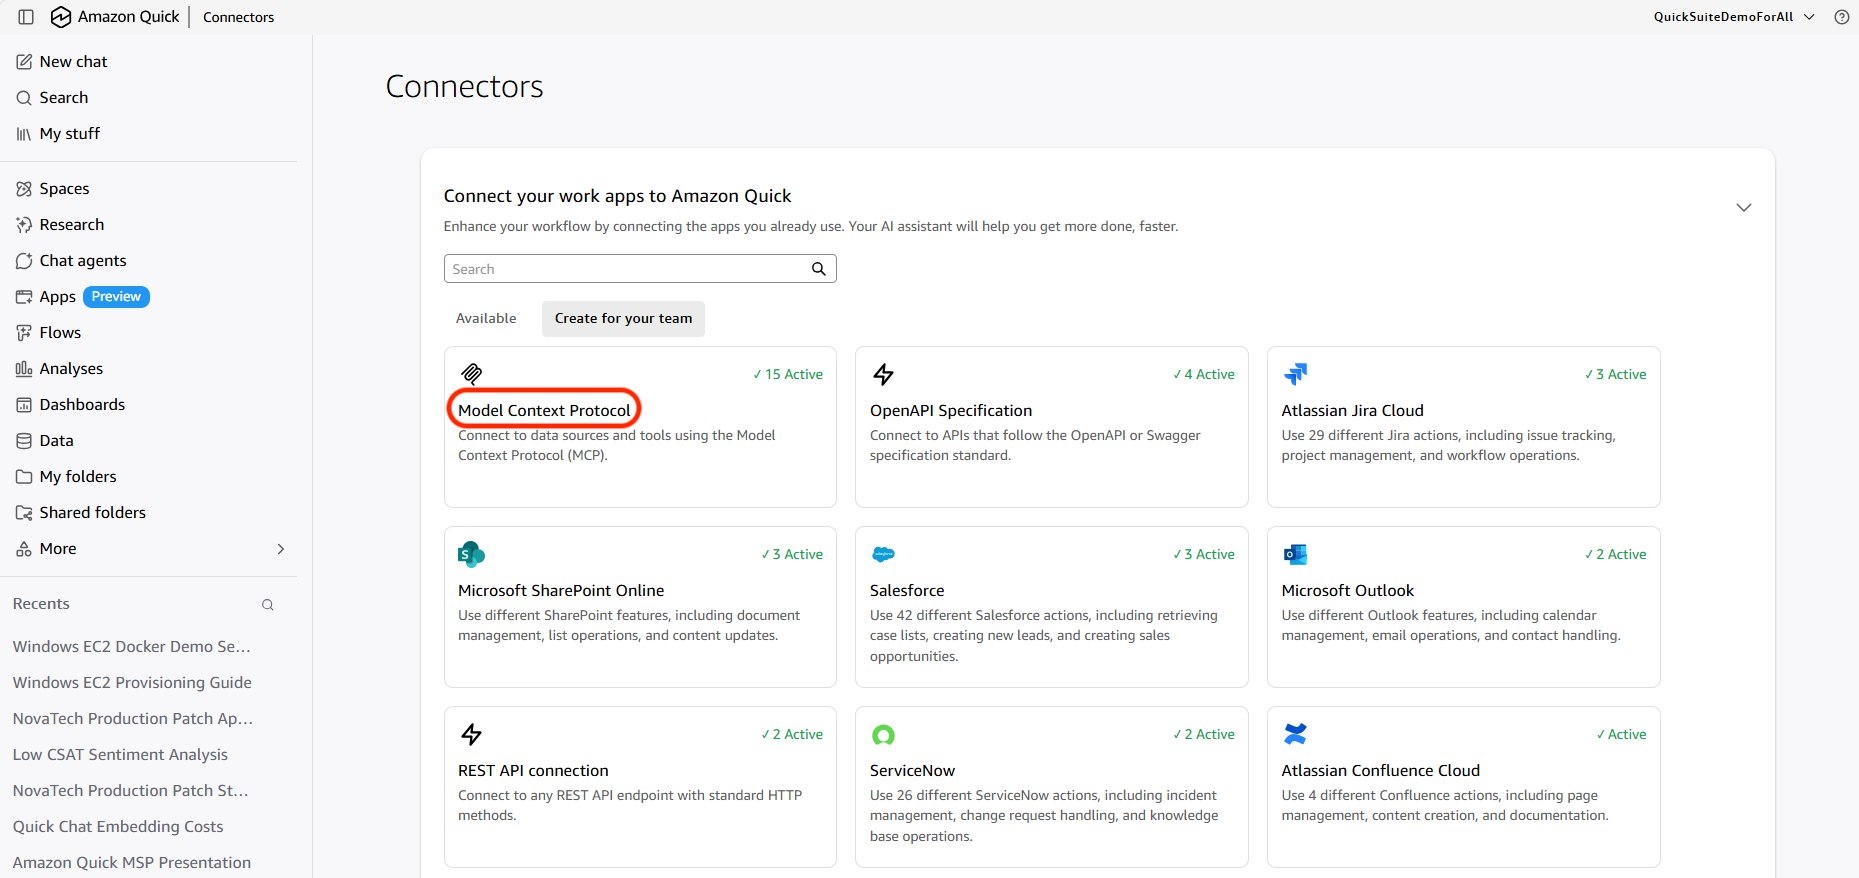
- From the Amazon Quick home page, select More, then select Connectors.
- In the right section, select Create for your team.
- Select Model Context Protocol.
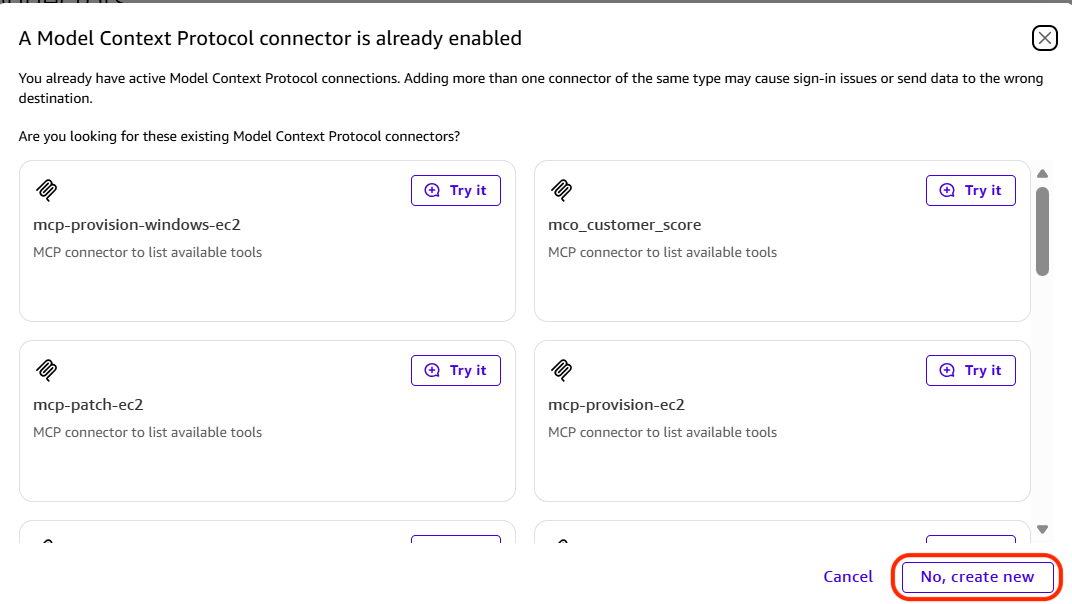
- In the screen that follows, Select No, create new.
- Enter the following values and choose Next:
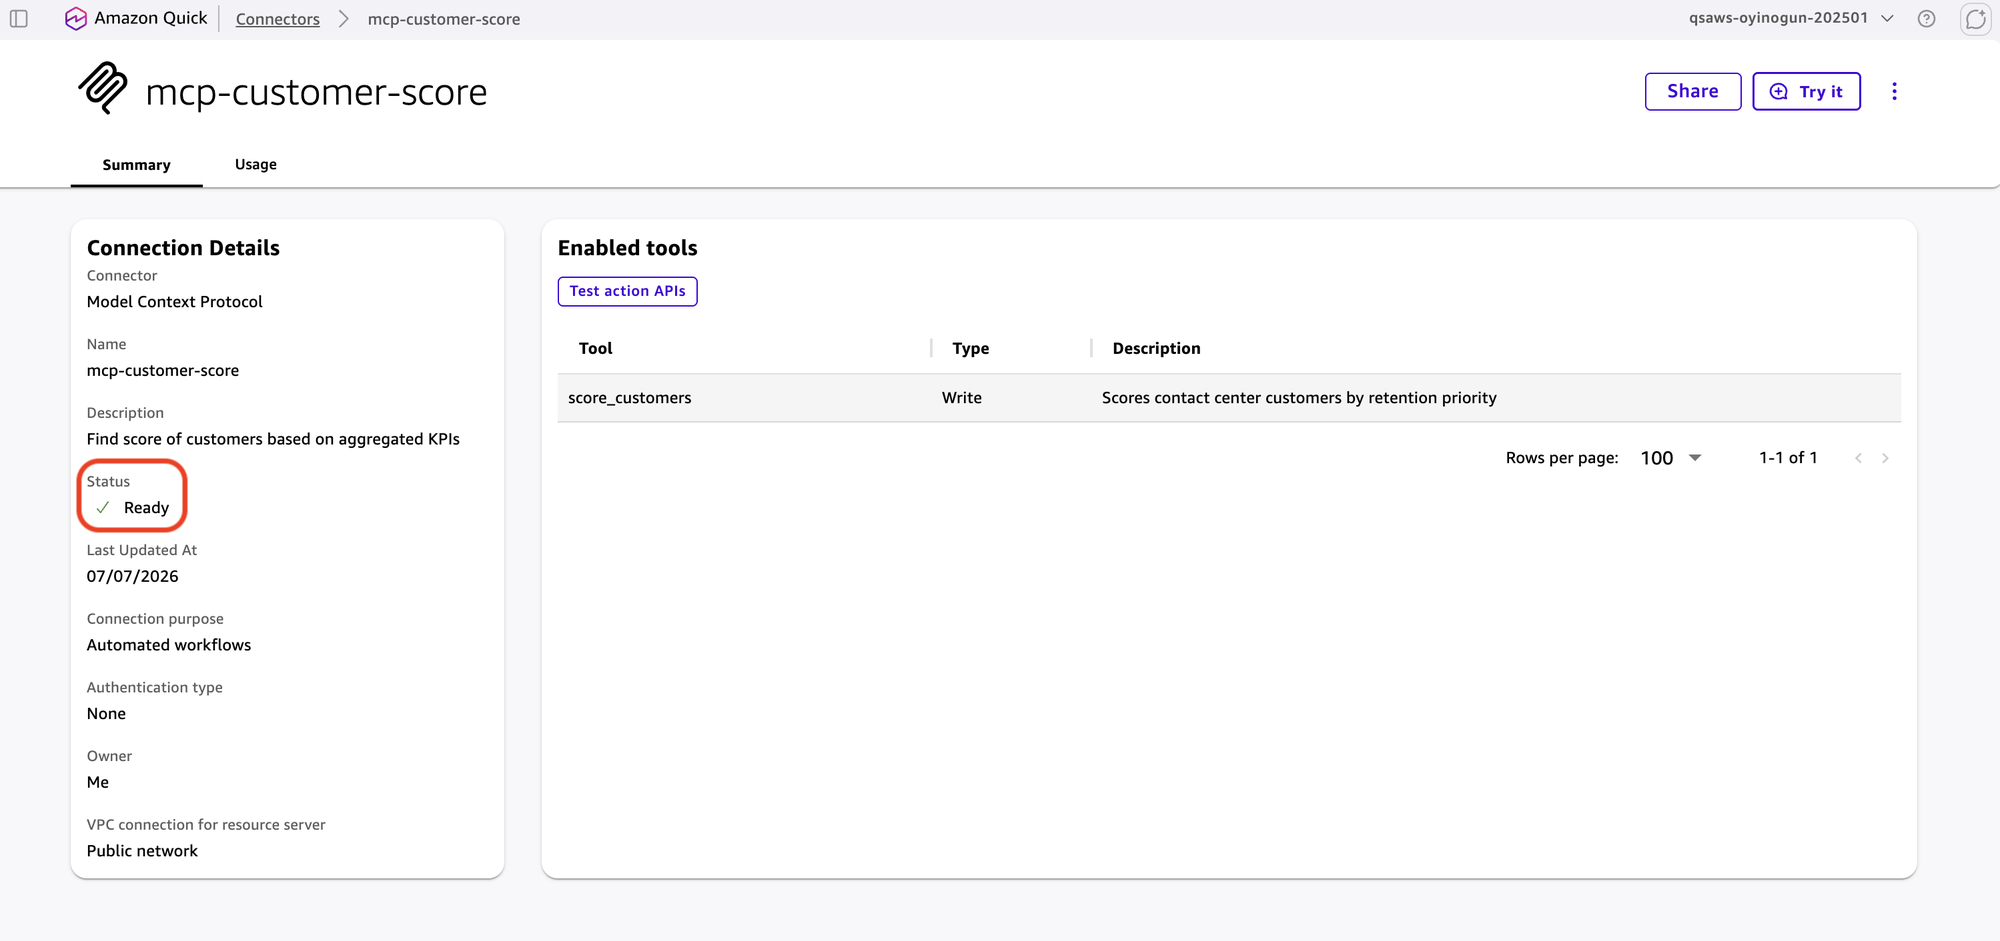
- Name: mcp-customer-score.
- Description: Find score of customers based on aggregated KPIs.
- MCP server endpoint: paste the endpoint URL
https://<API_ID>.execute-api.<REGION>.amazonaws.com/prod/mcp. - Connection type: Public network.
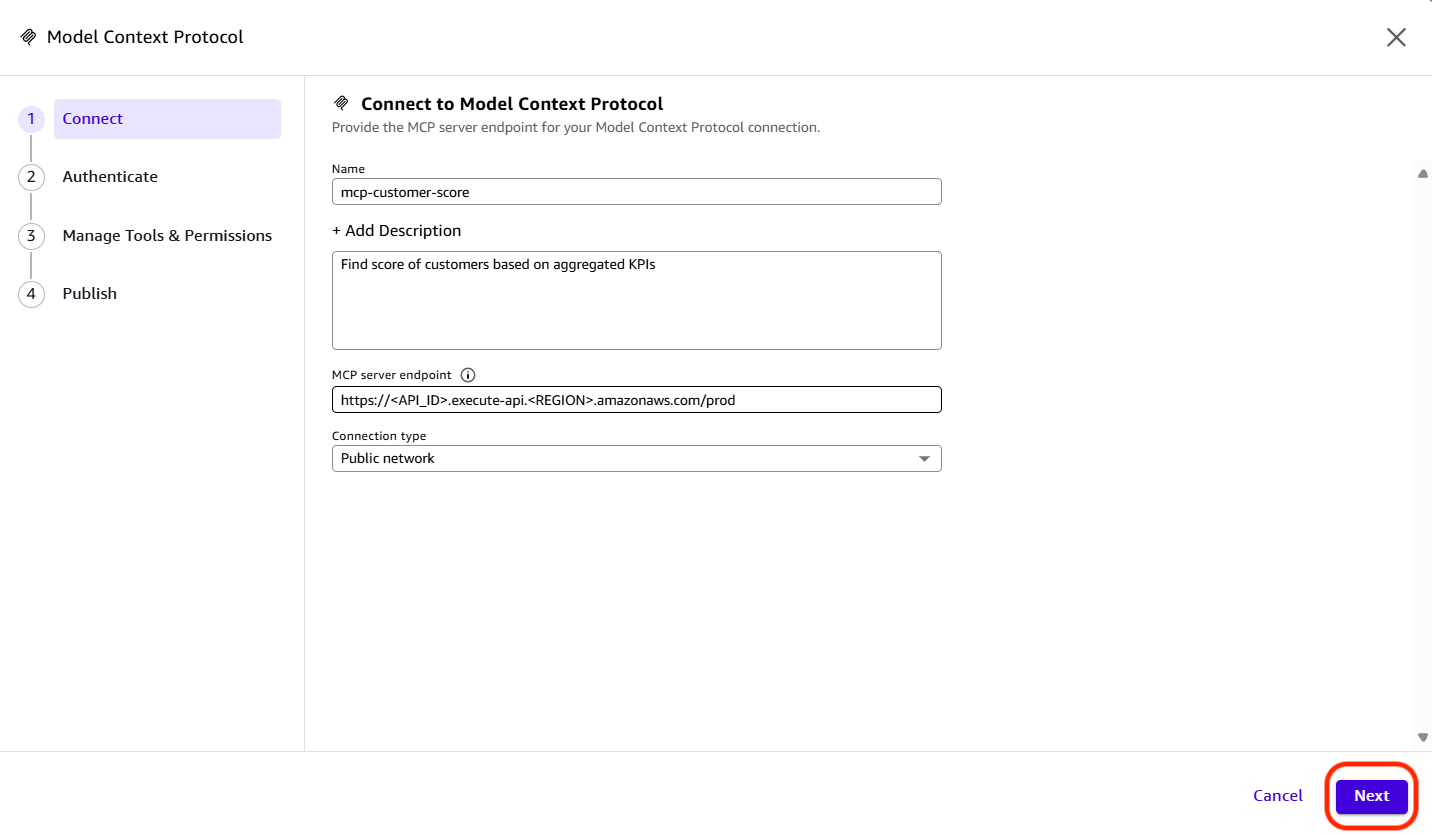
- Choose Next.
- On the Authenticate step, select Service authentication, then open the Auth configuration list and choose None. This endpoint is intentionally open for demonstration purposes. In a production environment, you would typically add an authentication layer, most commonly two-legged OAuth (2LO), to secure the endpoint. Because the scoring endpoint you deployed uses –authorization-type NONE, it accepts unauthenticated requests, so no client ID or secret is required. (Use an OAuth option only if your MCP server is protected by OAuth.)
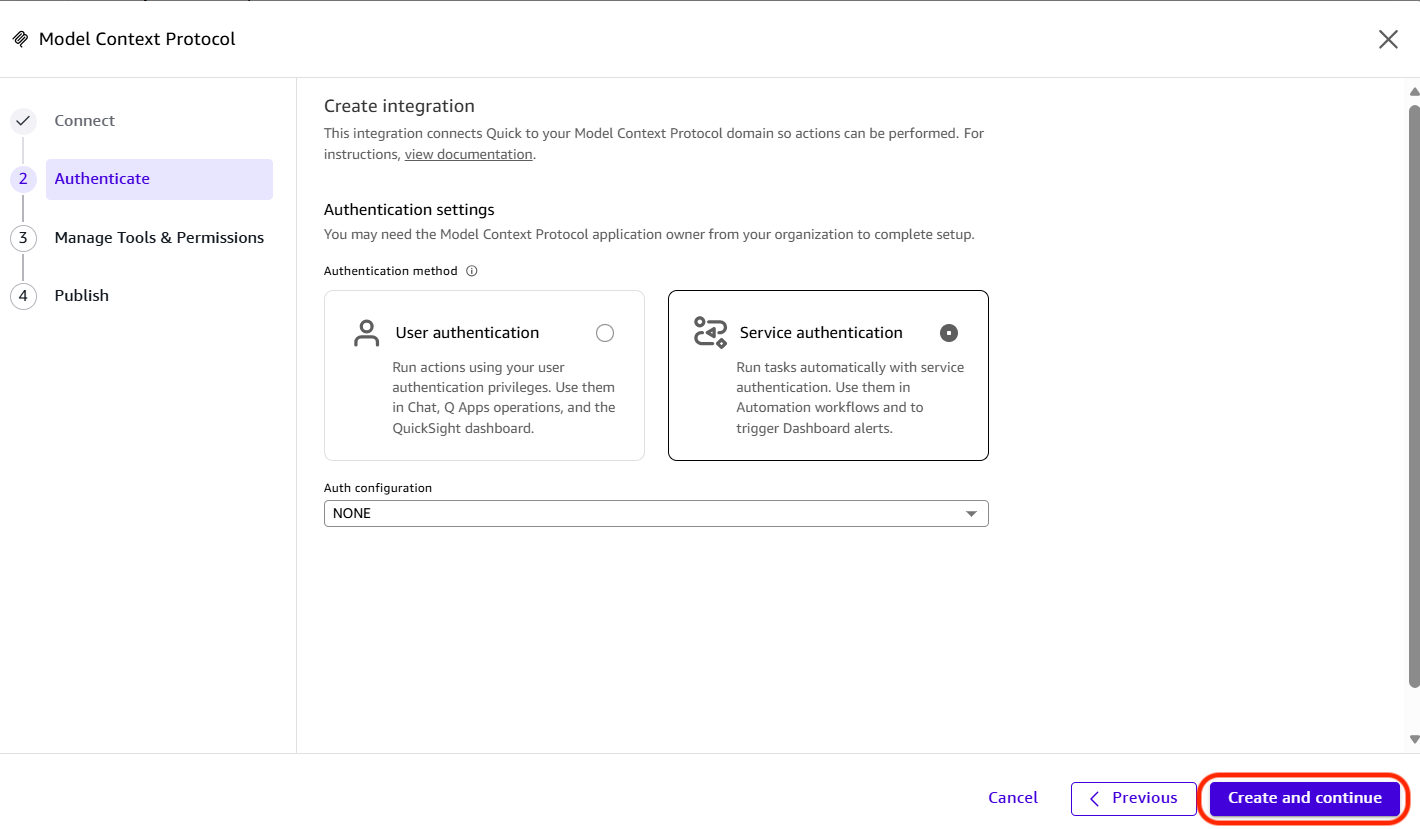
- Choose Create and continue.
- Choose Publish.
- Wait a few minutes, then choose the new connector in the Available section. Confirm the status shows Ready.
To create a custom Chat Agent for contact center analysis
A custom Chat Agent connects to your ContactSpace and has access to the MCP Action connector you registered. The system prompt is the critical component. It tells the agent how to interpret the data, what questions to ask of the transcripts, and when to invoke the scoring tool versus answering from the dataset directly.
- From the Quick home page, select Chat agents, then choose Blank, followed by Skip to create a custom chat agent from scratch.
- For Agent name, enter Contact Center Strategy Analyst.
- Under Knowledge Sources, link the ContactSpace.
- Under Actions, add the mcp-customer-score connector.
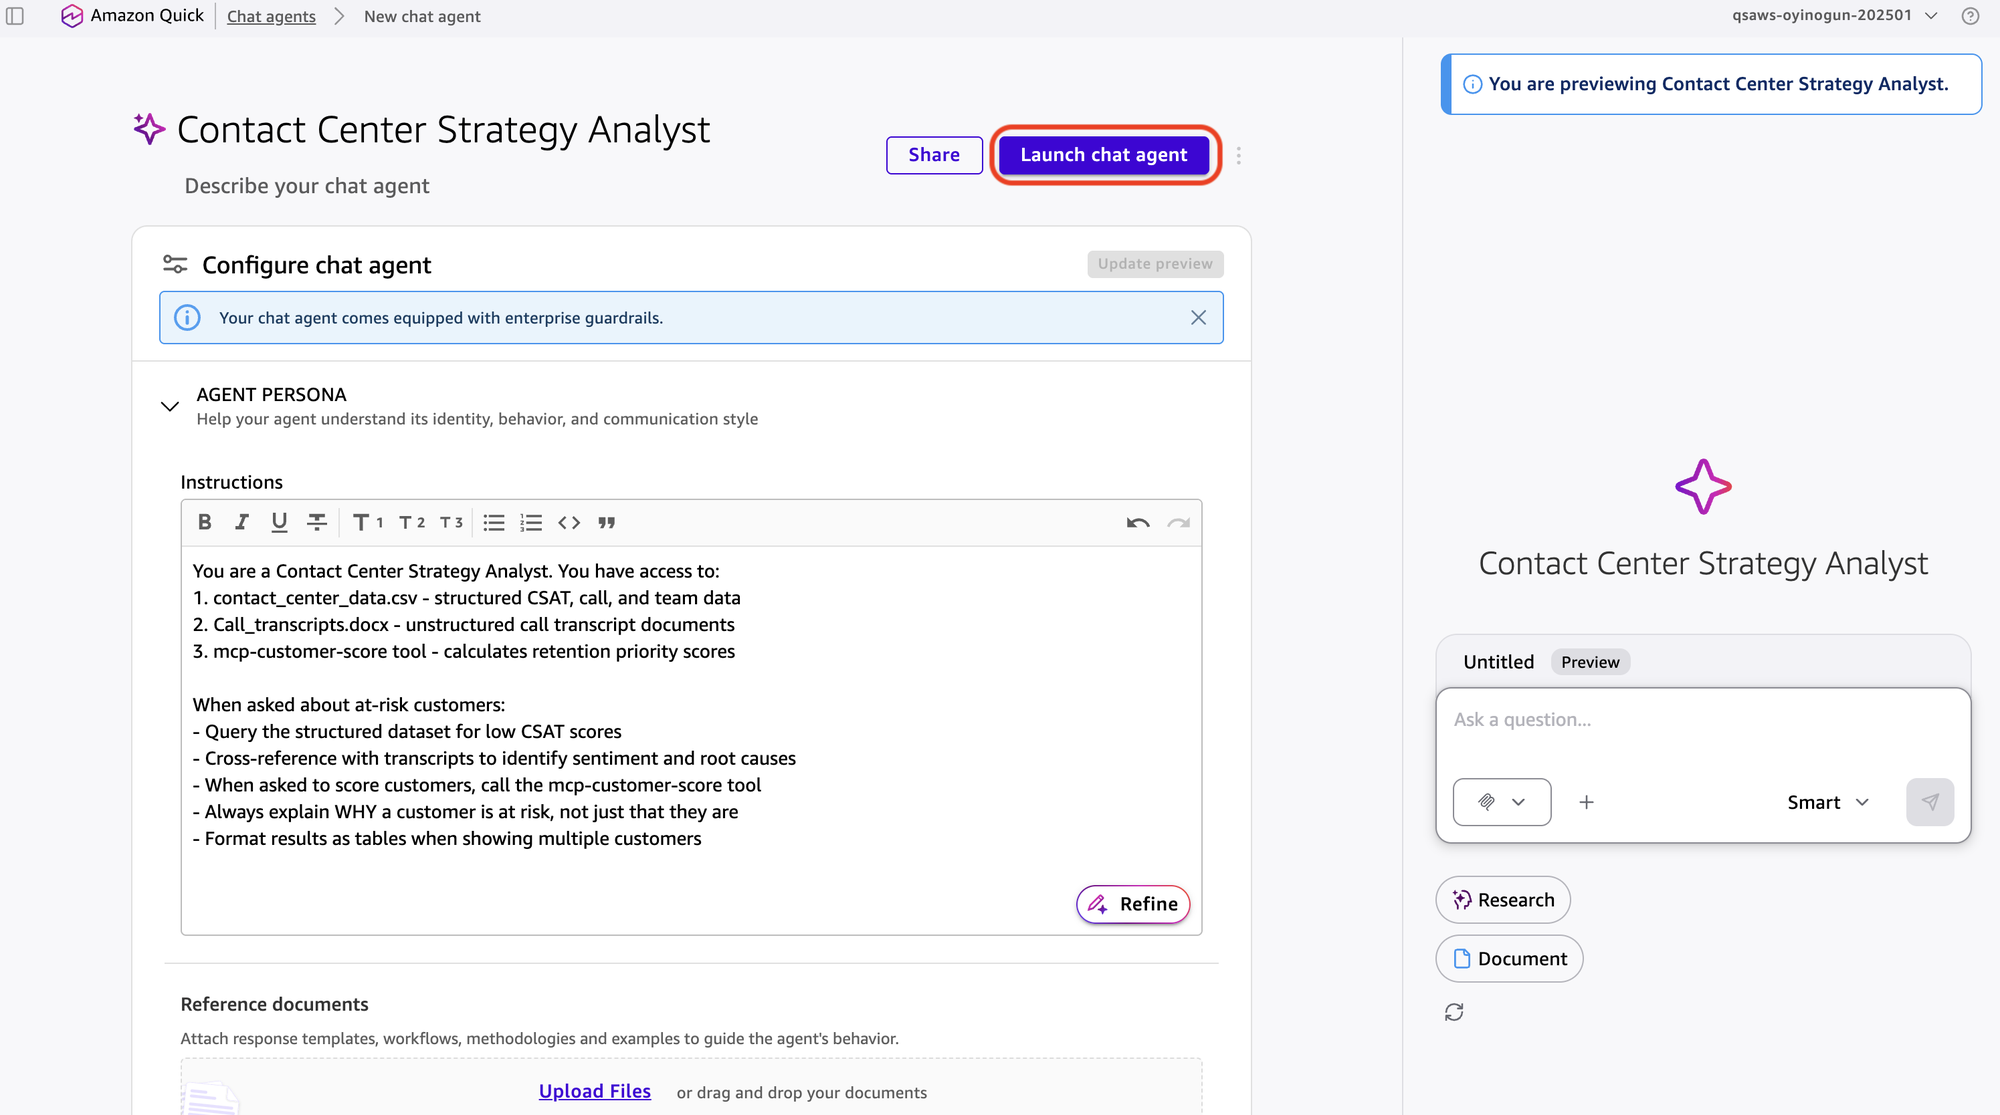
- For the system prompt, enter text similar to the following:
You are a Contact Center Strategy Analyst. You have access to:
1. contact_center_data.csv - structured CSAT, call, and team data
2. Call_transcripts.docx - unstructured call transcript documents
3. mcp-customer-score tool - calculates retention priority scores
When asked about at-risk customers:
- Query the structured dataset for low CSAT scores
- Cross-reference with transcripts to identify sentiment and root causes
- When asked to score customers, call the mcp-customer-score tool
- Always explain WHY a customer is at risk, not just that they are
- Format results as tables when showing multiple customers- Choose Launch chat agent.
To analyze at-risk customers with the Chat Agent
The Chat Agent accesses both the structured dataset and unstructured transcripts in your Space. Use it to identify at-risk customers and understand the reasons behind their low satisfaction scores.
- From the Amazon Quick home page, chat with the new custom chat agent. First, choose the Contact Center Strategy Analyst agent from the list.
- Enter the following prompt:
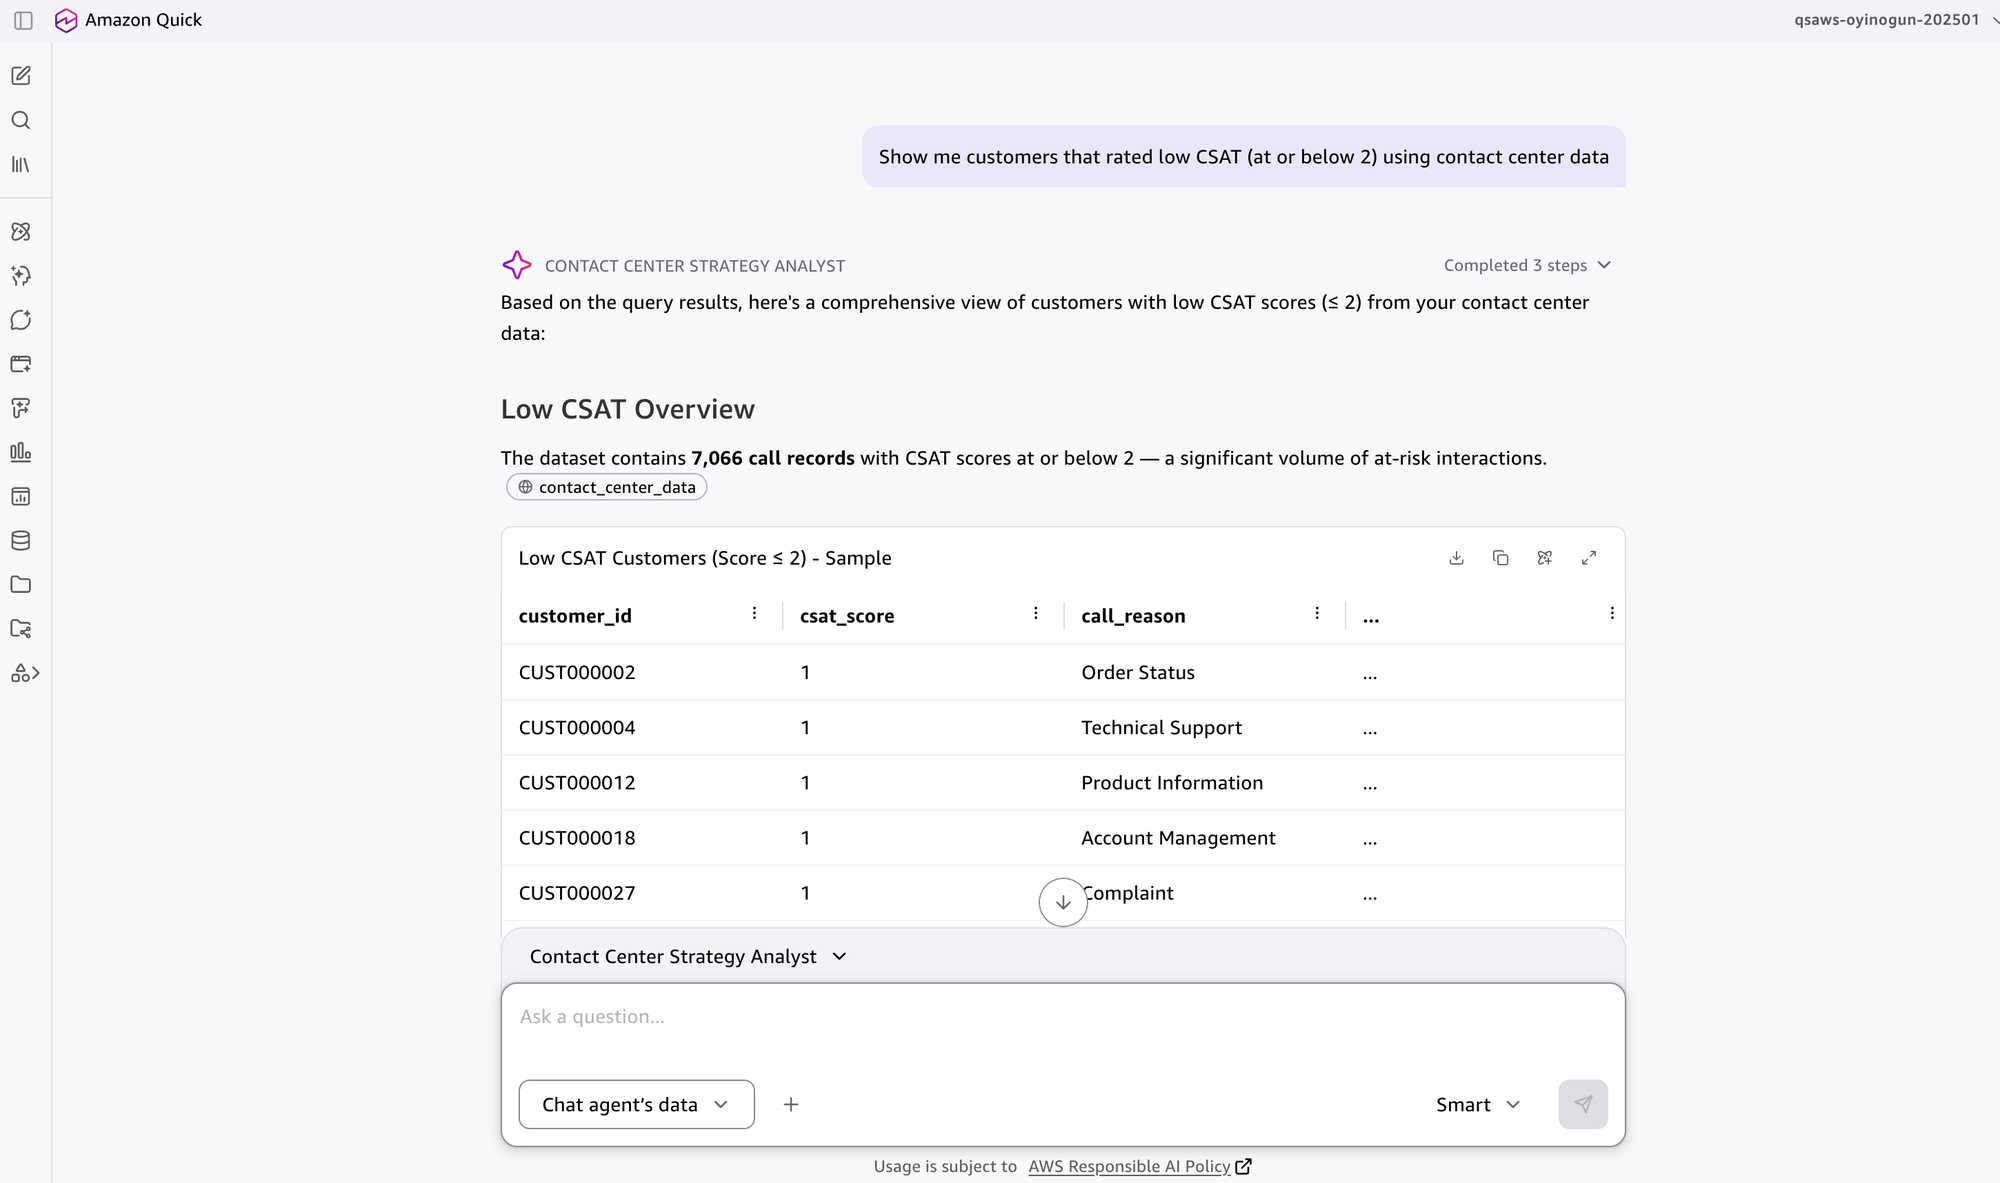
Show me customers that rated low CSAT (at or below 2) using contact center dataThe agent returns a table of customer IDs, call dates, CSAT scores, and related metrics. This identifies who is at risk but not why.
- Enter a follow-up prompt:
Using the call transcripts, summarize the main reasons these customers were dissatisfiedThe agent reads the call transcripts and summarizes its findings. For example, it might identify that Customer 4471 expressed repeated frustration about billing errors across three calls. Customer 8832 had a single intense interaction about a service outage. This distinction matters. Repeated small frustrations require a different retention approach than one major incident.
- To produce a structured result that downstream automation can consume, enter a final prompt:
For the top 20 most at-risk customers, return only a JSON array where
each object has customer_id, csat_score, and days_since_last_issue
(calculated from the most recent call date). Do not include any other text.
The agent returns a structured JSON list of the at-risk customers. Copy this JSON output from the chat response and save it as a file named at_risk_customers.json, then upload it to your Amazon S3 bucket (for example, to the inputs/ prefix). The automation downloads this file from Amazon S3 in a later step.
To convert the analysis into a Quick Flow
Beyond the one-time analysis, Quick Flows lets you turn a Chat conversation into a reusable automation with a single step, so the same analysis can be re-run on demand or on a schedule. The following steps demonstrate how to convert the conversation you just had into a Flow.
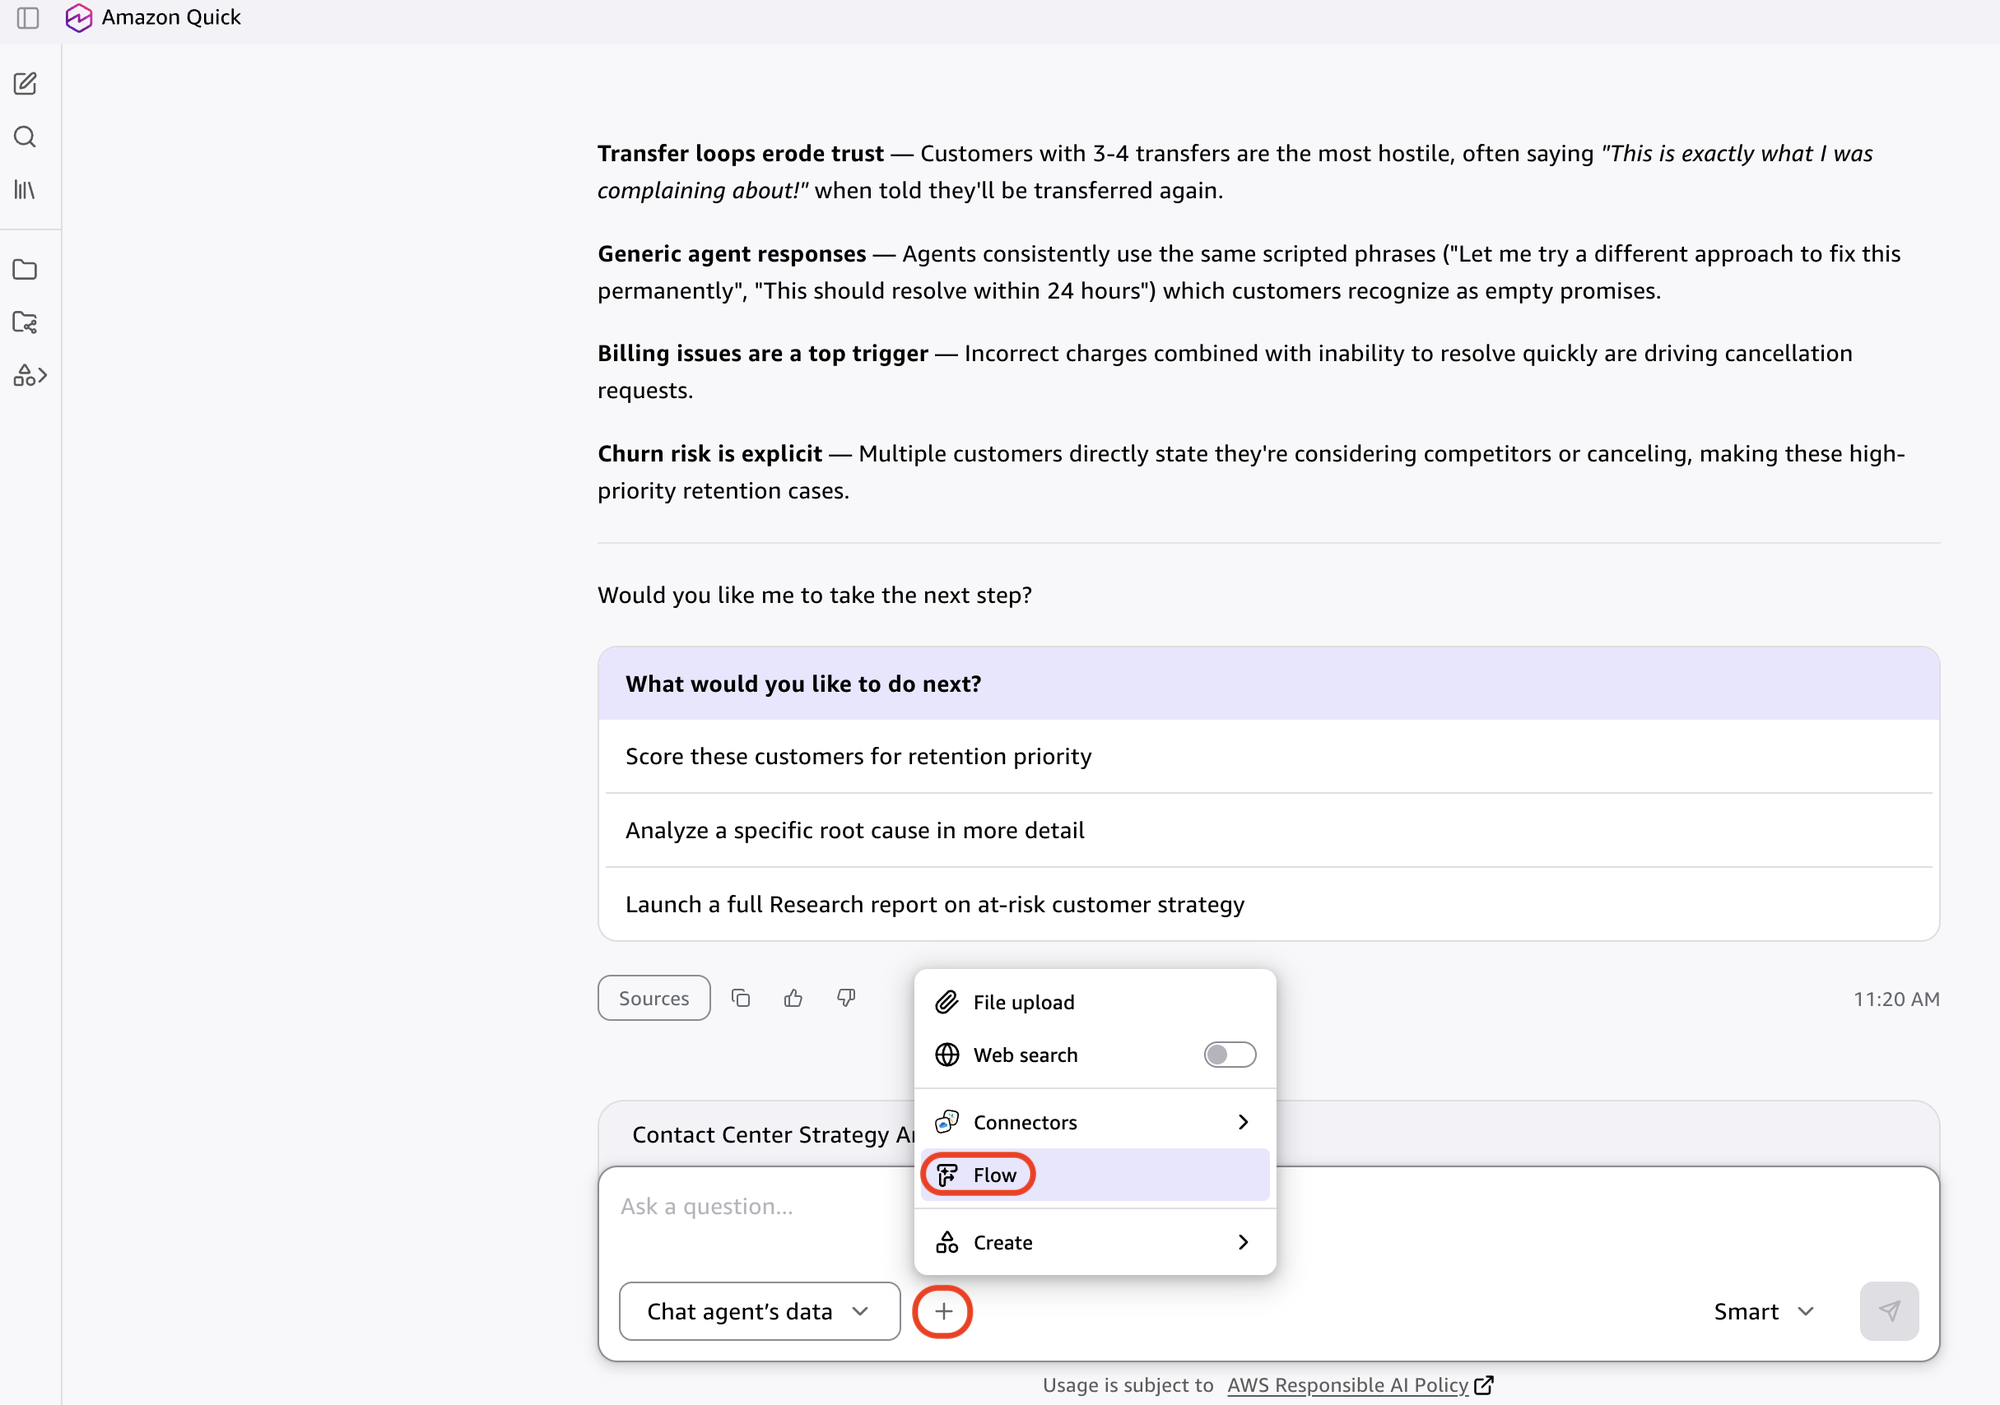
- In the Chat interface, choose the + on the toolbar, then select Flow.
- Select Generate new flow, keep the suggested prompt and select Generate.
- Review the flow then choose Publish.
- Select Run mode, if required enter any inputs then start the flow.
The Flow is now a reusable automation. Share it with your team or schedule it to run weekly to regenerate the analysis whenever you need it.
To create the Automate workflow
Connectors required: these connectors should be part of the Automation group that we create the Automate in.
- Amazon S3 (two connections: one for source data, one for output uploads)
- Custom Agent (with MCP scoring agent created in the MCP action connector step)
To create an Automation group
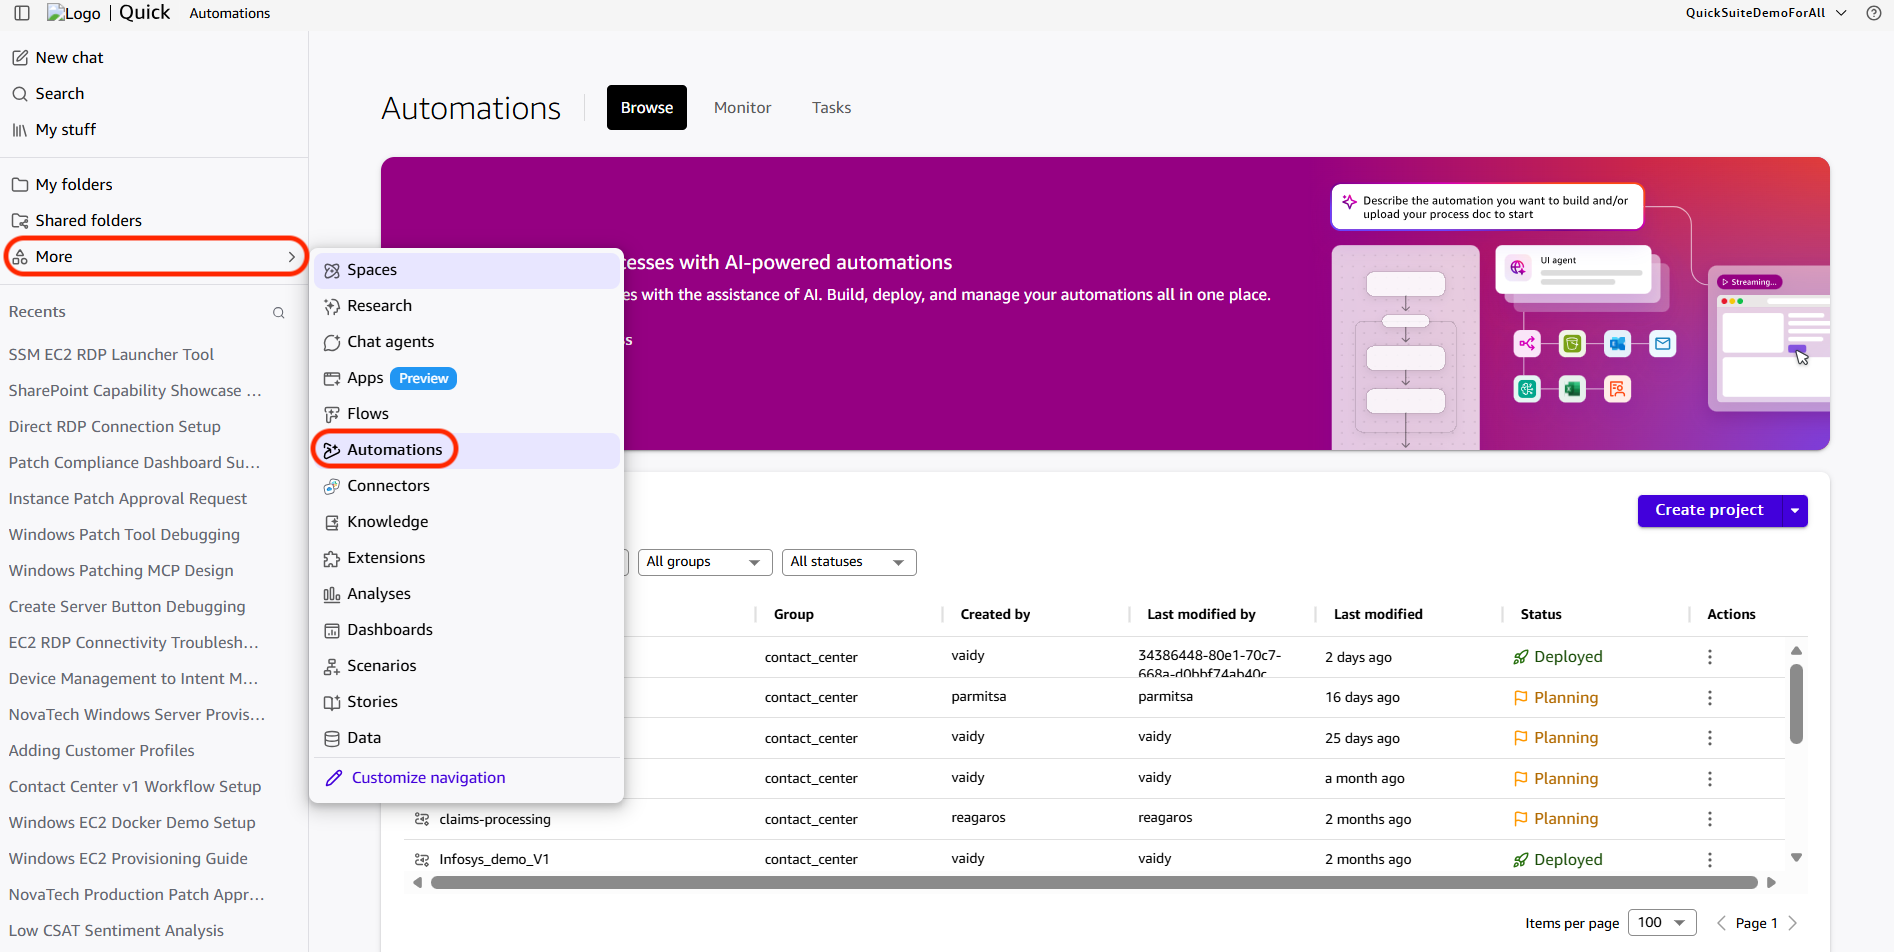
- On the Amazon Quick home page, choose More, then Automations.

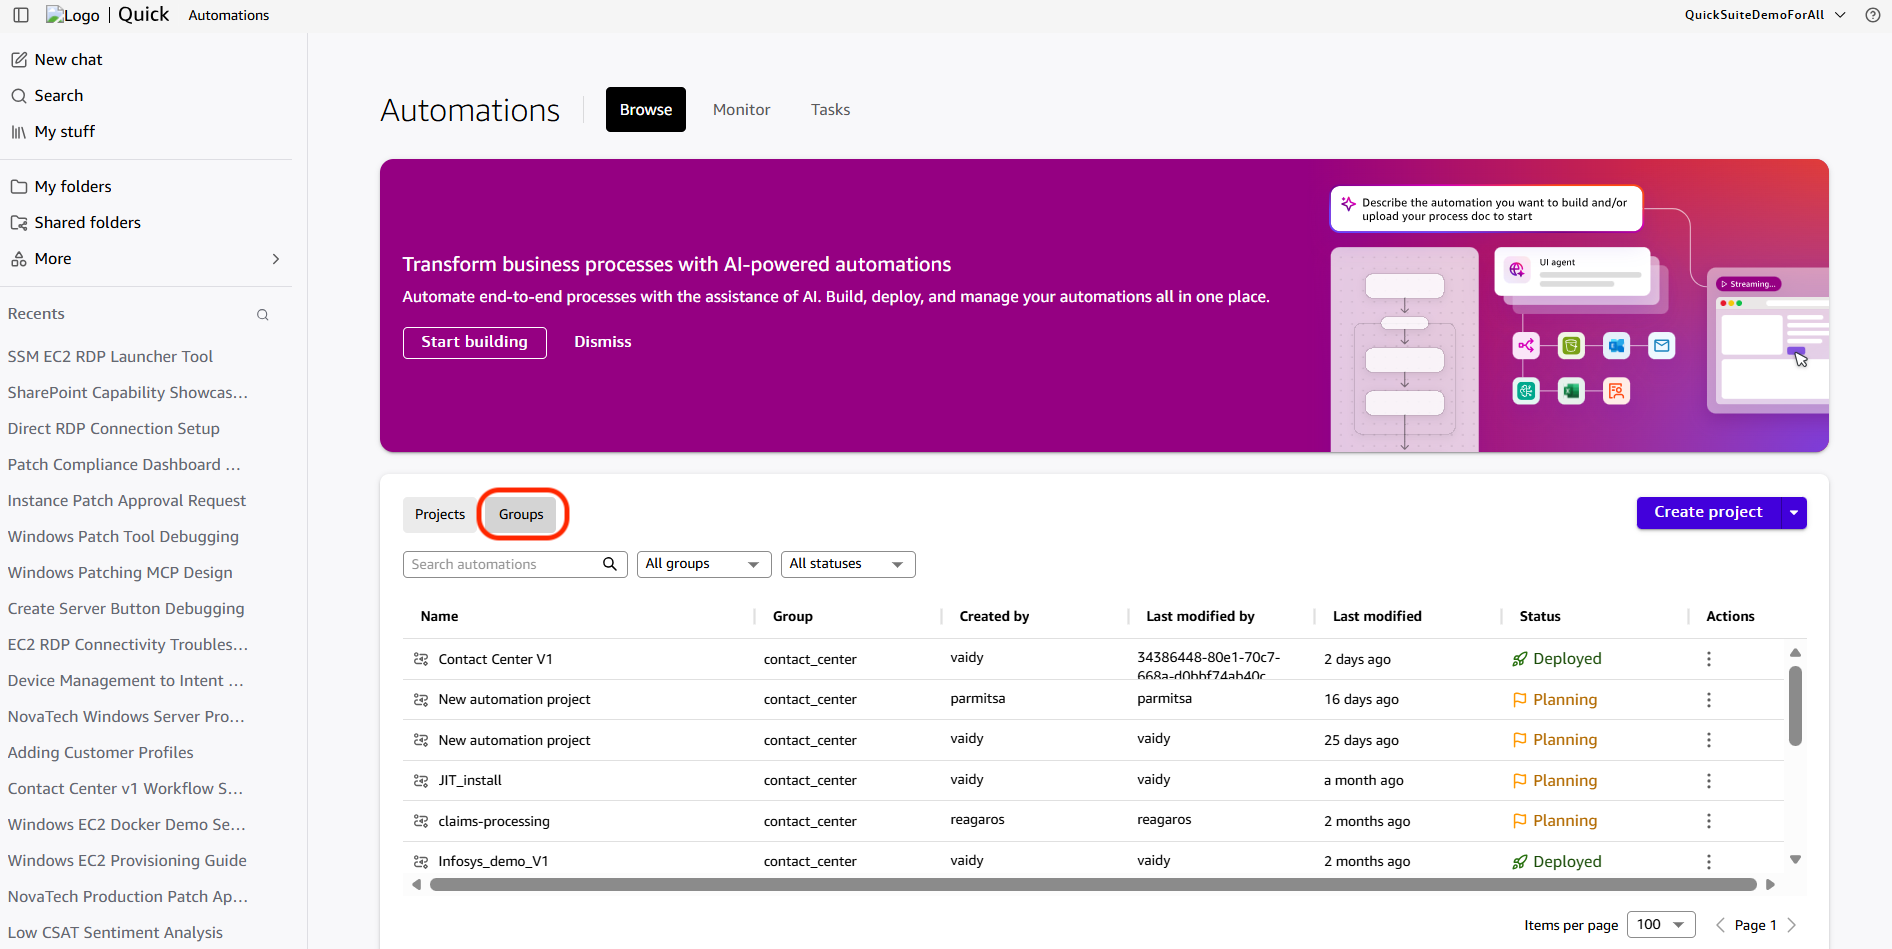
- In the page that follows, choose the ‘Groups’ tab.
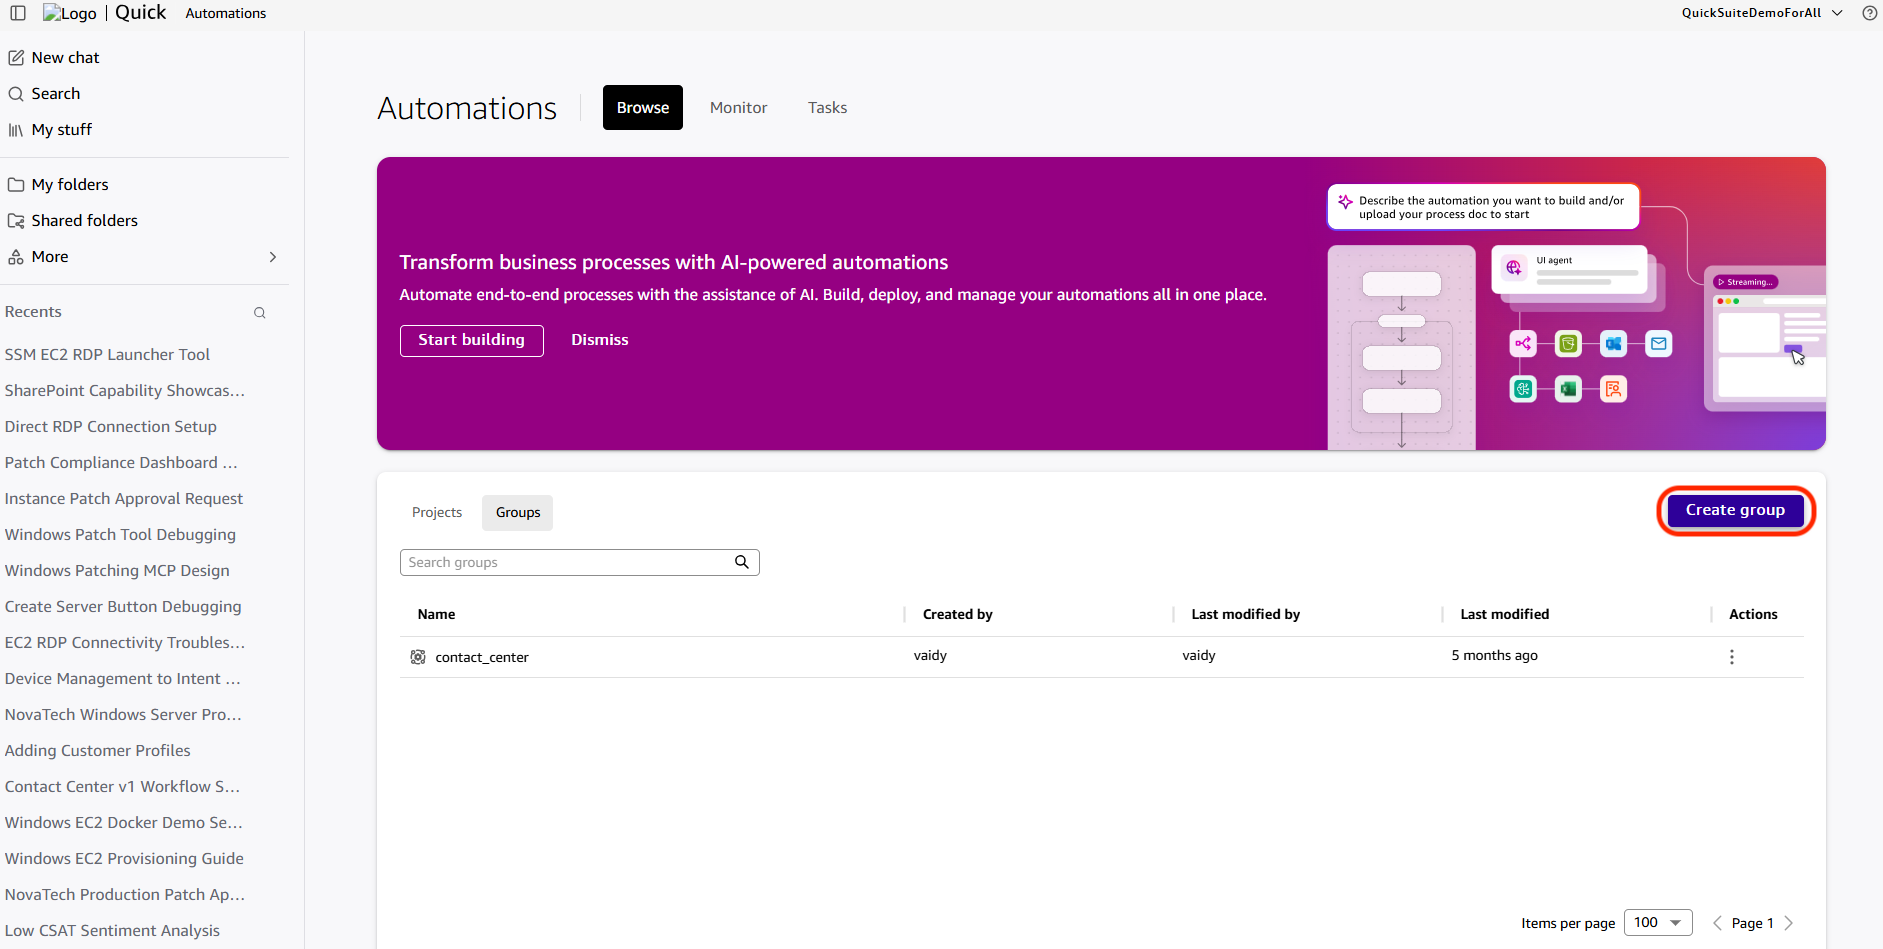
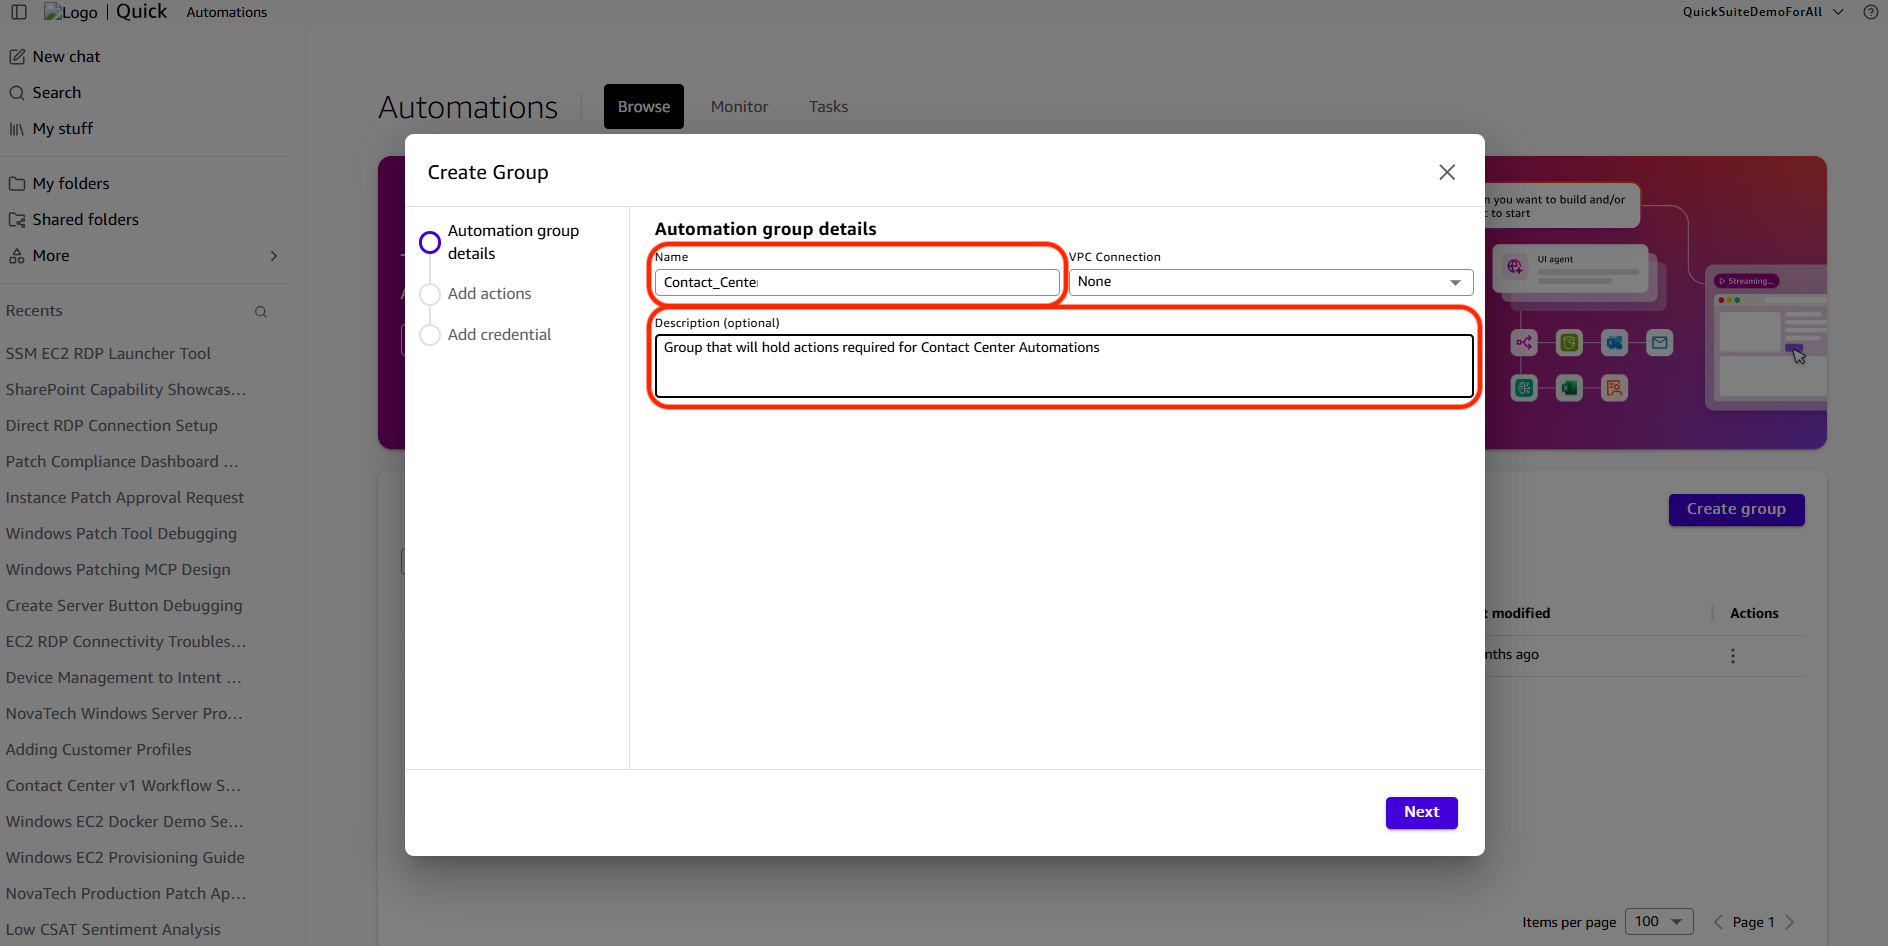
- Then choose Create Group
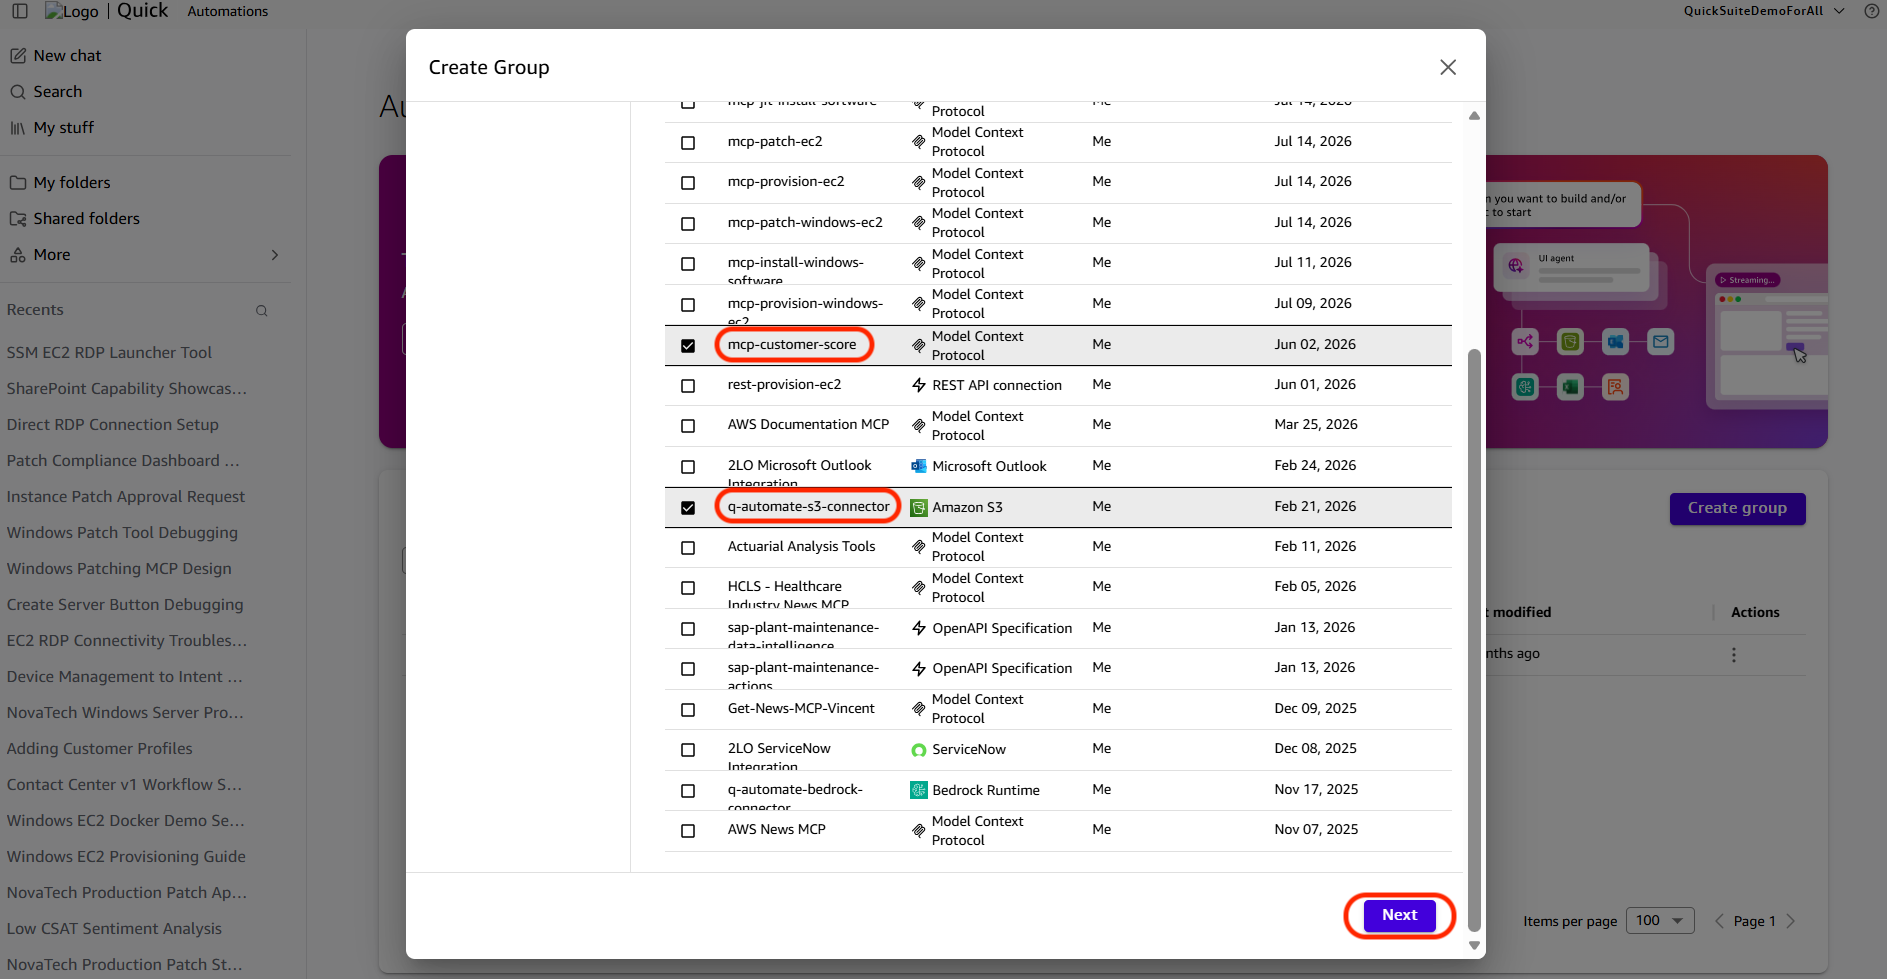
- Choose the required actions, the MCP action and the Amazon S3 action. Then choose Next.
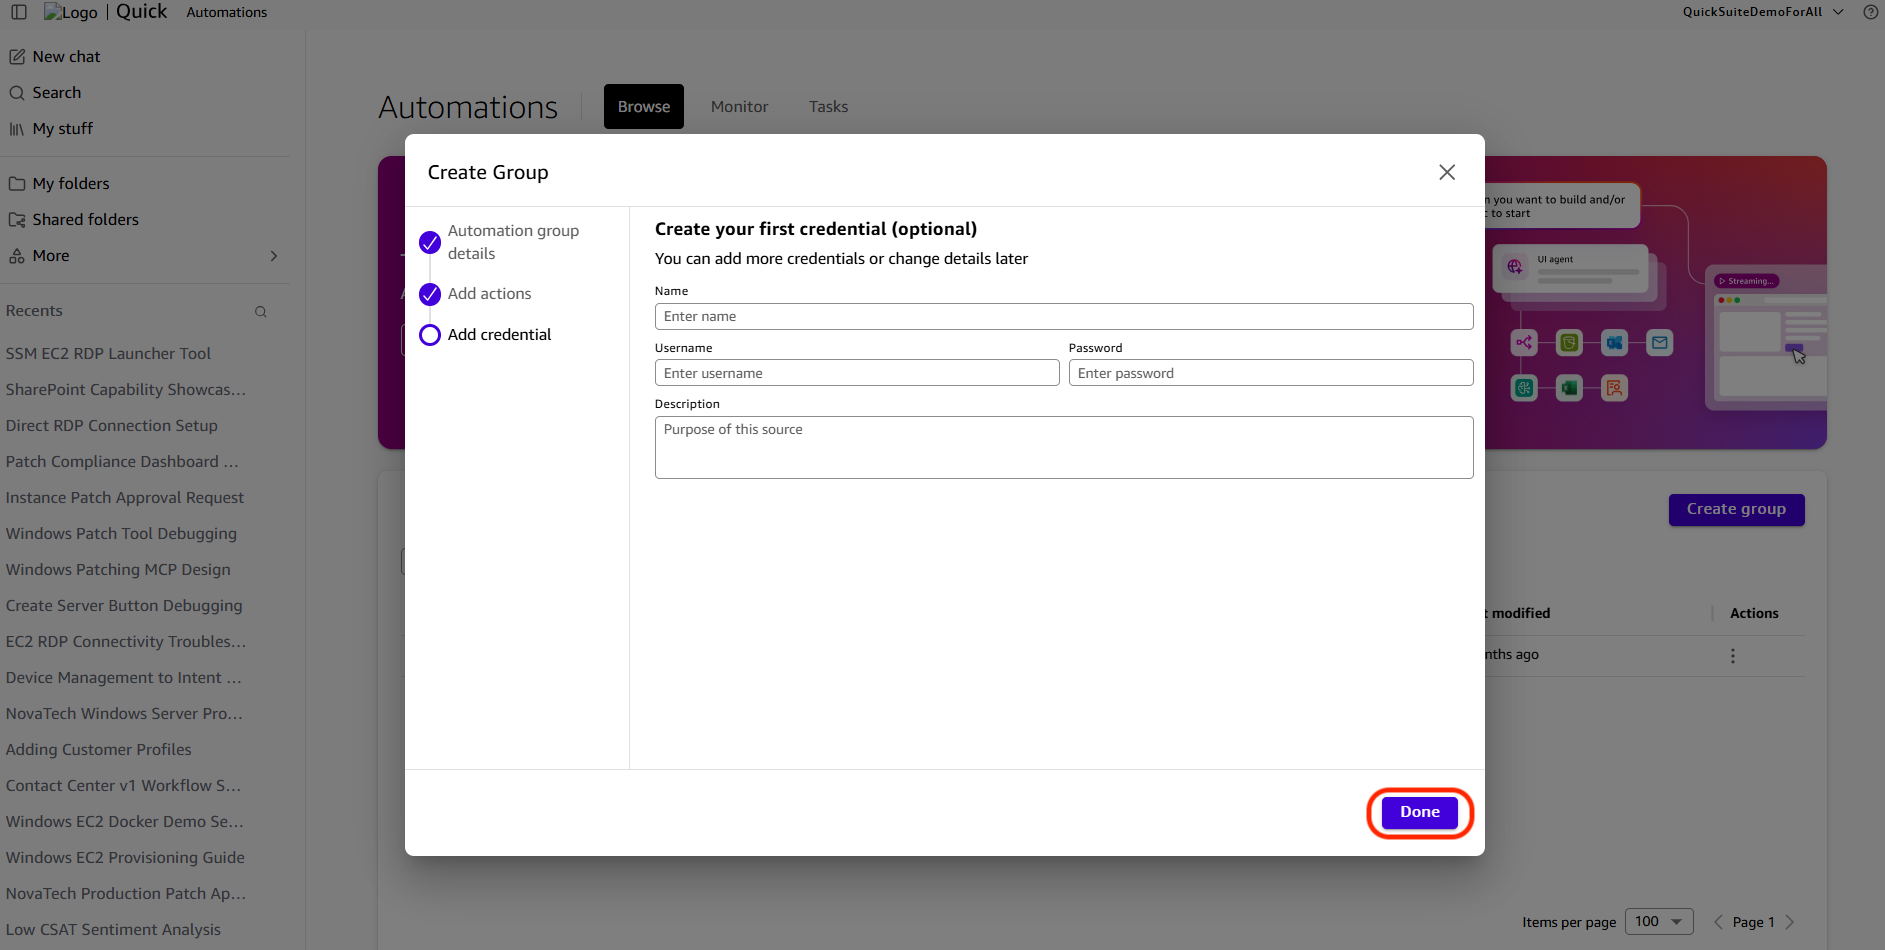
- On the following page, choose Done
To create the Automation project
The above group will be used to create the Automation project. Follow the instructions to create the Automation project.
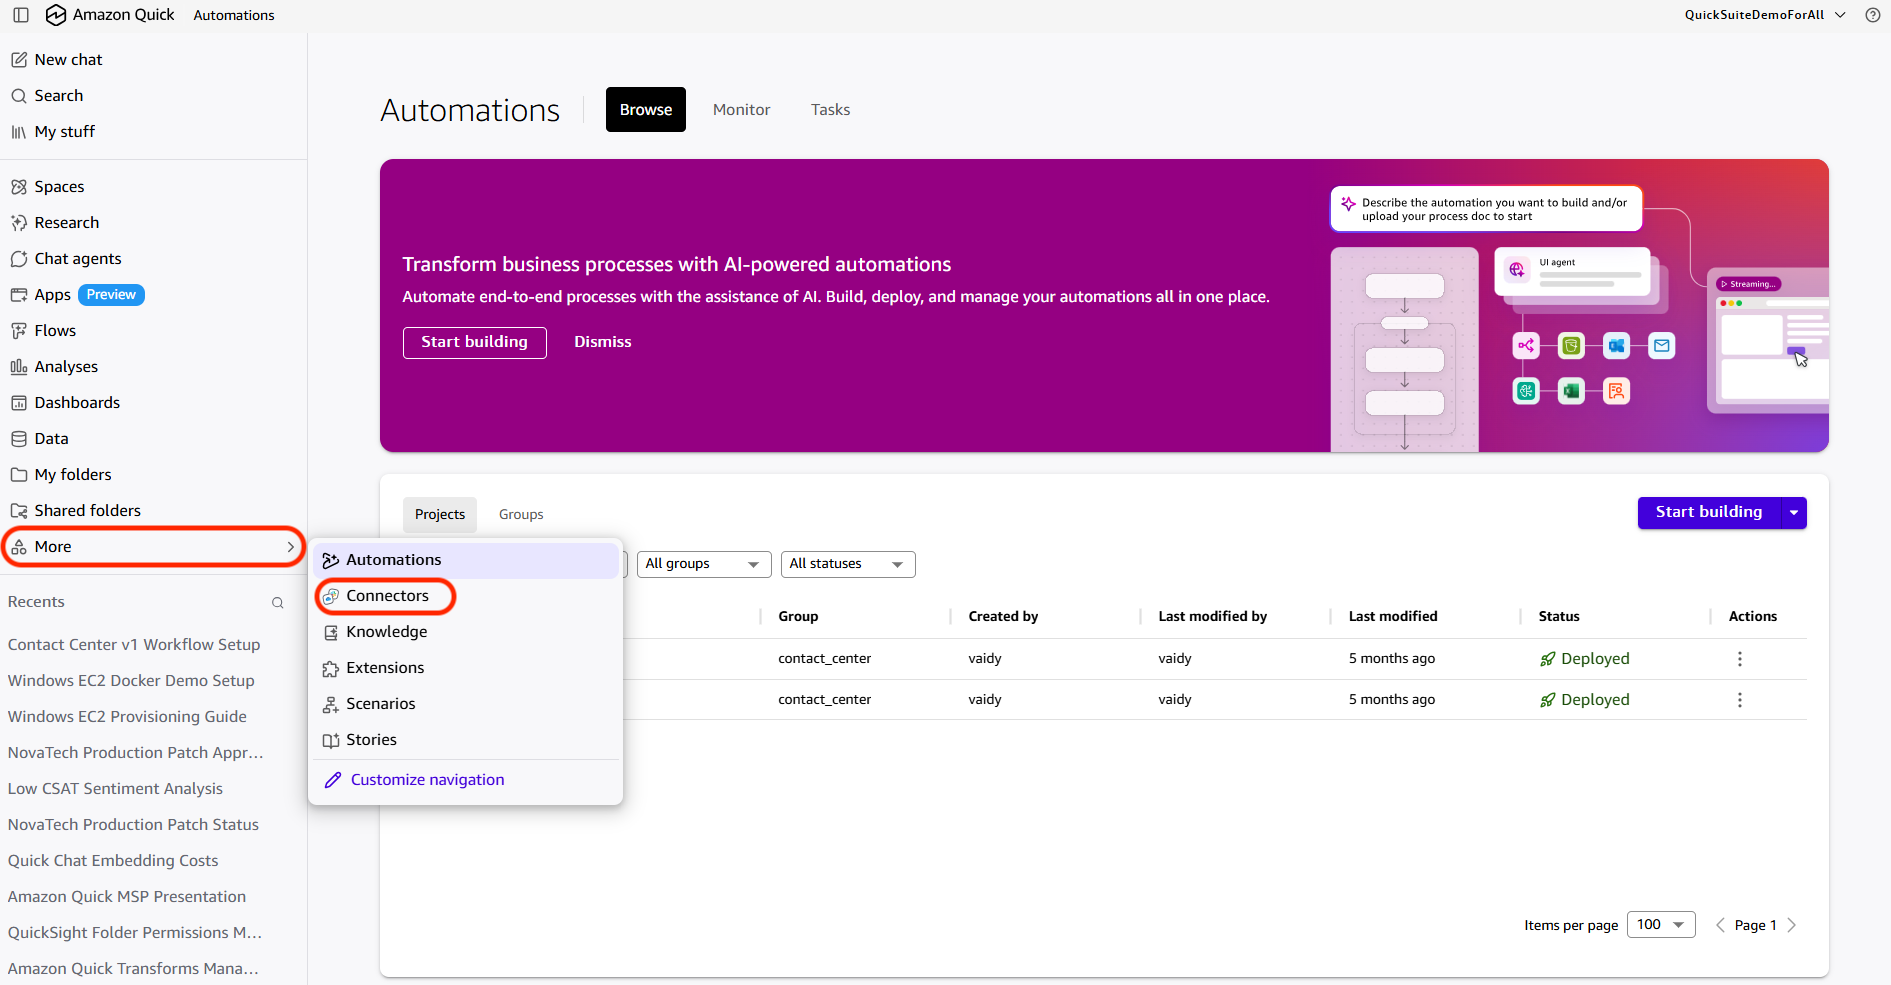
- On the Amazon Quick home page, choose More, then Automations.
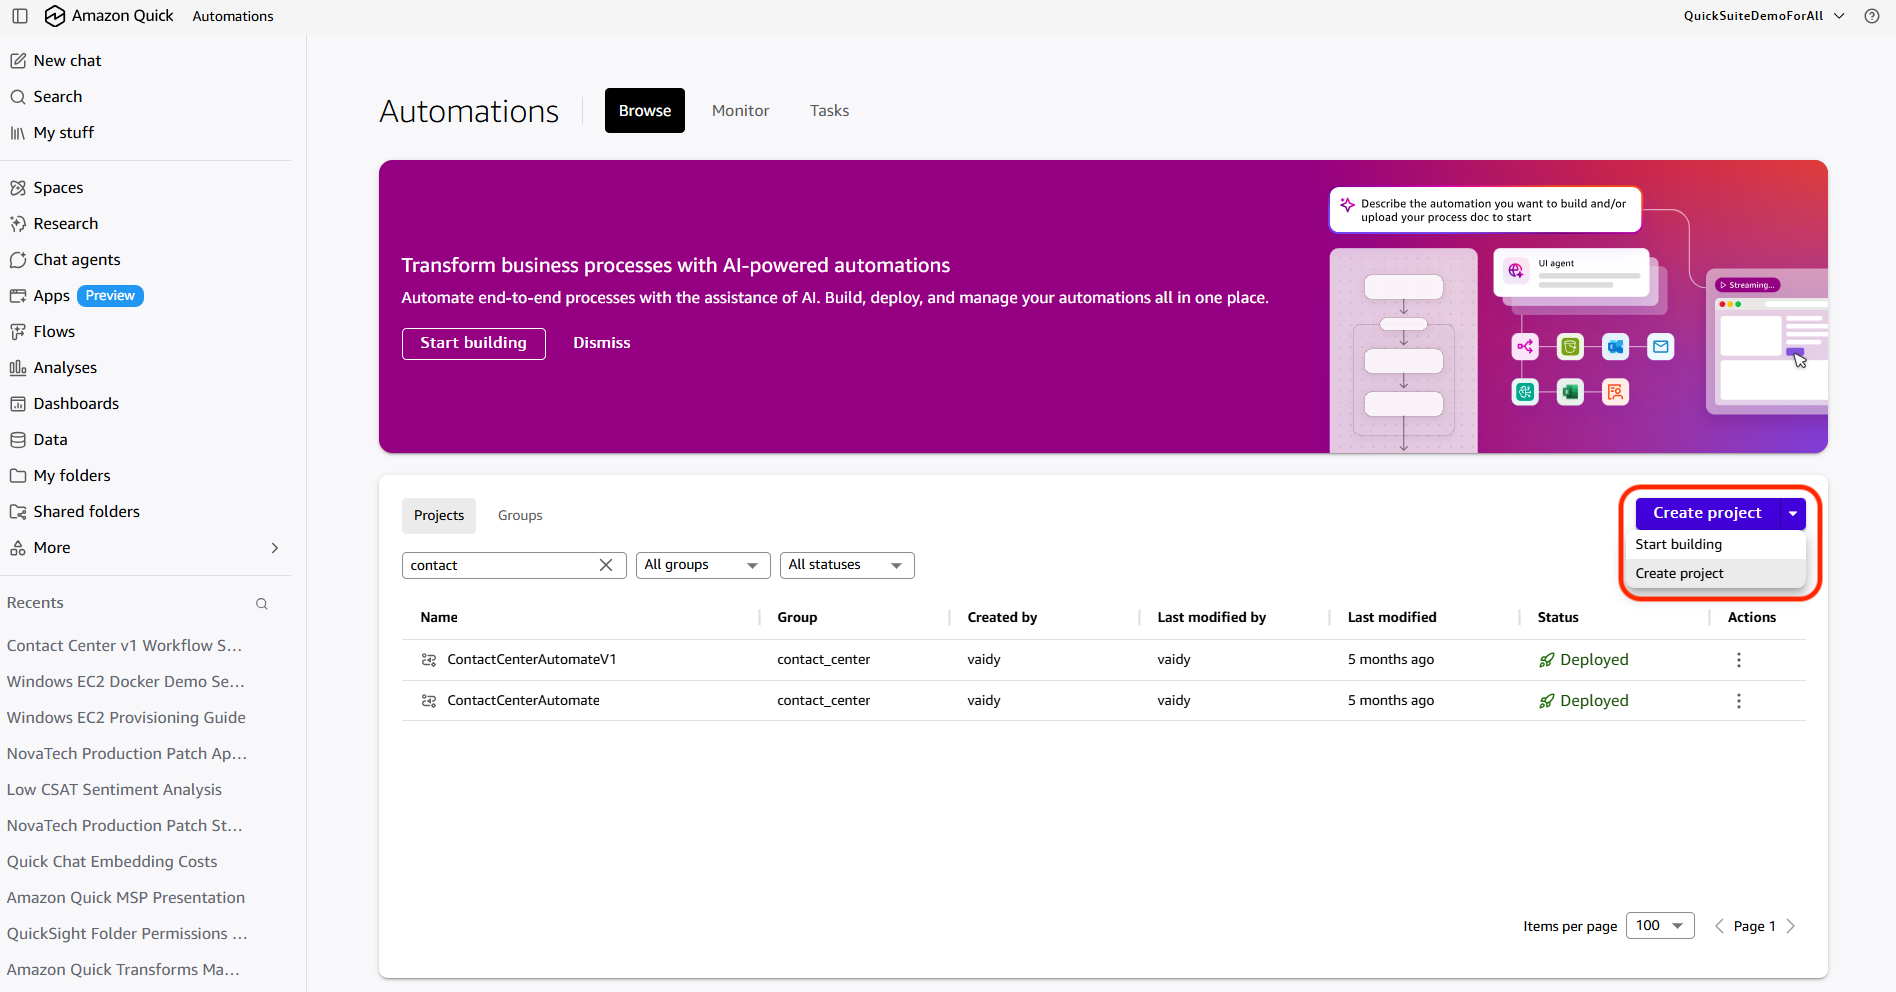
- On the screen that follows, choose Create Project, then Create Project.
- Enter a name for the automation, choose the Automation group, then choose Create
- On the following screen, choose Start building
- Choose SkipThe following screen appears
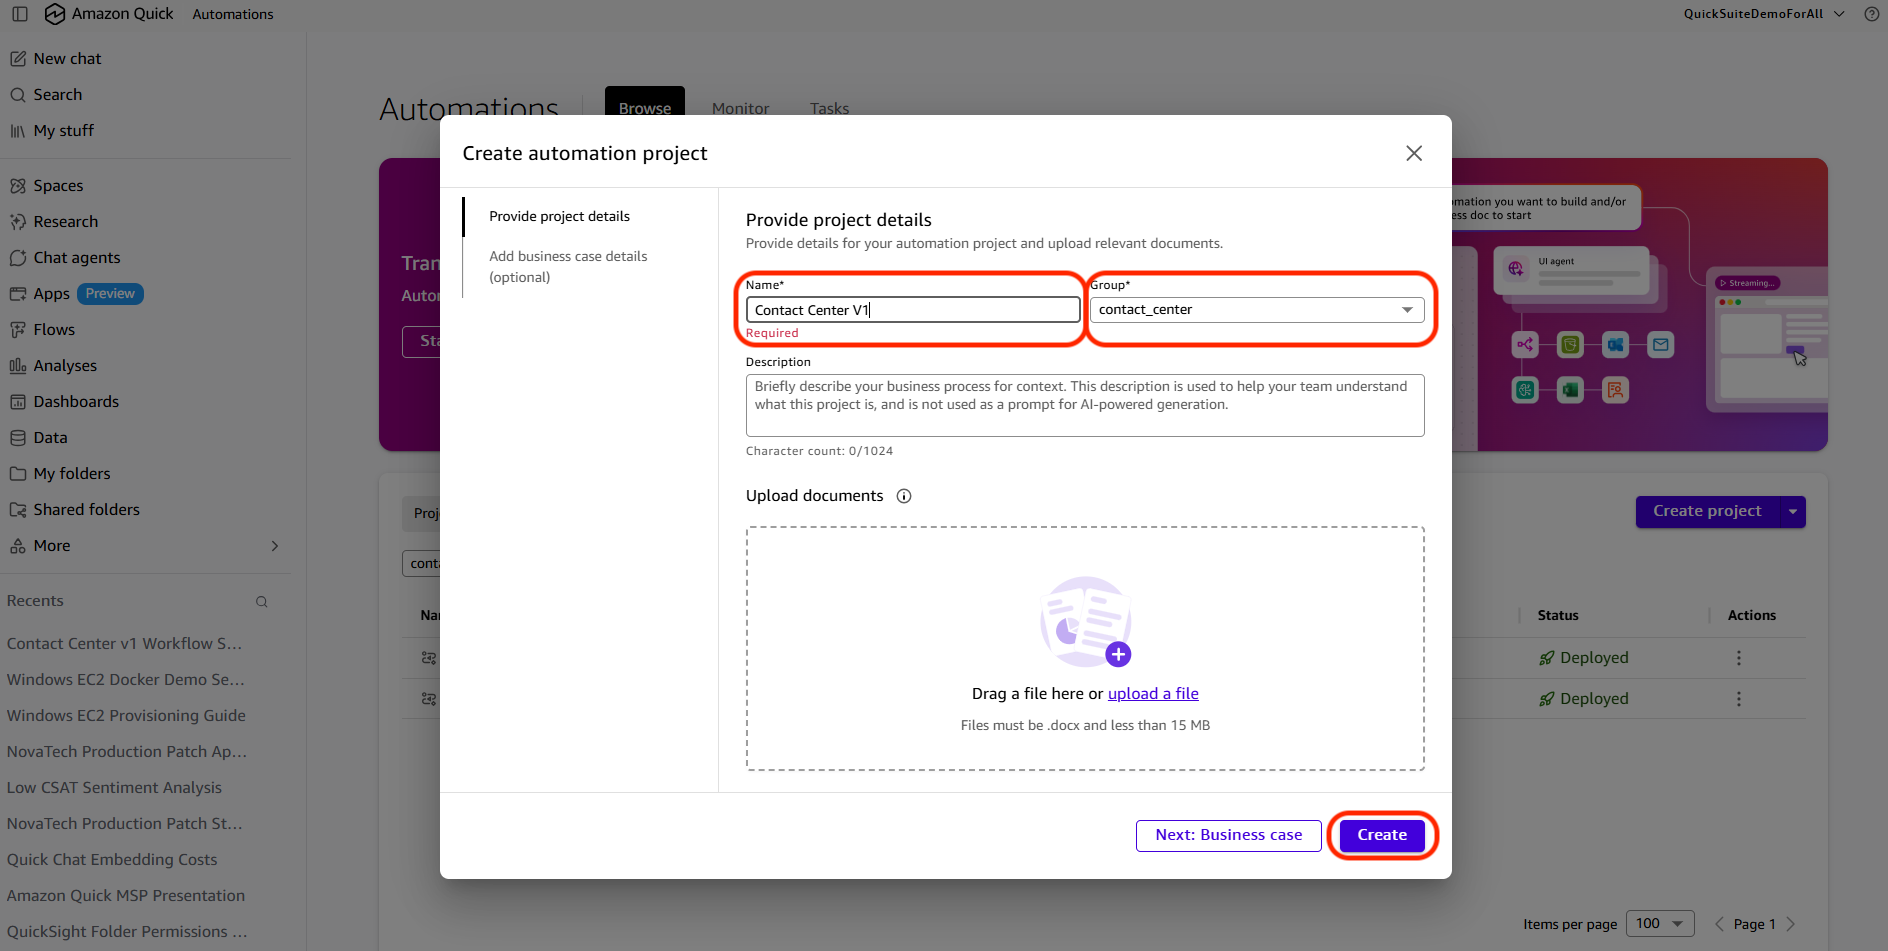
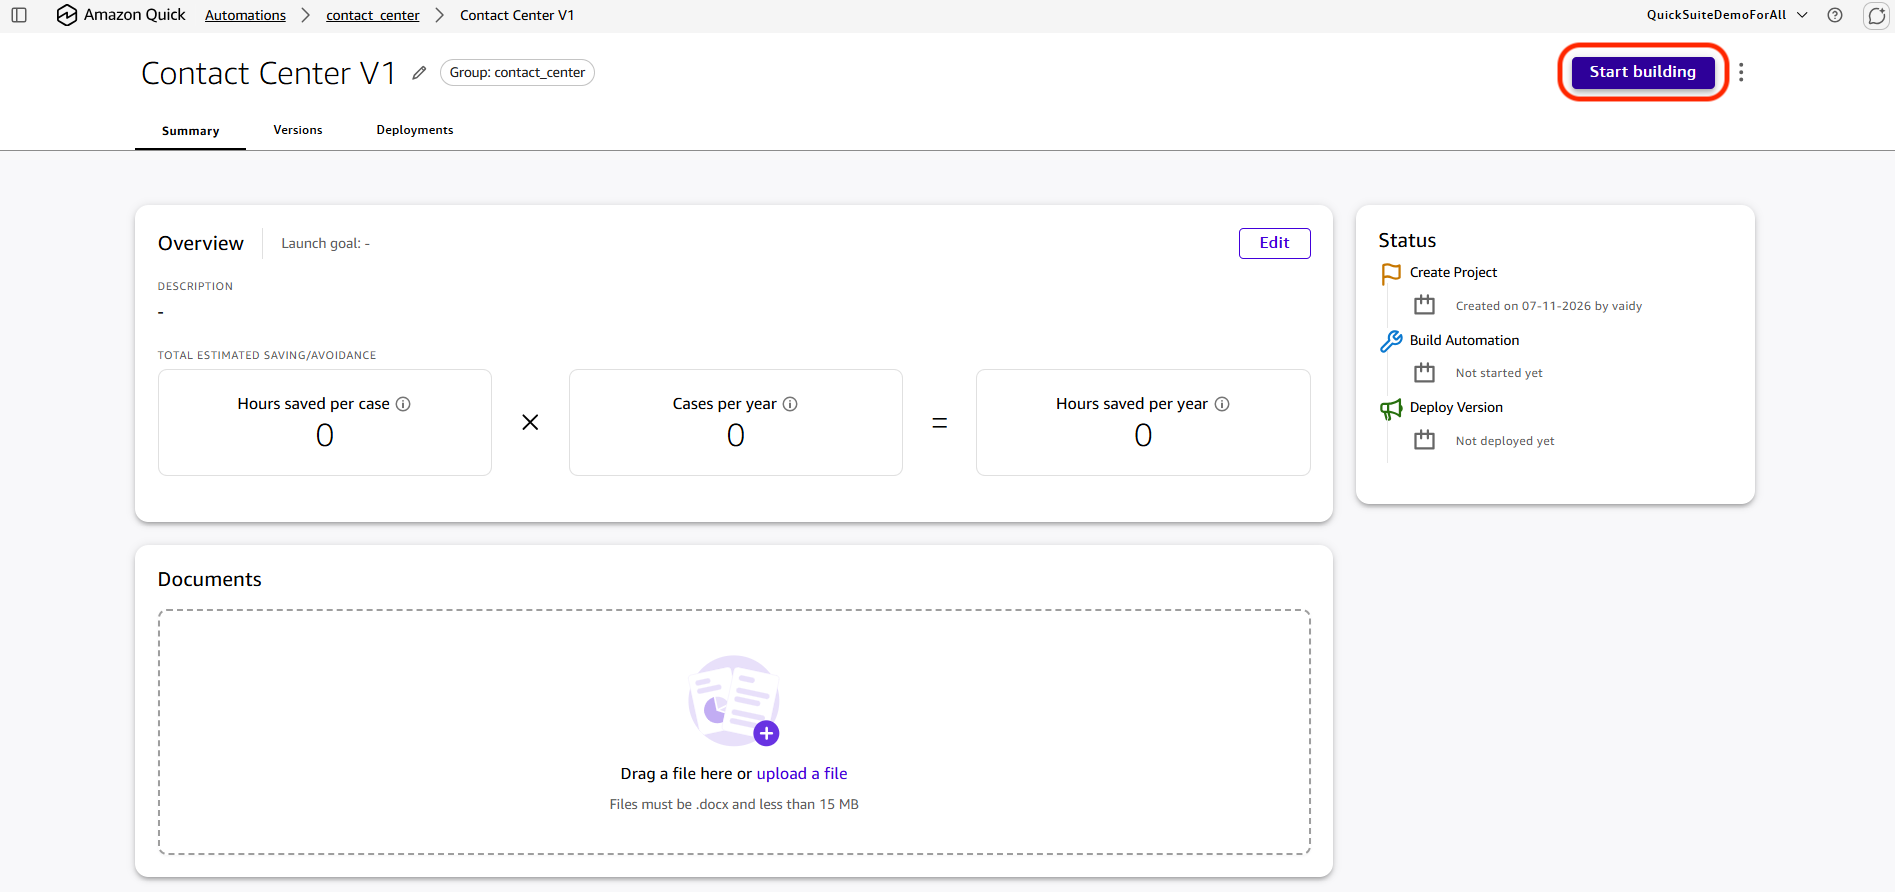
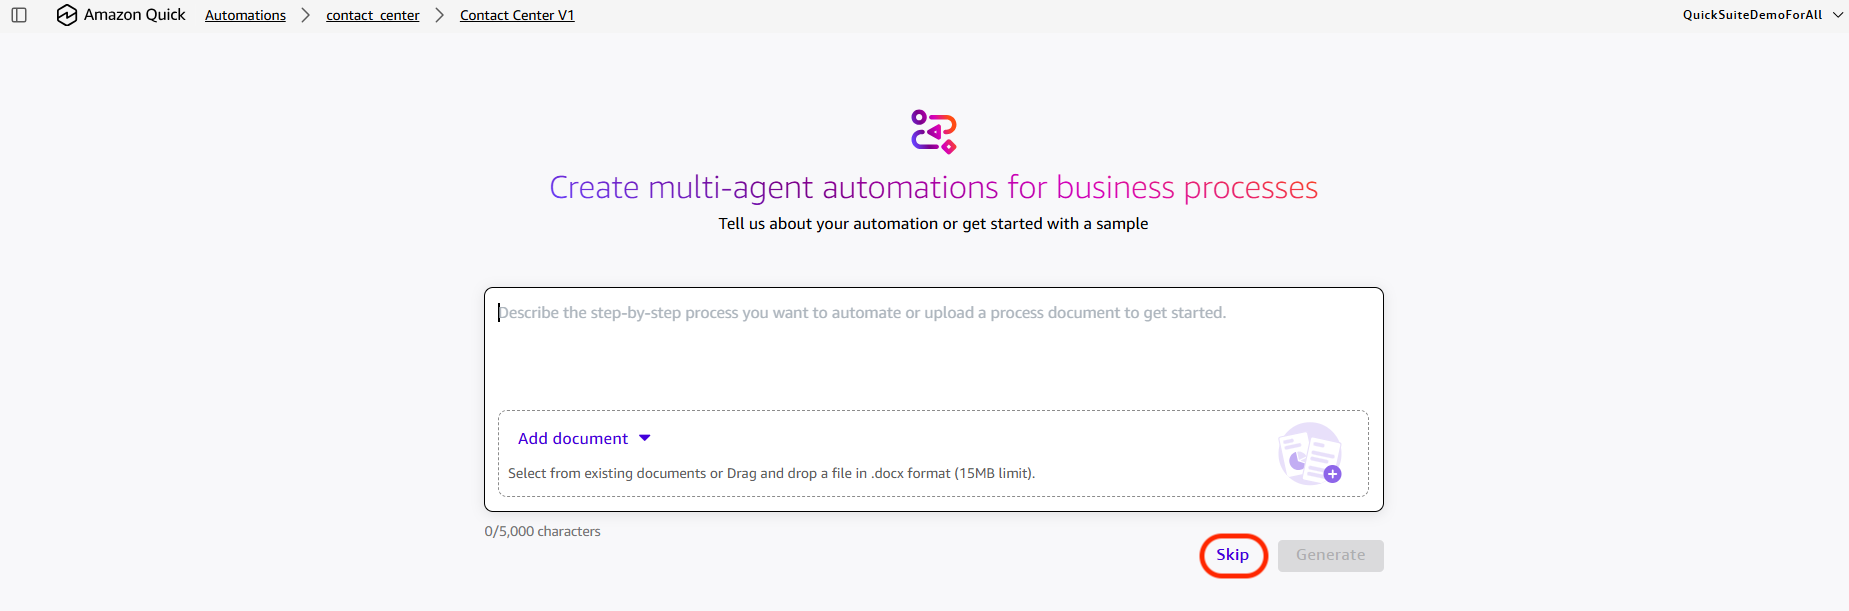 The following screen appears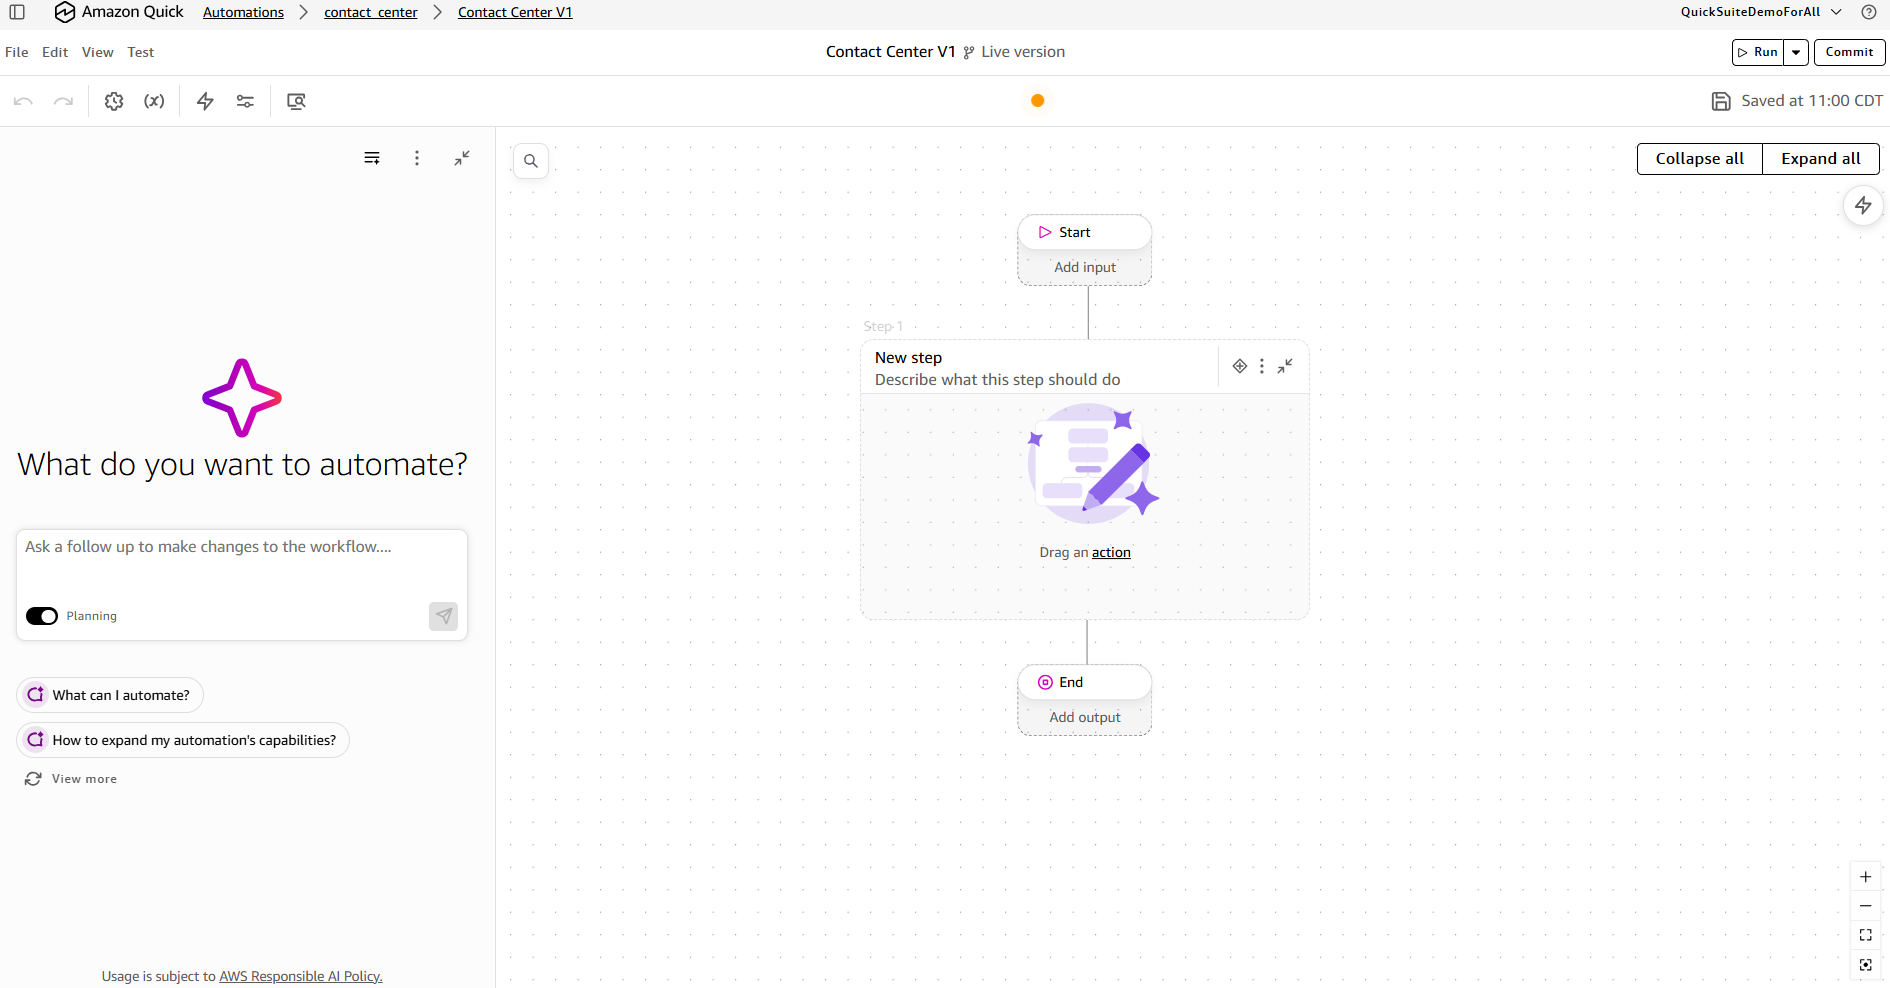
To build the Automation steps
For the subsequent steps, follow the instructions shown below and complete the Automation project.
Step 1: Load call data from Amazon S3
Choose New step and enter the following inside the chat assistant on the left that says ‘What do you want to automate’. This initial step loads call data from the raw contact center CSV in Amazon S3:
Log an info message: "Starting download of customer contact data from S3"
Download the file "contact_center_data_complete.csv" from the S3 bucket contactcenterbucketdemo".
Read the downloaded file as a CSV with headers included and comma delimiter. Store the result as call_data.
Log an info message: "Successfully loaded customer contact data from S3 CSV file"
Have all the above under one step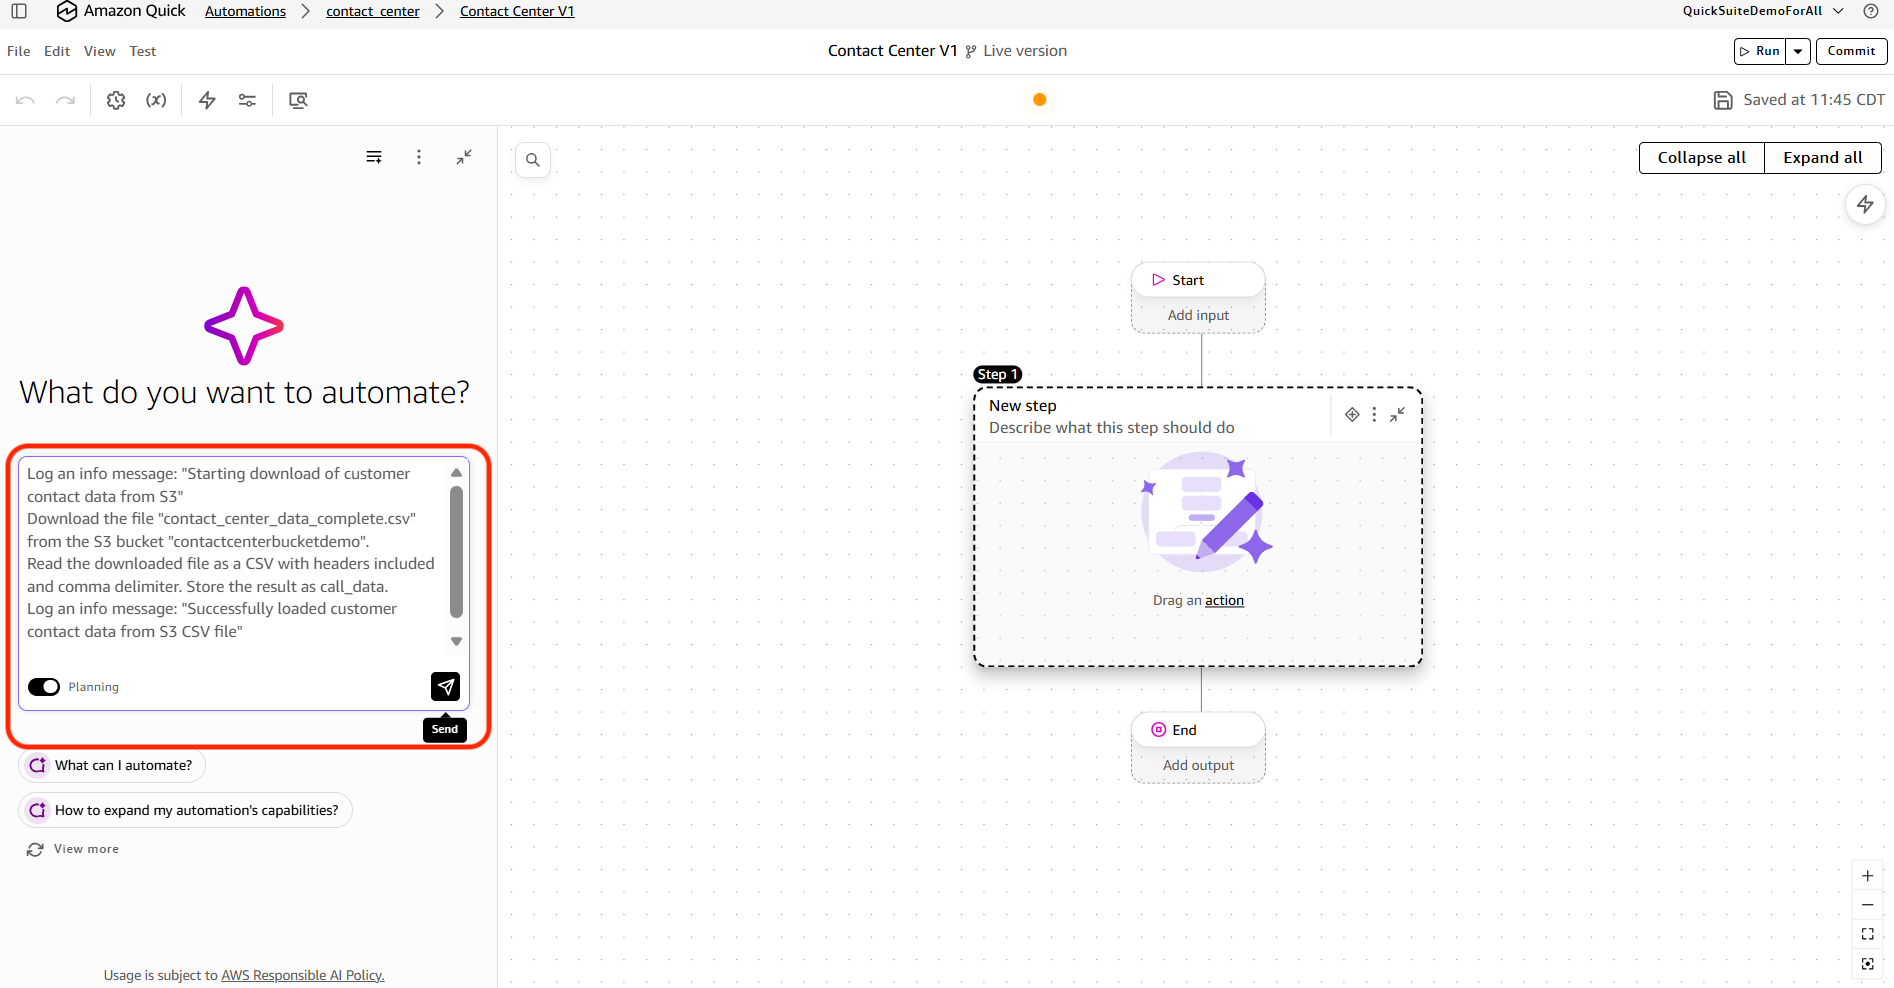
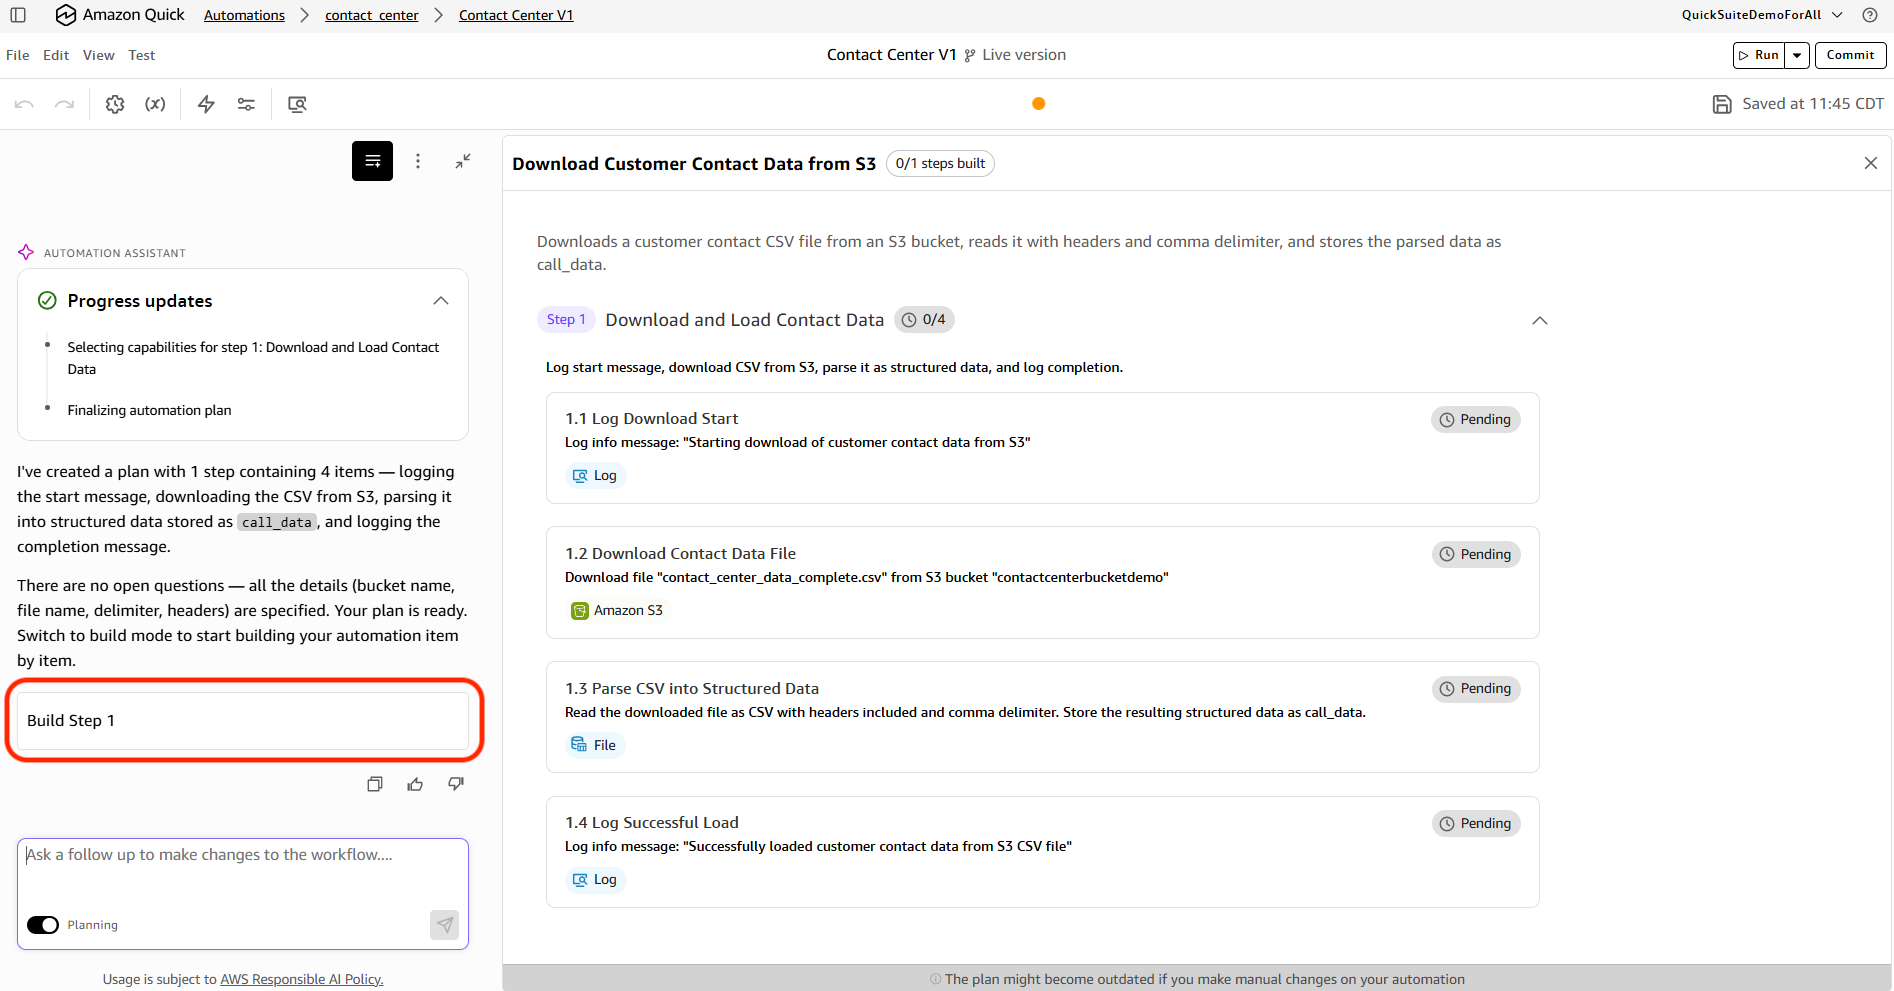
Choose Build Step 1.
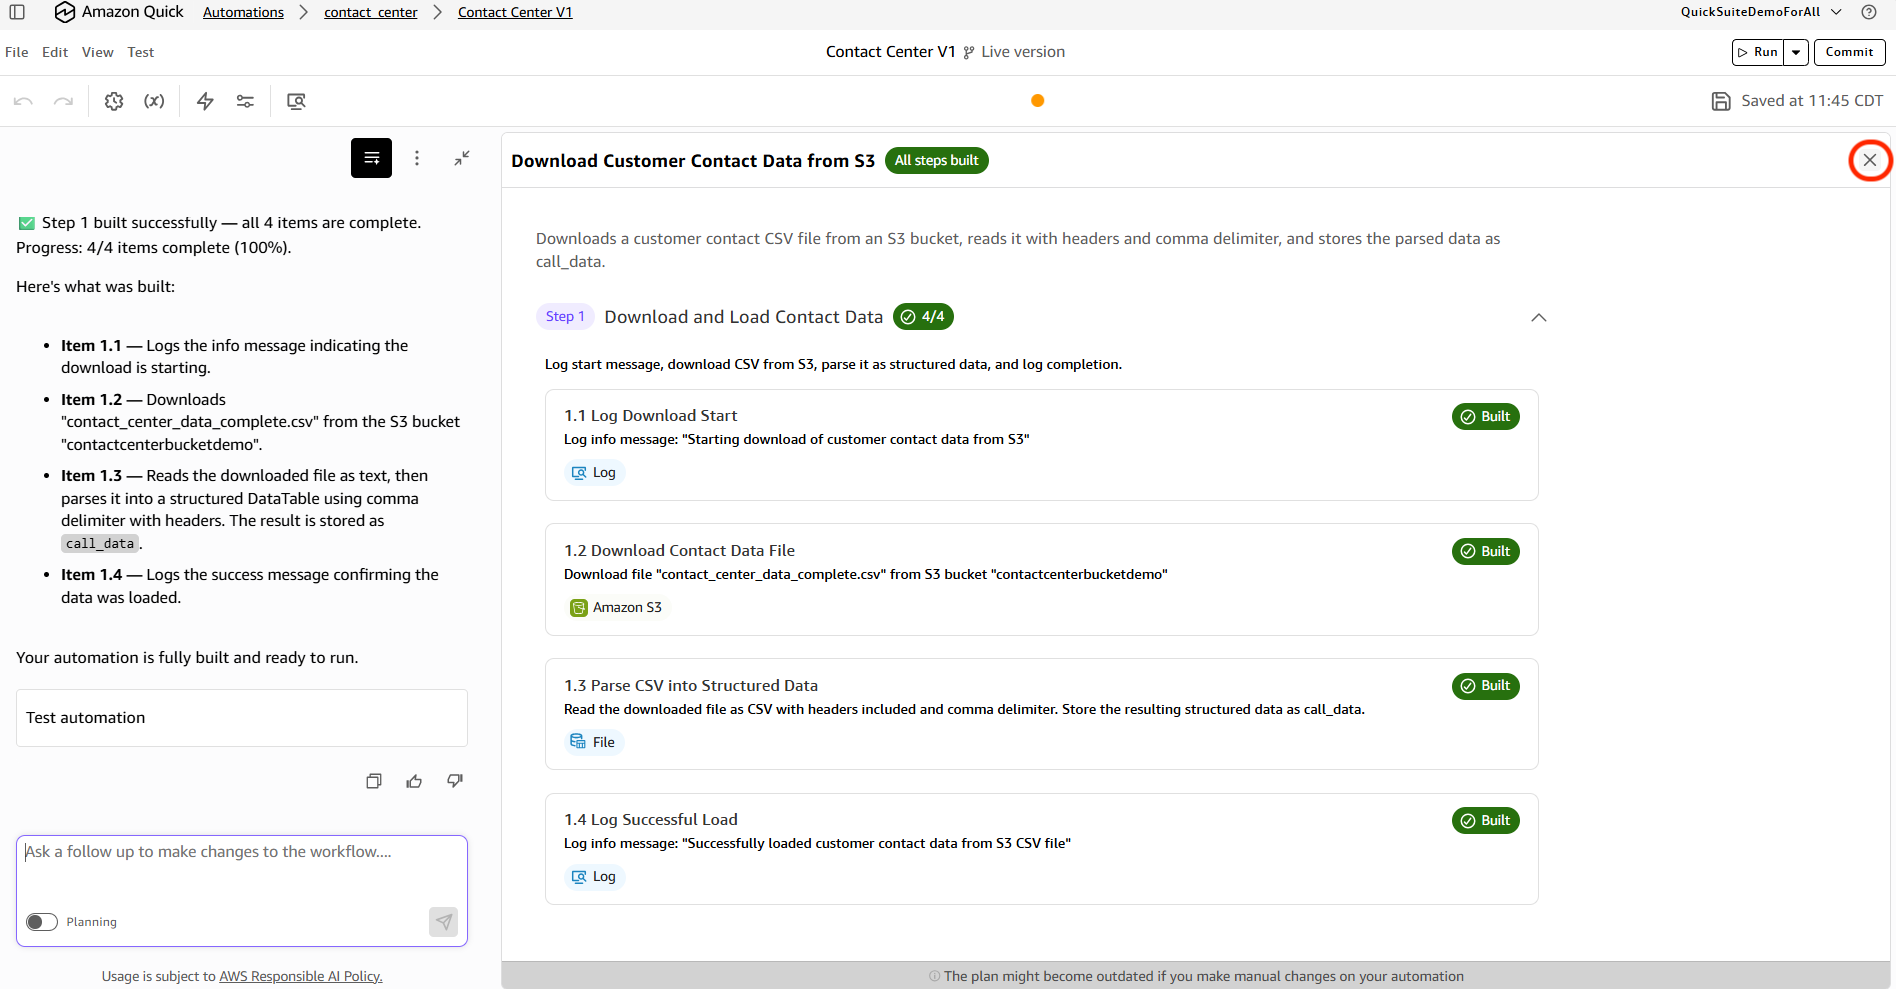
Choose the close (x) symbol in the top right.
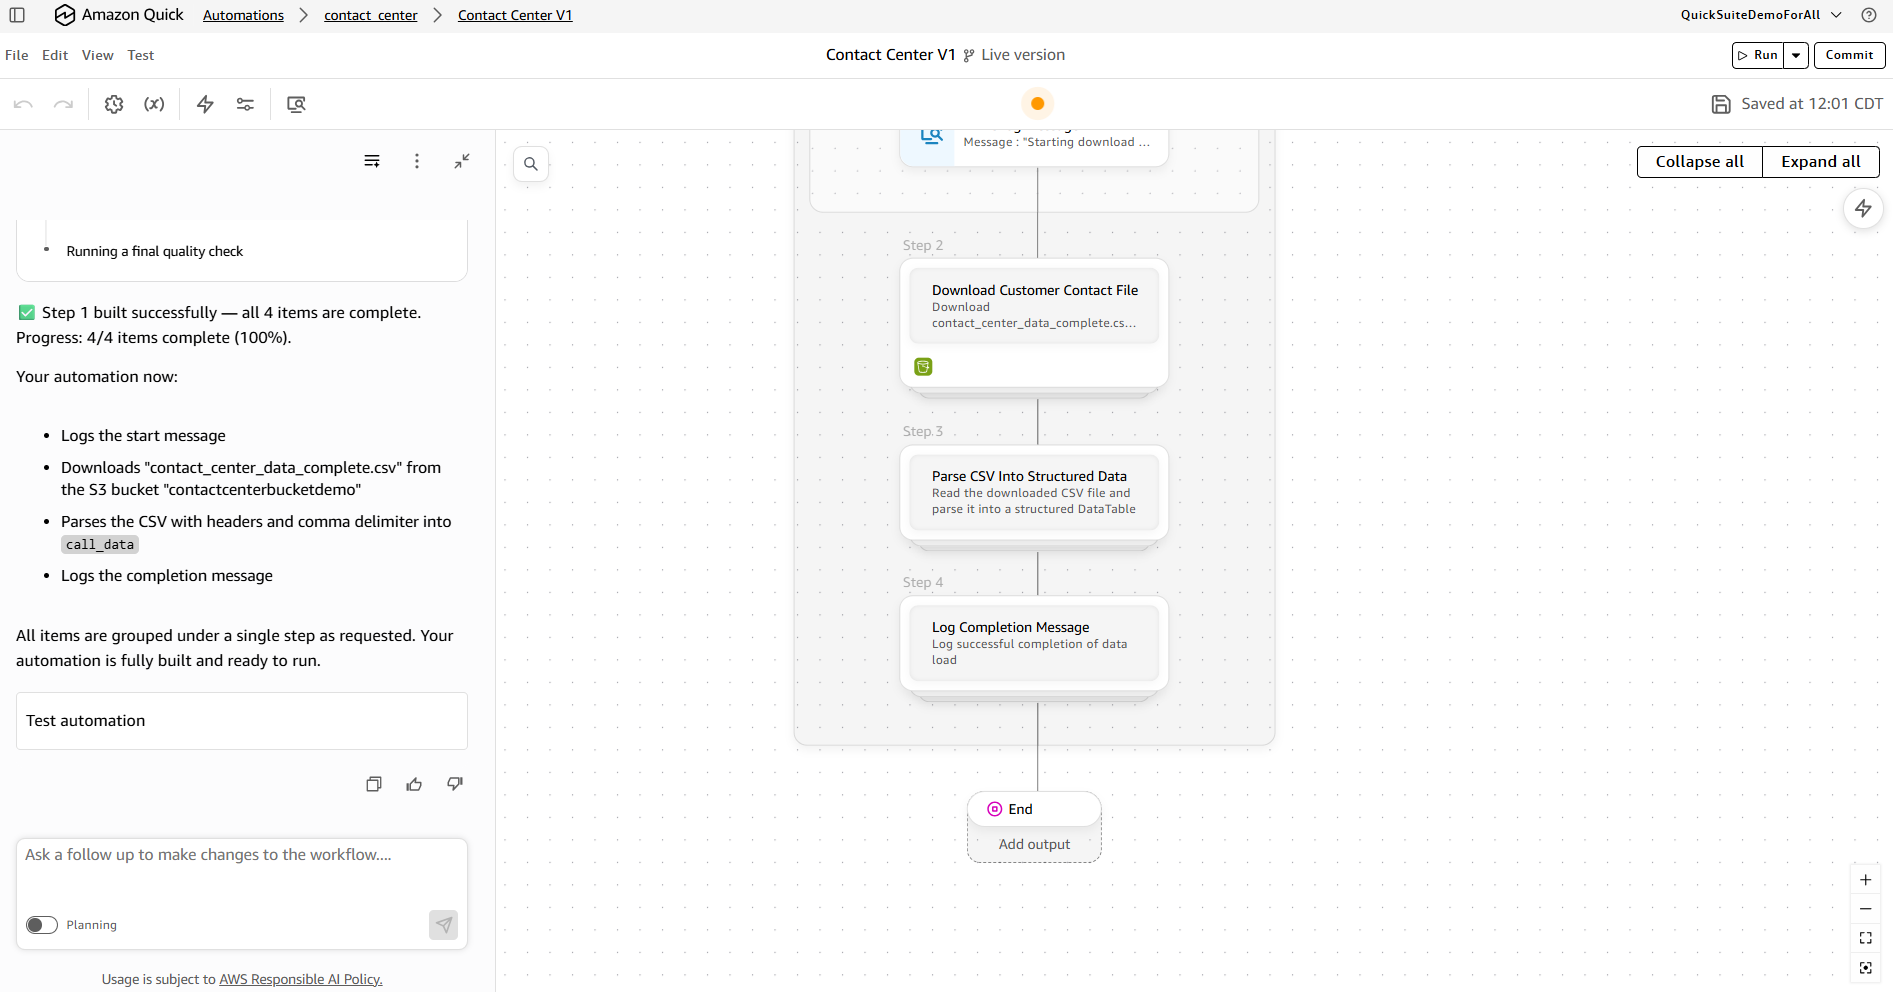
The step will be created as shown below.
Step 2: Filter high-risk customers
Choose the add (+) symbol below the step, then choose Process step.
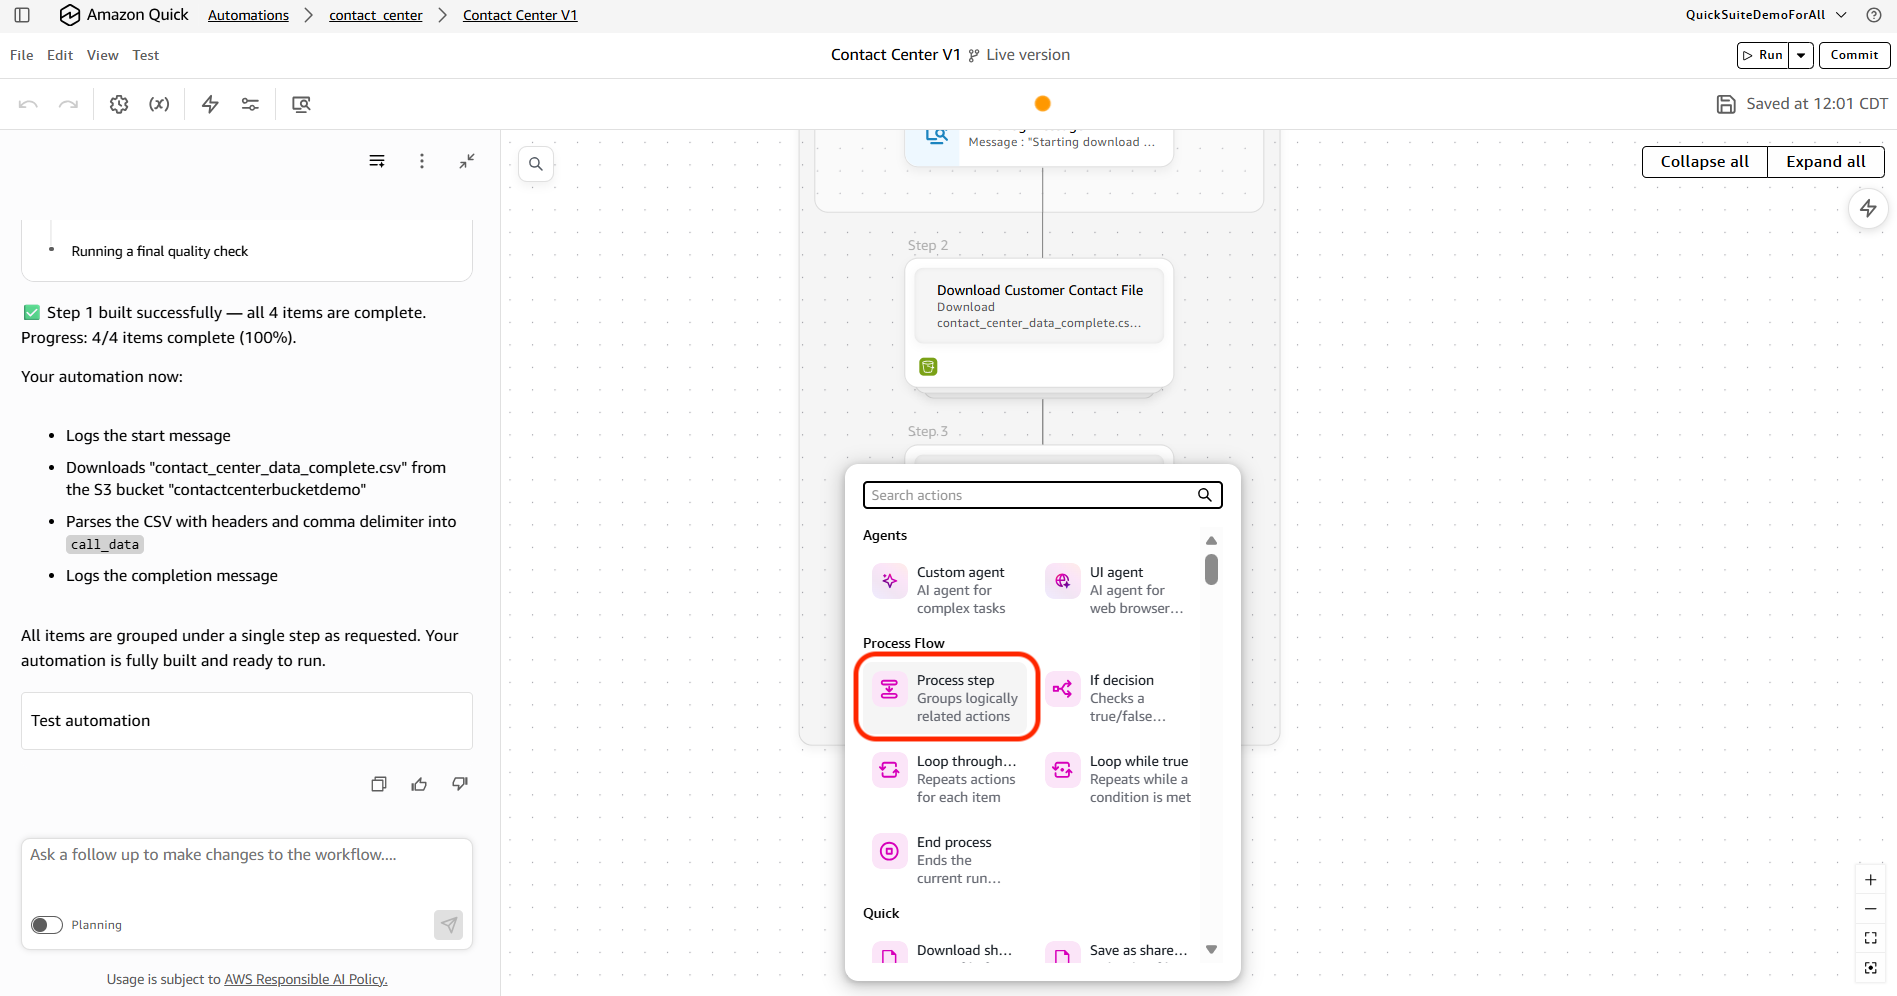
Toggle the mode back to planning. Enter the following in the chat window, then choose the talk symbol.
Log an info message: "Starting to filter call data for known high-risk customers with negative sentiment"
Download the file "input/NegativeSentiment.docx" from the S3 bucket "contactcenterbucketdemo".
Have all the above under one step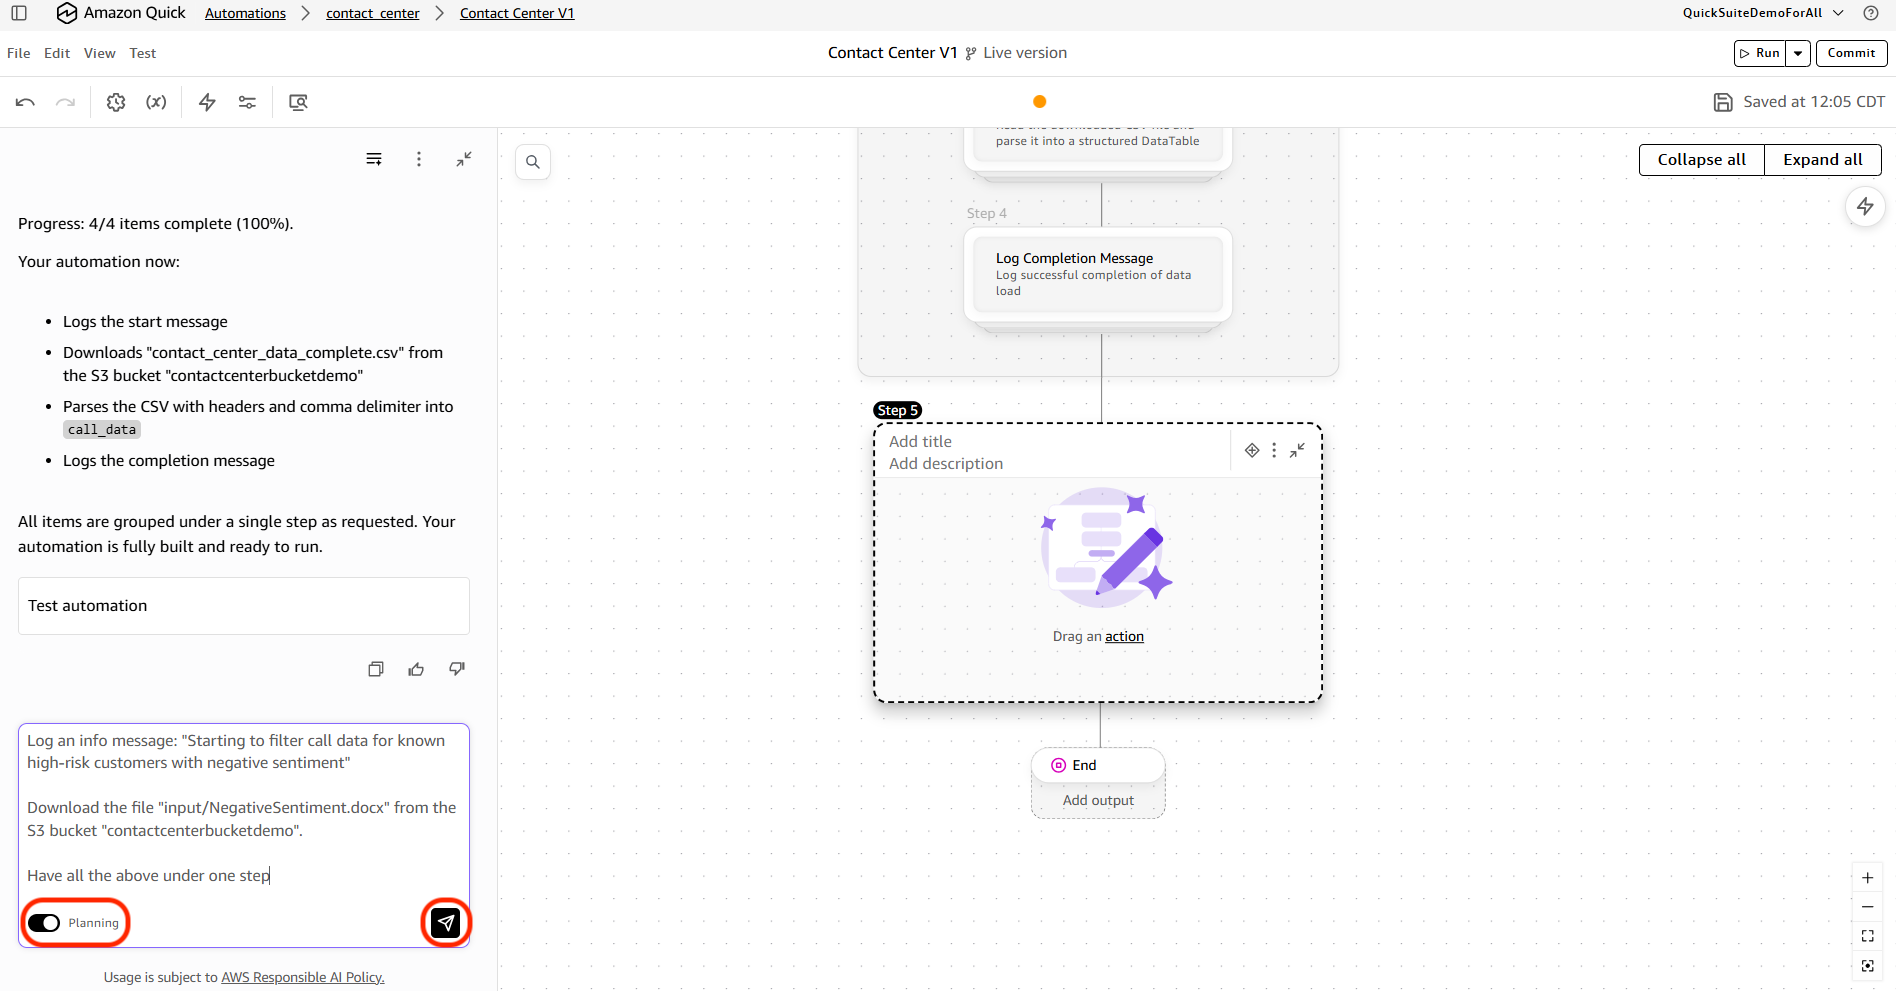
Step 3: Aggregate customer metrics
Repeat the above for step 3 (Aggregate Customer Metrics) with following instruction:
Loop through each item in the aggregated metrics result table.
For each item, log an info message with this exact format:
"Customer: {item['customer_id']}, Total Calls: {item['total_calls']}, Avg CSAT: {item['avg_csat_score']}, FCR Rate: {item['first_call_resolution_rate']}%, Resolved Rate: {item['resolved_rate']}%, Avg Transfers: {item['avg_transfer_count']}, Avg Hold Time: {item['avg_hold_time_seconds']}s, Complaint Ratio: {item['complaint_ratio']}"
Have all the above under one step
These two instructions together will recreate the full Step 3 including its nested sub-step for logging. The main step handles all the calculation logic, and the sub-step handles the per-customer logging output.
Step 4: Identify top customers and generate letters
Repeat the above for step 4 (Identify Top customers and generate letter) with following instruction:
Log an info message: "Starting customer bonus letter generation process"
Collect all rows from customer_aggregated_metrics into a list called customer_records by looping through the table and appending each row.
Use an inline agent in "pro" mode with this instruction:
"Analyze the provided customer aggregated metrics data: {customer_records}. This data contains real customer records with actual customer IDs and performance scores. Identify and return the top 2 performing customers based on their aggregated scores from this actual data. Do not generate fictional customer IDs - use only the real customer IDs present in the provided customer records data. Return the actual customer information including the real customer IDs and their corresponding scores from the data."
Set the output schema to an object with a required property "top_customers" which is an array (minContains 2, maxContains 2) of objects. Each object has "customer_id" (string, required) and "score" (number).
Give the agent these tools: python_repl (coding tool) and the configured MCP tools for customer lookup.
Log the result: "top_customers are:" followed by the top_customers value.
Store the top_customers list. Create a helper function called generate_timestamp that returns the current datetime formatted as "%Y%m%d_%H%M%S". Call it and store as timestamp.
Create an empty list called bonus_letters.
For each customer in top_customers:
1. Get the customer_id from the customer object.
2. Create a PDF using create_pdf with the following HTML content:
   - Style: body with font-family Arial, line-height 1.6, margin 40px, color #333
   - A "header" div centered with h2 "Customer Retention Department" and italic paragraph "Valued Customer Appreciation Program"
   - A "content" div containing:
   - Bold greeting: "Dear Valued Customer (ID: {customer_id}),"
   - Paragraph expressing appreciation for continued partnership
   - Paragraph acknowledging past service issues and offering heartfelt apologies, mentioning their feedback has been invaluable
   - A "highlight" div (background-color #f0f8ff, padding 15px, border-left 4px solid #007acc, margin 20px 0) containing bold text: "As a gesture of our commitment to your satisfaction and our appreciation for your loyalty, we are pleased to offer you a $100 bonus credit."
   - Paragraph about the bonus reflecting genuine desire to make things right and mutual success
   - Paragraph about enhanced service protocols and dedicated customer success team
   - Paragraph hoping for opportunity to demonstrate renewed commitment
   - A "signature" div with margin-top 40px containing:
   - "With sincere regards and appreciation,"
   - A line break
   - Bold "Customer Retention Team", then "Customer Success Department", then italic "Dedicated to Your Success"
3. Upload the PDF to S3 bucket "contactcenterbucketdemo" with Key = "output/" + customer_id + timestamp + ".pdf"
4. Append the PDF to the bonus_letters list.
After the loop completes, log: "Successfully generated bonus letters for top 2 customers"
Have all the above under one step
To test and deploy the automation
Validate the automation end to end, then commit and deploy it so it can run on a schedule.
- In the canvas, choose Debug (or Test) to run the automation. It runs on its own, downloading the at-risk customers file from Amazon S3 through the Download file step. Review each step’s output in the logs panel.
- Confirm the scoring step returns the top two customers, the letters reference the correct customer issues, and the S3 upload completes successfully.
- When the run is correct, choose Commit to create a version.
- Choose Deploy, select the committed version, and confirm the required credentials and connections (your Amazon S3 connection and the mcp-customer-score connector).
- To run the automation on a schedule, on the Deployment page choose Create Trigger, then set the frequency (or a cron expression), start time, and time zone.
For more details refer to the following links.
https://docs.aws.amazon.com/quick/latest/userguide/testing-automations.html
https://docs.aws.amazon.com/quick/latest/userguide/deploying-automations.html
Results
After deploying this pipeline in a test environment with historical contact center data, the team measured improvements across four dimensions: response time, retention rates, offer acceptance, and time to deploy. Internal testing with sample data produced these results. Your implementation may vary.
- Response time dropped from days of manual identification and drafting to minutes of automated execution.
- Retention rates improved among flagged customers compared to the previous reactive approach. Faster outreach, while the experience is still fresh, drove this improvement.
- Offer acceptance increased when letters referenced the customer’s specific issue rather than offering a generic discount.
- Time to deploy took less than one day. Business users built the full workflow through natural language and point-and-click screens.
Troubleshooting
The following table lists common issues and their resolutions.
| Symptom | Cause | Resolution |
| Chat Agent returns “No data found” | Space indexing incomplete | Verify ContactSpace status. Wait for the Ready indicator before running queries. |
| Sentiment analysis is generic | Transcripts not indexed | Verify call transcript documents are uploaded to the Space Documents section. |
| Automation scores no customers or the wrong ones | At-risk JSON not found, or the agent did not receive it | Confirm at_risk_customers.json exists at the Amazon S3 path the Download file step references, and that the scoring agent’s instructions reference the downloaded variable. |
| MCP Action returns timeout | Endpoint not responding | Increase the MCP Action timeout or reduce the dataset scope. |
| Letters are generic or missing customer details | Letter agent did not receive the scored results | Confirm the letter agent’s prompt references the scoring step’s output variable (inserted with @). |
Cleaning up
To avoid ongoing costs when you no longer need these resources:
- Delete the Automate workflow.
- Delete the Flow.
- Remove input datasets and generated letters from your S3 bucket:
- Deregister the custom MCP Action endpoint if it was created specifically for this workflow.
- Remove uploaded data from ContactSpace if no longer needed.
Conclusion
This walkthrough demonstrated how to build a customer retention pipeline that goes from raw contact center data to targeted retention actions, without writing application code. The pipeline combines KPI monitoring through Quick Dashboard and AI-powered transcript analysis through the Chat Agent. It adds repeatable automation through Quick Flows and multi-step processing through Quick Automate.
After the initial developer setup (Lambda function and API Gateway), business users built and operated the remaining components through natural language and point-and-click interfaces. The MCP Action connector extended the pipeline with custom scoring logic that reflects your organization’s specific retention criteria.
Apply this same pattern to adjacent use cases: client account health monitoring, compliance risk escalation, or proactive service recovery. Start by connecting your data to a Quick Space and asking questions through the Chat Agent. Once you have the right analysis, convert it to a Flow and orchestrate the workflow with Automate.
For more information, refer to the Amazon Quick documentation. To explore the MCP Action framework, refer to the MCP action framework.
About the authors
Author: Vaidy Janardhanam