

Establishing a data perimeter on AWS: Allow access to company data only from expected networks
To accomplish this, you should be familiar with the expected network access patterns and establish organization-wide guardrails to limit access to known networks… Additionally, you should verify that the credentials associated with your AWS Identity and Access Management (IAM) principals are only…
A key part of protecting your organization’s non-public, sensitive data is to understand who can access it and from where. One of the common requirements is to restrict access to authorized users from known locations. To accomplish this, you should be familiar with the expected network access patterns and establish organization-wide guardrails to limit access to known networks. Additionally, you should verify that the credentials associated with your AWS Identity and Access Management (IAM) principals are only usable within these expected networks. On Amazon Web Services (AWS), you can use the network perimeter to apply network coarse-grained controls on your resources and principals. In this fourth blog post of the Establishing a data perimeter on AWS series, we explore the benefits and implementation considerations of defining your network perimeter.
The network perimeter is a set of coarse-grained controls that help you verify that your identities and resources can only be used from expected networks.
To achieve these security objectives, you first must define what expected networks means for your organization. Expected networks usually include approved networks your employees and applications use to access your resources, such as your corporate IP CIDR range and your VPCs. There are also scenarios where you need to permit access from networks of AWS services acting on your behalf or networks of trusted third-party partners that you integrate with. You should consider all intended data access patterns when you create the definition of expected networks. Other networks are considered unexpected and shouldn’t be allowed access.
Security risks addressed by the network perimeter
The network perimeter helps address the following security risks:
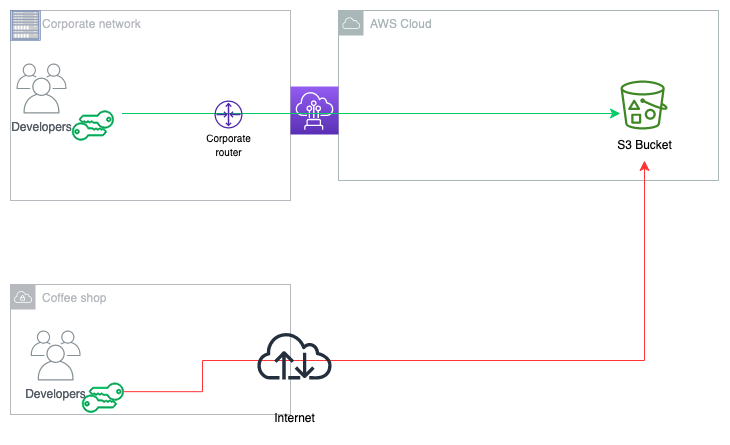
Unintended information disclosure through credential use from non-corporate networks
It’s important to consider the security implications of having developers with preconfigured access stored on their laptops. For example, let’s say that to access an application, a developer uses a command line interface (CLI) to assume a role and uses the temporary credentials to work on a new feature. The developer continues their work at a coffee shop that has great public Wi-Fi while their credentials are still valid. Accessing data through a non-corporate network means that they are potentially bypassing their company’s security controls, which might lead to the unintended disclosure of sensitive corporate data in a public space.
Unintended data access through stolen credentials
Organizations are prioritizing protection from credential theft risks, as threat actors can use stolen credentials to gain access to sensitive data. For example, a developer could mistakenly share credentials from an Amazon EC2 instance CLI access over email. After credentials are obtained, a threat actor can use them to access your resources and potentially exfiltrate your corporate data, possibly leading to reputational risk.
Figure 1 outlines an undesirable access pattern: using an employee corporate credential to access corporate resources (in this example, an Amazon Simple Storage Service (Amazon S3) bucket) from a non-corporate network.

Figure 1: Unintended access to your S3 bucket from outside the corporate network
Implementing the network perimeter
During the network perimeter implementation, you use IAM policies and global condition keys to help you control access to your resources based on which network the API request is coming from. IAM allows you to enforce the origin of a request by making an API call using both identity policies and resource policies.
The following two policies help you control both your principals and resources to verify that the request is coming from your expected network:
- Service control policies (SCPs) are policies you can use to manage the maximum available permissions for your principals. SCPs help you verify that your accounts stay within your organization’s access control guidelines.
- Resource based policies are policies that are attached to resources in each AWS account. With resource based policies, you can specify who has access to the resource and what actions they can perform on it. For a list of services that support resource based policies, see AWS services that work with IAM.
With the help of these two policy types, you can enforce the control objectives using the following IAM global condition keys:
- aws:SourceIp: You can use this condition key to create a policy that only allows request from a specific IP CIDR range. For example, this key helps you define your expected networks as your corporate IP CIDR range.
- aws:SourceVpc: This condition key helps you check whether the request comes from the list of VPCs that you specified in the policy. In a policy, this condition key is used to only allow access to an S3 bucket if the VPC where the request originated matches the VPC ID listed in your policy.
- aws:SourceVpce: You can use this condition key to check if the request came from one of the VPC endpoints specified in your policy. Adding this key to your policy helps you restrict access to API calls that originate from VPC endpoints that belong to your organization.
- aws:ViaAWSService: You can use this key to write a policy to allow an AWS service that uses your credentials to make calls on your behalf. For example, when you upload an object to Amazon S3 with server-side encryption with AWS Key Management Service (AWS KMS) on, S3 needs to encrypt the data on your behalf. To do this, S3 makes a subsequent request to AWS KMS to generate a data key to encrypt the object. The call that S3 makes to AWS KMS is signed with your credentials and originates outside of your network.
- aws:PrincipalIsAWSService: This condition key helps you write a policy to allow AWS service principals to access your resources. For example, when you create an AWS CloudTrail trail with an S3 bucket as a destination, CloudTrail uses a service principal, cloudtrail.amazonaws.com, to publish logs to your S3 bucket. The API call from CloudTrail comes from the service network.
The following table summarizes the relationship between the control objectives and the capabilities used to implement the network perimeter.
| Control objective | Implemented by using | Primary IAM capability |
| My resources can only be accessed from expected networks. | Resource-based policies | aws:SourceIp aws:SourceVpc aws:SourceVpce aws:ViaAWSService aws:PrincipalIsAWSService |
| My identities can access resources only from expected networks. | SCPs | aws:SourceIp aws:SourceVpc aws:SourceVpce aws:ViaAWSService |
My resources can only be accessed from expected networks
Start by implementing the network perimeter on your resources using resource based policies. The perimeter should be applied to all resources that support resource- based policies in each AWS account. With this type of policy, you can define which networks can be used to access the resources, helping prevent access to your company resources in case of valid credentials being used from non-corporate networks.
The following is an example of a resource-based policy for an S3 bucket that limits access only to expected networks using the aws:SourceIp, aws:SourceVpc, aws:PrincipalIsAWSService, and aws:ViaAWSService condition keys. Replace <my-data-bucket>, <my-corporate-cidr>, and <my-vpc> with your information.
The Deny statement in the preceding policy has four condition keys where all conditions must resolve to true to invoke the Deny effect. Use the IfExists condition operator to clearly state that each of these conditions will still resolve to true if the key is not present on the request context.
This policy will deny Amazon S3 actions unless requested from your corporate CIDR range (NotIpAddressIfExists with aws:SourceIp), or from your VPC (StringNotEqualsIfExists with aws:SourceVpc). Notice that aws:SourceVpc and aws:SourceVpce are only present on the request if the call was made through a VPC endpoint. So, you could also use the aws:SourceVpce condition key in the policy above, however this would mean listing every VPC endpoint in your environment. Since the number of VPC endpoints is greater than the number of VPCs, this example uses the aws:SourceVpc condition key.
This policy also creates a conditional exception for Amazon S3 actions requested by a service principal (BoolIfExists with aws:PrincipalIsAWSService), such as CloudTrail writing events to your S3 bucket, or by an AWS service on your behalf (BoolIfExists with aws:ViaAWSService), such as S3 calling AWS KMS to encrypt or decrypt an object.
Extending the network perimeter on resource
There are cases where you need to extend your perimeter to include AWS services that access your resources from outside your network. For example, if you’re replicating objects using S3 bucket replication, the calls to Amazon S3 originate from the service network outside of your VPC, using a service role. Another case where you need to extend your perimeter is if you integrate with trusted third-party partners that need access to your resources. If you’re using services with the described access pattern in your AWS environment or need to provide access to trusted partners, the policy EnforceNetworkPerimeter that you applied on your S3 bucket in the previous section will deny access to the resource.
In this section, you learn how to extend your network perimeter to include networks of AWS services using service roles to access your resources and trusted third-party partners.
AWS services that use service roles and service-linked roles to access resources on your behalf
Service roles are assumed by AWS services to perform actions on your behalf. An IAM administrator can create, change, and delete a service role from within IAM; this role exists within your AWS account and has an ARN like arn:aws:iam::<AccountNumber>:role/<RoleName>. A key difference between a service-linked role (SLR) and a service role is that the SLR is linked to a specific AWS service and you can view but not edit the permissions and trust policy of the role. An example is AWS Identity and Access Management Access Analyzer using an SLR to analyze resource metadata. To account for this access pattern, you can exempt roles on the service-linked role dedicated path arn:aws:iam::<AccountNumber>:role/aws-service-role/*, and for service roles, you can tag the role with the tag network-perimeter-exception set to true.
If you are exempting service roles in your policy based on a tag-value, you must also include a policy to enforce the identity perimeter on your resource as shown in this sample policy. This helps verify that only identities from your organization can access the resource and cannot circumvent your network perimeter controls with network-perimeter-exception tag.
Partners accessing your resources from their own networks
There might be situations where your company needs to grant access to trusted third parties. For example, providing a trusted partner access to data stored in your S3 bucket. You can account for this type of access by using the aws:PrincipalAccount condition key set to the account ID provided by your partner.
The following is an example of a resource-based policy for an S3 bucket that incorporates the two access patterns described above. Replace <my-data-bucket>, <my-corporate-cidr>, <my-vpc>, <third-party-account-a>, <third-party-account-b>, and <my-account-id> with your information.
There are four condition operators in the policy above, and you need all four of them to resolve to true to invoke the Deny effect. Therefore, this policy only allows access to Amazon S3 from expected networks defined as: your corporate IP CIDR range (NotIpAddressIfExists and aws:SourceIp), your VPC (StringNotEqualsIfExists and aws:SourceVpc), networks of AWS service principals (aws:PrincipalIsAWSService), or an AWS service acting on your behalf (aws:ViaAWSService). It also allows access to networks of trusted third-party accounts (StringNotEqualsIfExists and aws:PrincipalAccount: <third-party-account-a>), and AWS services using an SLR to access your resources (ArnNotLikeIfExists and aws:PrincipalArn).
My identities can access resources only from expected networks
Applying the network perimeter on identity can be more challenging because you need to consider not only calls made directly by your principals, but also calls made by AWS services acting on your behalf. As described in access pattern 3 Intermediate IAM roles for data access in this blog post, many AWS services assume an AWS service role you created to perform actions on your behalf. The complicating factor is that even if the service supports VPC-based access to your data — for example AWS Glue jobs can be deployed within your VPC to access data in your S3 buckets — the service might also use the service role to make other API calls outside of your VPC. For example, with AWS Glue jobs, the service uses the service role to deploy elastic network interfaces (ENIs) in your VPC. However, these calls to create ENIs in your VPC are made from the AWS Glue managed network and not from within your expected network. A broad network restriction in your SCP for all your identities might prevent the AWS service from performing tasks on your behalf.
Therefore, the recommended approach is to only apply the perimeter to identities that represent the highest risk of inappropriate use based on other compensating controls that might exist in your environment. These are identities whose credentials can be obtained and misused by threat actors. For example, if you allow your developers access to the Amazon Elastic Compute Cloud (Amazon EC2) CLI, a developer can obtain credentials from the Amazon EC2 instance profile and use the credentials to access your resources from their own network.
To summarize, to enforce your network perimeter based on identity, evaluate your organization’s security posture and what compensating controls are in place. Then, according to this evaluation, identify which service roles or human roles have the highest risk of inappropriate use, and enforce the network perimeter on those identities by tagging them with data-perimeter-include set to true.
The following policy shows the use of tags to enforce the network perimeter on specific identities. Replace <my-corporate-cidr>, and <my-vpc> with your own information.
The above policy statement uses the Deny effect to limit access to expected networks for identities with the tag data-perimeter-include attached to them (StringEquals and aws:PrincipalTag/data-perimeter-include set to true). This policy will deny access to those identities unless the request is done by an AWS service on your behalf (aws:ViaAWSService), is coming from your corporate CIDR range (NotIpAddressIfExists and aws:SourceIp), or is coming from your VPCs (StringNotEqualsIfExists with the aws:SourceVpc).
Amazon EC2 also uses a special service role, also known as infrastructure role, to decrypt Amazon Elastic Block Store (Amazon EBS). When you mount an encrypted Amazon EBS volume to an EC2 instance, EC2 calls AWS KMS to decrypt the data key that was used to encrypt the volume. The call to AWS KMS is signed by an IAM role, arn:aws:iam::*:role/aws:ec2-infrastructure, which is created in your account by EC2. For this use case, as you can see on the preceding policy, you can use the aws:PrincipalArn condition key to exclude this role from the perimeter.
IAM policy samples
This GitHub repository contains policy examples that illustrate how to implement network perimeter controls. The policy samples don’t represent a complete list of valid access patterns and are for reference only. They’re intended for you to tailor and extend to suit the needs of your environment. Make sure you thoroughly test the provided example policies before implementing them in your production environment.
Conclusion
In this blog post you learned about the elements needed to build the network perimeter, including policy examples and strategies on how to extend that perimeter. You now also know different access patterns used by AWS services that act on your behalf, how to evaluate those access patterns, and how to take a risk-based approach to apply the perimeter based on identities in your organization.
For additional learning opportunities, see the Data perimeters on AWS. This information resource provides additional materials such as a data perimeter workshop, blog posts, whitepapers, and webinar sessions.
If you have feedback about this post, submit comments in the Comments section below. If you have questions about this post, start a new thread on the AWS Security, Identity, & Compliance re:Post or contact AWS Support.
Want more AWS Security news? Follow us on Twitter.
Author: Laura Reith