Building gaming MLOps pipelines with Amazon Bedrock Agents

TutoSartup excerpt from this article:
Amazon SageMaker AI and MLOps Amazon SageMaker AI provides powerful MLOps capabilities… We will demonstrate how to leverage Amazon Bedrock Agents to create an intelligent MLOps assistant that streamlines the entire CI/CD pipeline construction and management process… We will combine the conve…

Colorful but old gas pipes with rust. Symmetrical industrial shot

In today’s competitive gaming landscape, machine learning (ML) has become essential for delivering personalized experiences, optimizing game mechanics, and driving business outcomes. However, traditional approaches to building and deploying ML systems often require extensive DevOps expertise, manual pipeline configuration, and complex infrastructure management that can slow down innovation and time-to-market. Game studios need agile, automated solutions that can rapidly iterate on ML models, while maintaining production reliability and scalability across diverse gaming use cases.

Amazon SageMaker AI and MLOps

Amazon SageMaker AI provides powerful MLOps capabilities. However, orchestrating the complete continuous integration and continuous delivery (CI/CD) pipeline—from model development to production deployment—typically involves navigating multiple Amazon Web Services (AWS) services. These include managing intricate dependencies and coordinating approval workflows. This complexity can create barriers for game studios, or game analytics teams, who want to focus on building great predictive models rather than wrestling with infrastructure.

We will demonstrate how to leverage Amazon Bedrock Agents to create an intelligent MLOps assistant that streamlines the entire CI/CD pipeline construction and management process. We will combine the conversational capabilities of Amazon Bedrock with the robust MLOps features of Amazon SageMaker AI. With this solution game teams can create, manage, and deploy gaming prediction models using natural language commands.

Our solution addresses common pain points in gaming machine learning model build, train, and deploy pipelines:

  • Rapid experimentation: Quickly spin up new prediction experiments without infrastructure overhead
  • Automated workflows: Streamline the path from model training to production deployment
  • Approval management: Handle model approvals through conversational interfaces
  • Multi-project coordination: Manage multiple game titles and their respective models from a single interface

By the end of this walkthrough we will have created a fully functional MLOps agent, capable of managing complex machine learning workflows for gaming analytics. Your team can then deploy the gaming prediction solution with conversational commands such as, “Create a player churn CI/CD pipeline for my mobile puzzle game,” or “Show status of build pipeline execution”.

Prerequisites

Before starting you will need to make certain you have done or have the following:

Create and configure an MLOps management agent

Set up the foundation infrastructure

Before creating the Amazon Bedrock Agent, establish the core AWS infrastructure that will support the MLOps workflows.

The infrastructure includes two AWS Identity and Access Management (IAM) roles:

  • mlops-agent-role
  • lambda-agent-role

Trust relationships and policies for each role have been provided and referenced in the create role steps.

Roles

First, create an mlops-agent-role with attached inline policies to enable the Amazon Bedrock Agent to access required AWS services that support an MLOps pipeline.

  • Create an IAM role, mlops-agent-role with Trusted entity type AWS service and use case Lambda
  • Select the Trust relationships tab, Edit the trust policy and paste the trust relationship policy in the trusted entities editor
  • Add permissions with Create inline policy and paste the mlops-agent-policy in the policy editor box
  • Create a second inline policy for AWS Lambda invocation access, and paste the lambda-invoke-access policy in the policy editor
  • Replace ACCOUNT_ID with your AWS account ID in the policy document

Next, create an IAM role that allows the AWS Lambda action invocation to access required AWS services.

  • Create an IAM role called lambda-agent-role with trusted entity type AWS service and use case Lambda
  • Search for the AWSLambdaBasicExecutionRole managed policy and add
  • Select the Trust relationships tab, Edit the trust policy and paste the trust relationship policy in the trusted entities editor
  • Next, add permissions with Create inline policy and add a lambda-agent-policy

Add a policy to the AWS managed AmazonSageMakerServiceCatalogProductsLaunchRole.

MLOps AWS Lambda function

The AWS Lambda function serves as the backend engine for the Amazon Bedrock Agent, handling all MLOps operations through an API. The Amazon Bedrock action group invocation calls the AWS Lambda function using an action group schema that maps endpoints to actions.

Use the following steps to create the AWS Lambda function:

  • In the console, select AWS Lambda
  • Select Author from scratch
  • Enter a Function name, we used: mlops-project-management
  • Choose a Python 3.1x Runtime
  • Select x86_64
  • Change the default execution role to use the existing lambda-agent-role previously created
  • Select the Create function button
AWS Lambda function creation interface. The page shows a form with three creation options at the top: 'Author from scratch' (which is selected), 'Use a blueprint', and 'Container image'. In the Basic Information section, the function name field contains 'mlops-project-management', the Runtime dropdown shows 'Python 3.13' is selected, and the Architecture section has 'x86_64' selected. In the Permissions section, 'Use an existing role' is selected with 'lambda-agent-role' chosen from a dropdown. Breadcrumb navigation at the top shows 'Lambda > Functions > Create function', and there's a blue 'Create function' button in the bottom right corner of the interface.

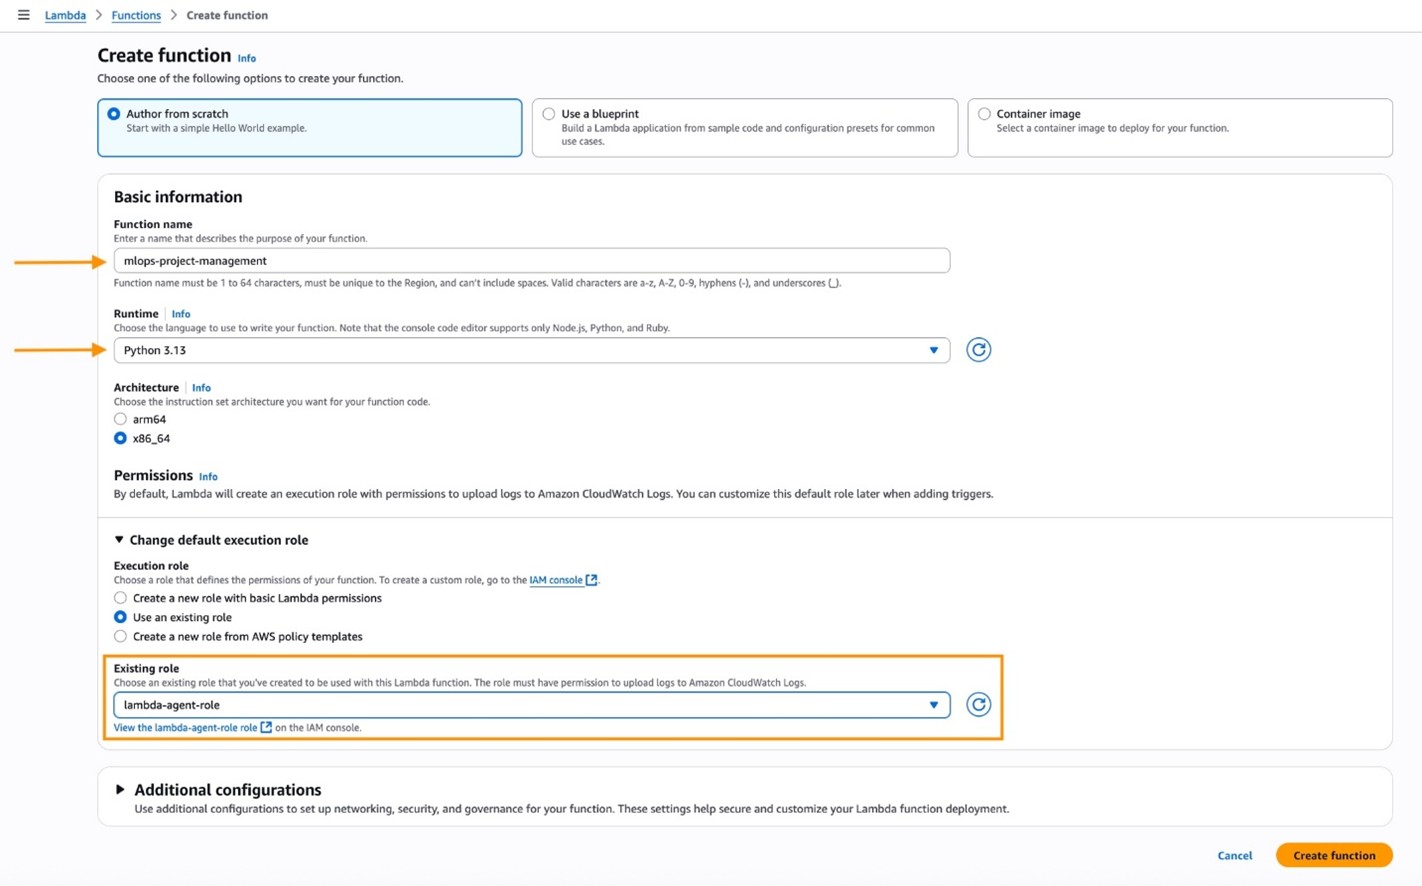
Figure 1: Create AWS Lambda function.

  • Download the AWS Lambda function file or clone the function from our GitHub AWS Samples repository
  • Copy and paste the function code into the Lambda code window
The AWS Lambda function management interface showing the 'mlops-project-management' function. The interface displays a function overview section at the top with buttons for Throttle, Copy ARN, Export to Infrastructure Composer, and Download. Below are navigation tabs with 'Code' currently selected. The main area shows a code editor containing Python code with multiple import statements including boto3, logging, json, and others. On the left side is a file explorer showing lambda_function.py under the MLOPS-PROJECT-MANAGEMENT directory. At the bottom of the interface are Deploy and Test buttons with their respective available actions indicated. The interface provides a comprehensive view of how Lambda functions are managed in the AWS Management Console.

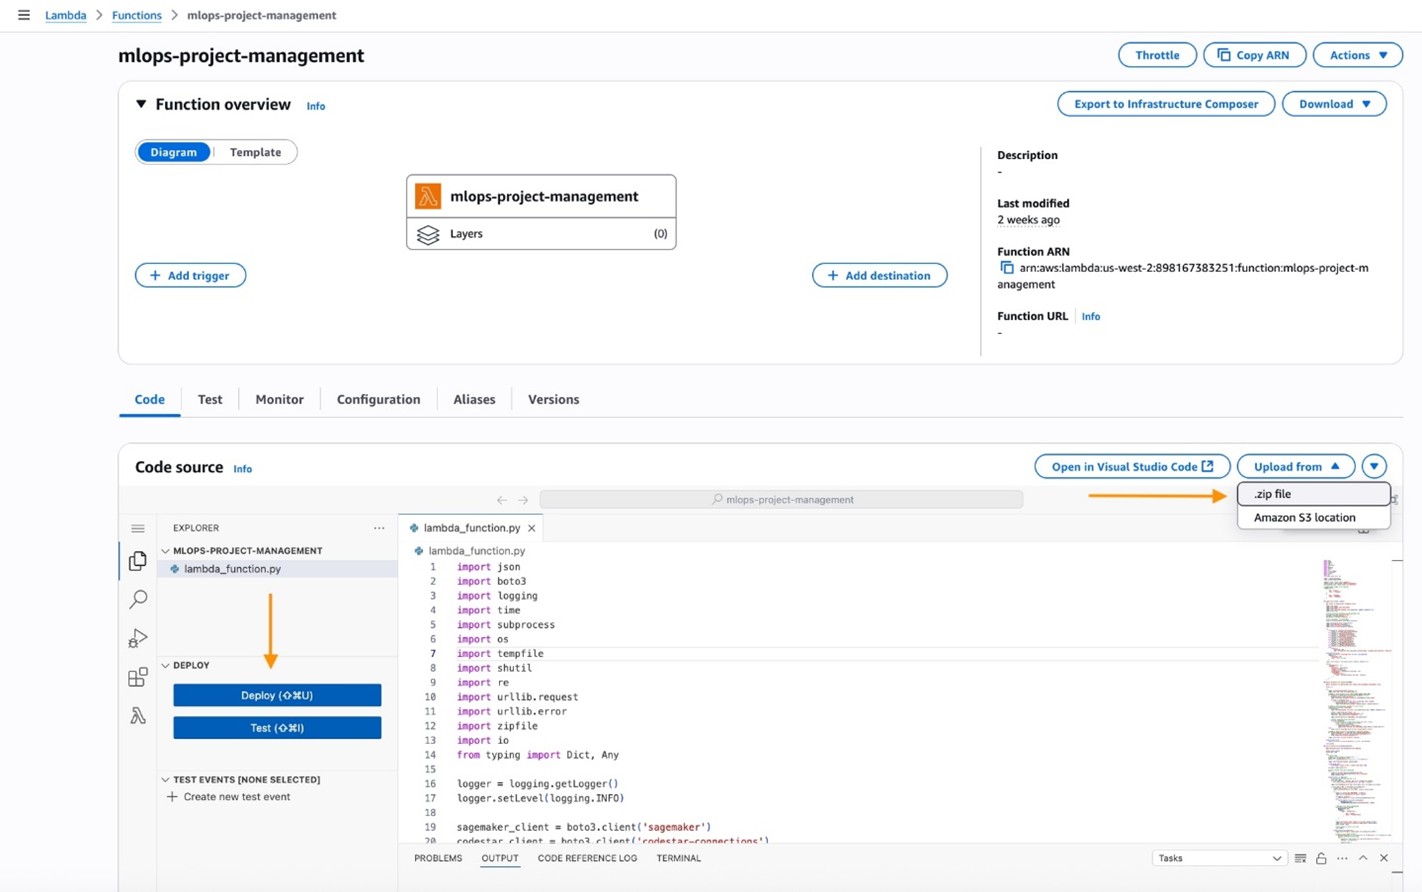
Figure 2: Add code to AWS Lambda function.

  • Select the Configuration tab to access the Function and General configuration
  • Choose the Edit button and update the function Timeout value to 15 minutes
  • On the Configuration tab, select Permissions and Add permissions for Resource-based policy statements:
    1. Choose AWS Service
    2. For Service, select other
    3. Statement ID: bedrock-agent-invoke
    4. Principal: amazonaws.com
    5. Source ARN: arn:aws:bedrock:<region>:<accountid>:agent/*
    6. Action: lambda:InvokeFunction and Save
  • Deploy the function
The AWS Lambda console showing the configuration page for a function named "mlops-project-management". The page displays a breadcrumb navigation at the top showing "Lambda" followed by "Functions" followed by "mlops-project-management". The main content area shows a "Function overview" section with a diagram view selected, displaying an orange Lambda function icon labeled "mlops-project- management" with "Layers (0)" beneath it. Below the diagram are two buttons: "Add trigger" on the left and "Add destination" on the right, connected by an orange arrow pointing downward from the function icon. The right side panel shows function details including "Description" (empty), "Last modified" showing "8 minutes ago", "Function ARN" displaying "arn:aws:lambda:us-west-2:898167383251:function:mlops-project- management", and "Function URL" (empty). At the bottom of the page are tabs for "Code", "Test", "Monitor", "Configuration" (currently selected), "Aliases", and "Versions". The Configuration tab shows a left sidebar with options for "General configuration" (selected), "Triggers", "Permissions", and "Destinations". The main configuration panel displays "General configuration" with fields for "Description" (empty), "Memory" showing "128 MB", "Ephemeral storage" showing "512 MB", and "SnapStart" showing "None". Most prominently, there is an orange-highlighted box around the "Timeout" field which shows "0 min 3 sec".

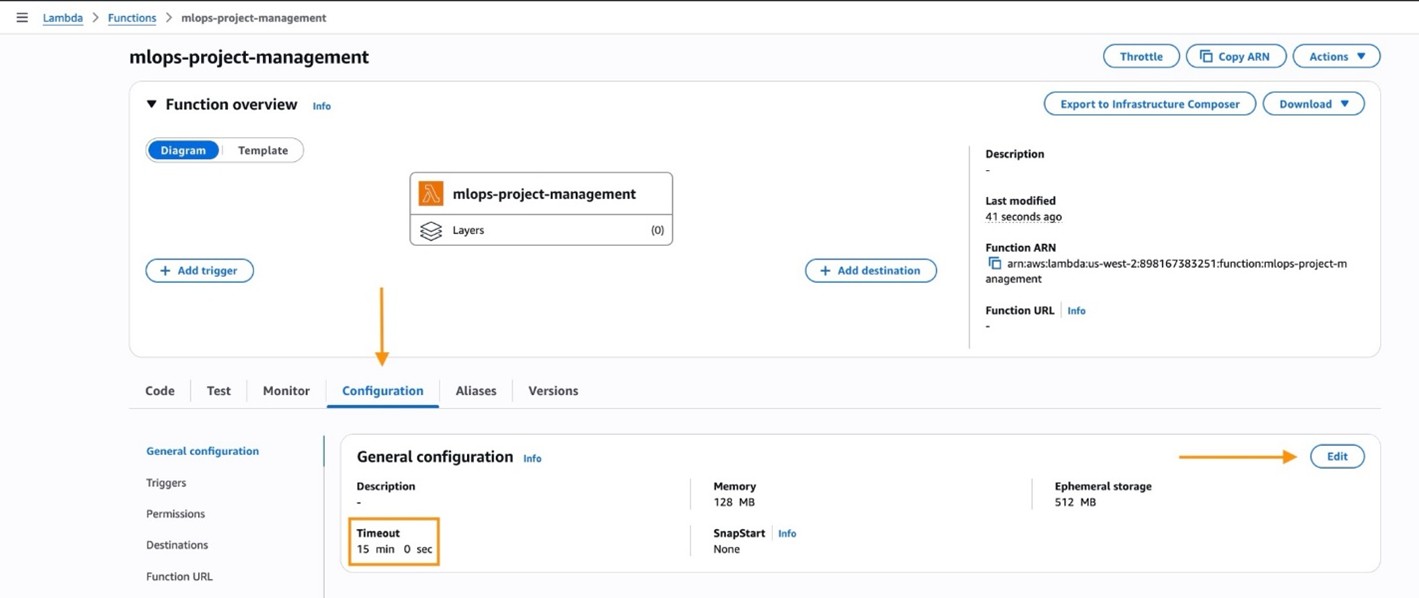
Figure 3: Set AWS Lambda function timeout value.

The function is now ready to act as an Amazon Bedrock Agent and support the following actions:

  • /configure-code-connection – Set up AWS CodeConnections connection for GitHub integration
  • /create-mlops-project – Create a new SageMaker MLOps project with GitHub integration
  • /create-feature-store-group – Create SageMaker Feature Store Feature Group
  • /create-model-group – Create SageMaker Model Package Group
  • /create-mlflow-server – Create Amazon SageMaker AI MLflow Tracking Server
  • /build-cicd-pipeline – Build CI/CD pipeline using seed code from GitHub
  • /manage-model-approval – Manage model package approval in Amazon SageMaker AI Model Registry
  • /manage-staging-approval – List models in staging ready for manual approval
  • /manage-project-lifecycle – Handle project updates and lifecycle management
  • /list-mlops-templates – List available MLOps AWS Service Catalog templates

In addition, the Lambda function automatically manages:

  • Repository seed code population from GitHub
  • Dynamic AWS CodeBuild build script generation with project-specific parameters
  • Pipeline parameter injection and configuration
  • Multi-stage approval workflow management
  • Error handling and detailed logging for troubleshooting

Amazon Bedrock MLOps Agent

Use the following steps to create the agent:

  • In the console, Navigate to Amazon Bedrock
  • Select Agents from the left navigation panel under Build
  • Choose Create Agent
  • Configure the agent with these settings:
    1. Agent Name: MLOpsOrchestrator
    2. Description: Intelligent assistant for gaming MLOps CI/CD pipeline management
    3. Foundation Model: US Anthropic Claude 3.7 Sonnet
    4. Use the existing service role, mlops-agent-role for the agent resource role
  • Configure the agent Instructions—provide instructions that establish the agent’s identity and capabilities by using the following:

You are an expert MLOps engineer specializing in SageMaker pipeline orchestration. Help users create, manage, and deploy ML models through automated CI/CD pipelines. Always follow AWS best practices and provide clear status updates.

Available actions include:

- Creating CodeConnections for GitHub integration
- Setting up MLOps projects and CI/CD pipelines
- Managing feature stores and MLflow tracking
- Handling model and deployment approvals

The Amazon Bedrock console showing the Agent builder interface for creating an agent named "MLOpsOrchestrator". The page displays a breadcrumb navigation at the top showing "Amazon Bedrock" followed by "Agents" followed by "MLOpsOrchestrator" followed by "Agent builder: MLOpsOrchestrator". The left sidebar contains a navigation menu with sections including "Discover" (with Overview, Model catalog, API keys), "Test" (with Chat/Text playground, Image/Video playground, Watermark detection), "Infer" (with Cross-region inference, Batch inference, Provisioned Throughput), "Tune" (with Custom models, Prompt router models, Imported models, Marketplace model deployment), and "Build" (with Agents highlighted in orange, Flows, Knowledge Bases, Automated Reasoning, Guardrails, Prompt Management, Data Automation). The main content area shows "Agent details" with fields for "Agent name" containing "MLOpsOrchestrator", "Agent description - optional" containing "AI agent for managing SageMaker MLOps CI/CD pipelines", and "Agent resource role" with radio buttons for "Create and use a new service role" and "Use an existing service role" (selected), with a dropdown showing "arn:aws:iam::898167383251:role/mlops-agent-role". Below that is a "Select model" section showing "Claude 3.7 Son..." with "v1" and "US Anthropic Claude 3.7 Sonnet" underneath. At the bottom is an "Instructions for the Agent" text area containing "You are an expert MLOps engineer specializing in SageMaker pipeline orchestration. Help users create, manage, and deploy ML models through automated CI/CD pipelines. Always follow AWS best practices and provide clear status updates." There are orange arrows pointing to the Agent name field, the existing service role selection, the Claude model selection, and the Agents menu item in the sidebar. At the top right are buttons for "Manual", "Assistant", "Test", "Prepare", "Save", and "Save and exit.

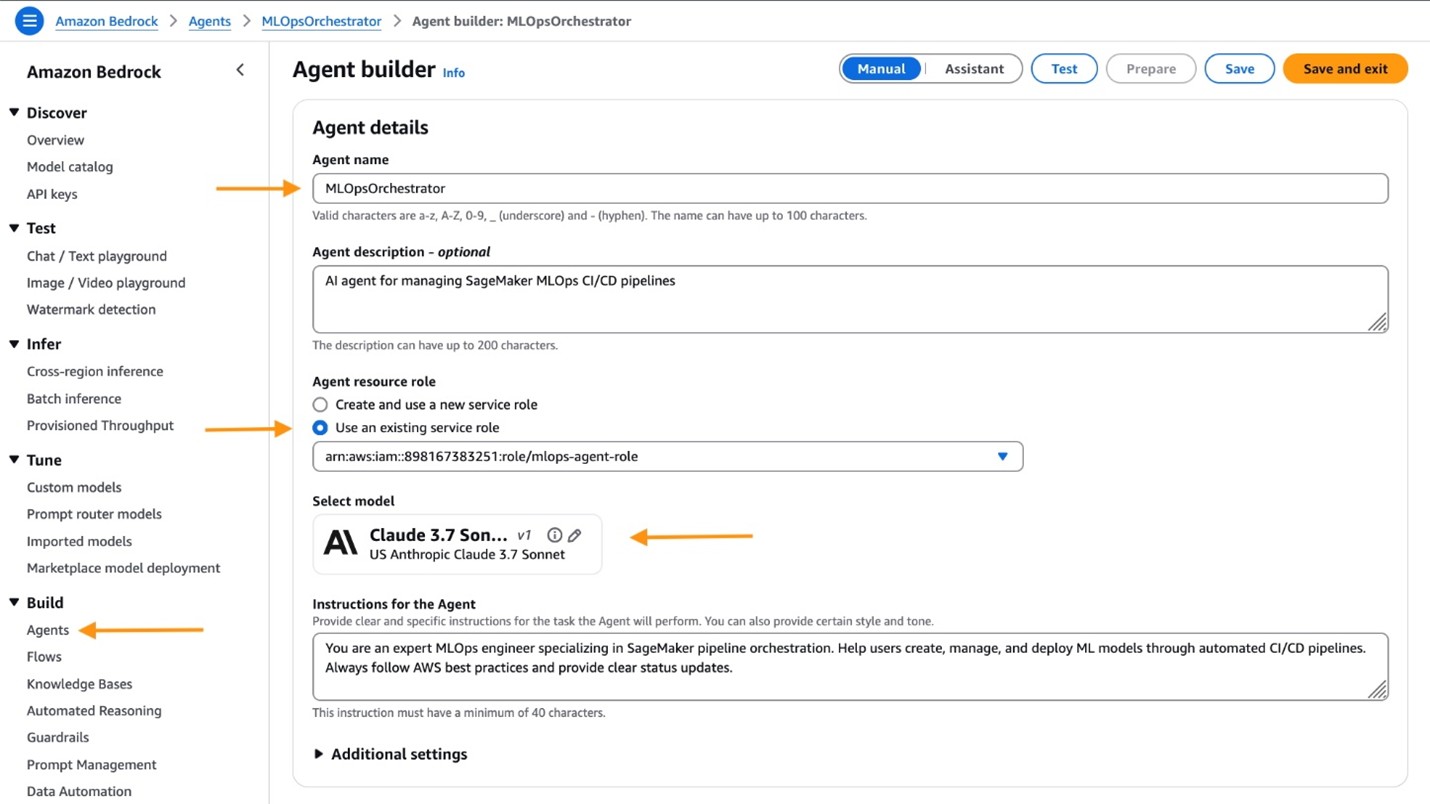
Figure 4: Create Amazon Bedrock Agent.

Amazon Bedrock Agent action groups

Use the following steps to create action groups:

  • In the Agent builder, under Action groups, Select Add
    • Enter the group name: ProjectManagement
    • Enter the following description: Actions for managing SageMaker MLOps projects and GitHub integration
    • Select the Action group type: Define with API schemas
    • Under Action group invocation, make certain to select: Select an existing Lambda function
    • Under Select Lambda function, select mlops-project-management, with Function version as $LATEST
The Amazon Bedrock console showing the "Edit ProjectManagement" action group configuration page. The page displays a breadcrumb navigation at the top showing "Amazon Bedrock" followed by "Agents" followed by "MLOpsOrchestrator" followed by "Agent builder: MLOpsOrchestrator" followed by "Action group details" followed by "Edit action". The left sidebar contains a navigation menu with sections including "Discover" (with Overview, Model catalog, API keys), "Test" (with Chat/Text playground, Image/Video playground, Watermark detection), "Infer" (with Cross-region inference, Batch inference, Provisioned Throughput), "Tune" (with Custom models, Prompt router models, Imported models, Marketplace model deployment), "Build" (with Agents, Flows, Knowledge Bases, Automated Reasoning, Guardrails, Prompt Management, Data Automation), "Assess" (with Evaluations), and "Configure and learn" (with Settings, Model access, User guide, Bedrock Service Terms). The main content area shows "Action group details" with a field for "Enter Action group name" containing "ProjectManagement" and a "Description - optional" field containing "Actions for managing SageMaker MLOps projects and GitHub integration". Below that is an "Action group type" section with two radio button options: "Define with function details" and "Define with API schemas" (selected). The "Action group invocation" section shows options for "Quick create a new Lambda function - recommended", "Select an existing Lambda function" (selected with an orange arrow pointing to it), and "Return control". Under "Select Lambda function" is a dropdown showing "mlops-project-management" with "$ LATEST" selected as the function version. The "Action group schema" section shows radio buttons for "Select an existing API schema" and "Define via in-line schema editor" (selected). Below is an "In-line OpenAPI schema" text editor containing JSON code that defines an MLOps Project Management API with various endpoints including "/configure-code-connection". At the bottom is an "Action status" section with radio buttons for "Enable" (selected with an orange arrow pointing to it) and "Disable". Orange arrows point to the "Define with API schemas" option, the "Select an existing Lambda function" option, the Lambda function dropdown, and the "Enable" option.

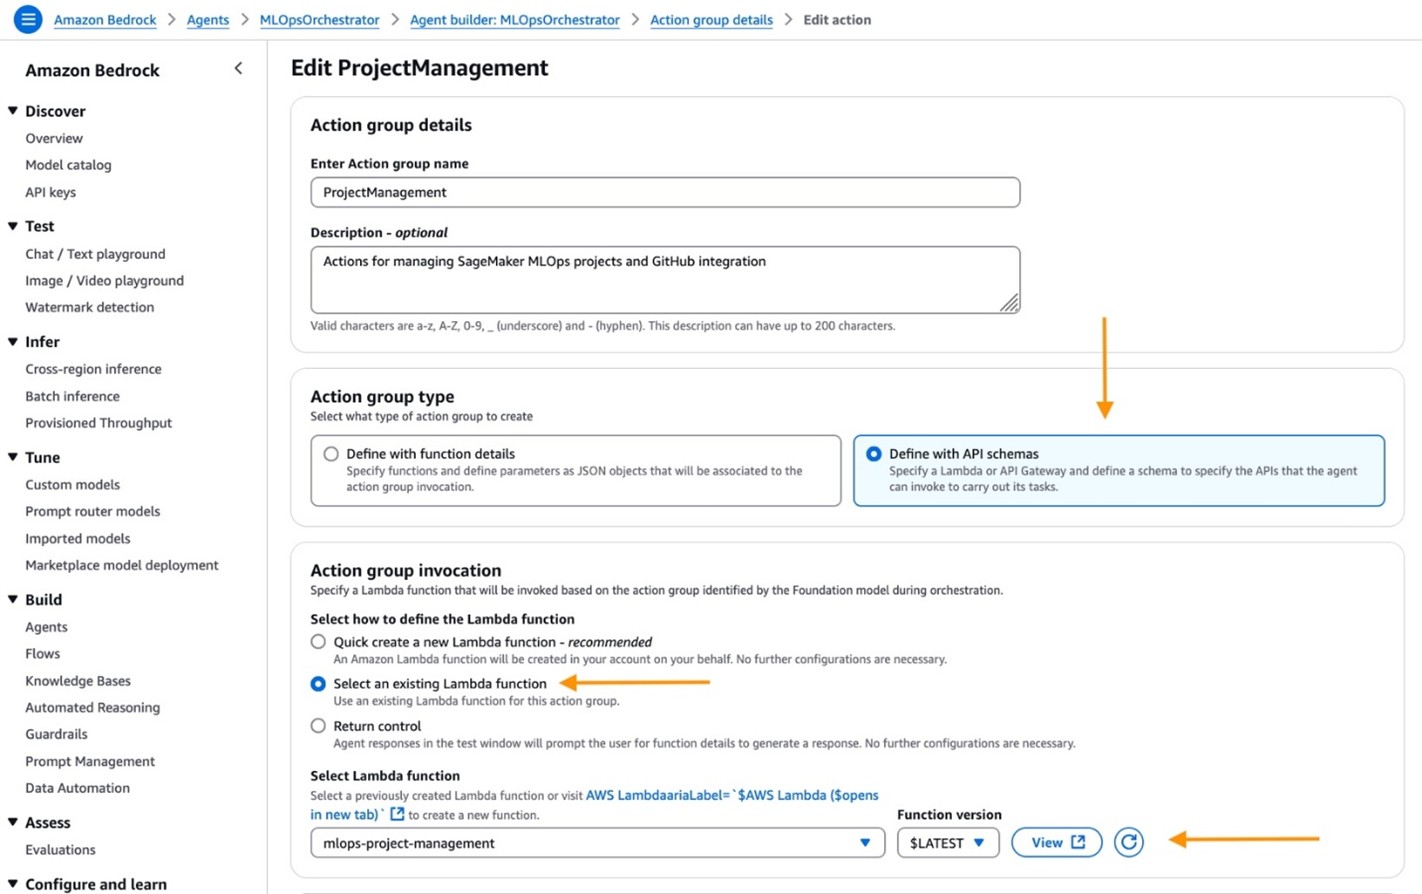
Figure 5: Configure Amazon Bedrock Agent action group.

  • Under Action group schema, select Define via in-line schema editor
  • Download the MLOps agent OpenAPI schema from the GitHub AWS Samples repository
  • Select JSON from the drop-down and paste the provided OpenAPI schema in the editor
  • Choose Save and exit
The Amazon Bedrock console showing the action group schema configuration page. The page displays a breadcrumb navigation at the top showing "Amazon Bedrock" followed by "Agents" followed by "MLOpsOrchestrator" followed by "Agent builder: MLOpsOrchestrator" followed by "Action group details" followed by "Edit action". The left sidebar contains a navigation menu with sections including "Discover" ( with Overview, Model catalog, API keys), "Test" (with Chat/Text playground, Image/Video playground, Watermark detection), "Infer" (with Cross-region inference, Batch inference, Provisioned Throughput), "Tune" ( with Custom models, Prompt router models, Imported models, Marketplace model deployment), "Build" (with Agents, Flows, Knowledge Bases, Automated Reasoning, Guardrails, Prompt Management, Data Automation), "Assess" (with Evaluations), and "Configure and learn" (with Settings, Model access, User guide, Bedrock Service Terms). The main content area shows a Lambda function dropdown with "mlops-project-management" selected and "$LATEST" as the function version. Below that is an "Action group schema" section with radio buttons for "Select an existing API schema" and "Define via in-line schema editor" (selected with an orange arrow pointing to it). The "In-line OpenAPI schema" text editor displays JSON code starting with line numbers, showing an OpenAPI specification with "openapi": "3.0.0", "info" containing "title": "MLOps Project Management API", "version": "2.3.0", and "description": "API for managing SageMaker MLOps projects, CI/CD pipelines, Feature Store, Model Registry, Model Approval, Staging Deployment Approval, and MLflow". The schema shows a "/configure-code-connection" path with POST method, including parameters for "connection_name" and other configuration details. At the bottom is an "Action status" section with radio buttons for "Enable" (selected with an orange arrow pointing to it) and "Disable". The bottom right shows buttons for "Cancel", "Save", and "Save and exit". Additional buttons visible include "Import schema", "Reset", and "JSON" dropdown.

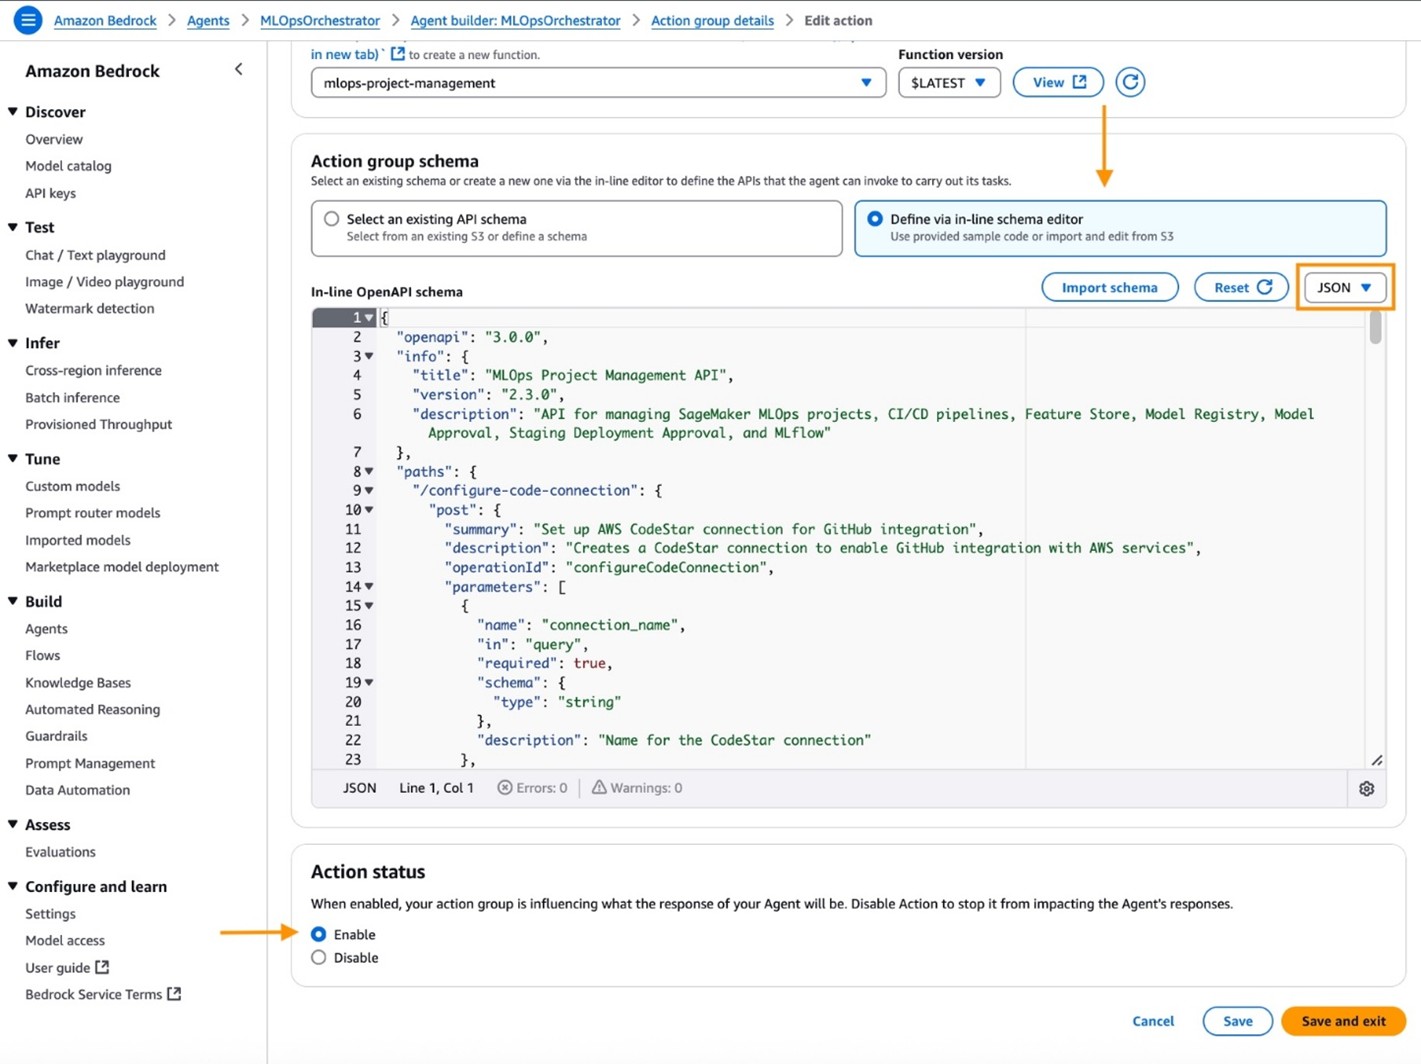
Figure 6: Create Amazon Bedrock Agent OpenAPI schema.

Use the MLOps agent

With the agent created and configured, it’s ready to use for launching AWS resources to support an MLOps CI/CD pipeline. As a foundation of the pipeline, an AWS Service Catalog template defines AWS CodeBuild projects, AWS CodePipeline pipelines, and SageMaker AI inference endpoints for staging and production.

Creating an Amazon SageMaker AI project launches these resources with configuration specified with the MLOps agent. Before creating an Amazon SageMaker AI project with the AWS Service Catalog template, you’ll need to set up several prerequisites.

These prerequisites include:

  • An AWS CodeConnection to access GitHub
  • A managed MLflow tracking server
  • A feature store with sample features for the MLOps template that handles model building, training, and deployment with third-party Git repositories
  • For the AWS Service Catalog template, create two empty private GitHub repositories:
    • player-churn-model-build
    • player-churn-model-deploy

To use the agent:

  • Select Test and Prepare in the Amazon Bedrock Agents console
  • Enter a prompt to create resources using natural language
    • Start with what MLOps tasks can you perform?
    • When using provided, example prompts, note created resources values and replace where appropriate
The Amazon Bedrock console showing the MLOpsOrchestrator agent overview page. The page displays a breadcrumb navigation at the top showing "Amazon Bedrock" followed by "Agents" followed by "MLOpsOrchestrator". The left sidebar contains a navigation menu with sections including "Discover" (with Overview, Model catalog, API keys), "Test" (with Chat/Text playground, Image/Video playground, Watermark detection), "Infer" (with Cross-region inference, Batch inference, Provisioned Throughput), "Tune" (with Custom models, Prompt router models, Imported models, Marketplace model deployment), "Build" (with Agents, Flows, Knowledge Bases, Automated Reasoning, Guardrails, Prompt Management, Data Automation), "Assess" (with Evaluations), and "Configure and learn" (with Settings, Model access, User guide, Bedrock Service Terms). The main content area shows "Agent overview" with details including Name "MLOpsOrchestrator", ID "YJESAOSVXP", Description "AI agent for managing SageMaker MLOps CI/CD pipelines", Status "PREPARED" with a green checkmark, Creation date "August 11, 2025, 16:02 (UTC-06:00)", Last prepared "September 05, 2025, 10:36 (UTC-06:00)", Permissions "arn:aws:iam::accountid:role/mlops-agent-role", Agent ARN "arn:aws:bedrock:us-west-2:accountid:agent/YJESAOSVXP", User Input "ENABLED", Memory "Disabled", Idle session timeout "3600 seconds", and KMS key (empty). Below that is a "Tags (0)" section showing "No tags" with a "Manage tags" button. At the bottom is a "Versions (0)" section with a search bar and table headers for "Version name", "Status", and "Creation date", showing "No versions" and text stating "Creating an alias from the working draft will create a version". There's also an "Aliases (0)" section with "Delete", "Edit", and "Create" buttons. On the right side is a "Test" panel with "TestAlias: Working draft" dropdown and a chat interface showing a user message “what MLOps tasks can you perform?” and an AI response beginning "I'd be happy to describe the MLOps capabilities of this assistant. What specific aspect of MLOps are you most interested in learning about? For example: 1. Creating MLOps projects with CI/CD pipelines 2. Managing feature stores 3. Working with MLflow for experiment tracking 4. Model registry and approval workflows 5. Project lifecycle management Or would you prefer a general overview of all available capabilities?" Orange arrows point to the Status field and the Memory field in the agent details.

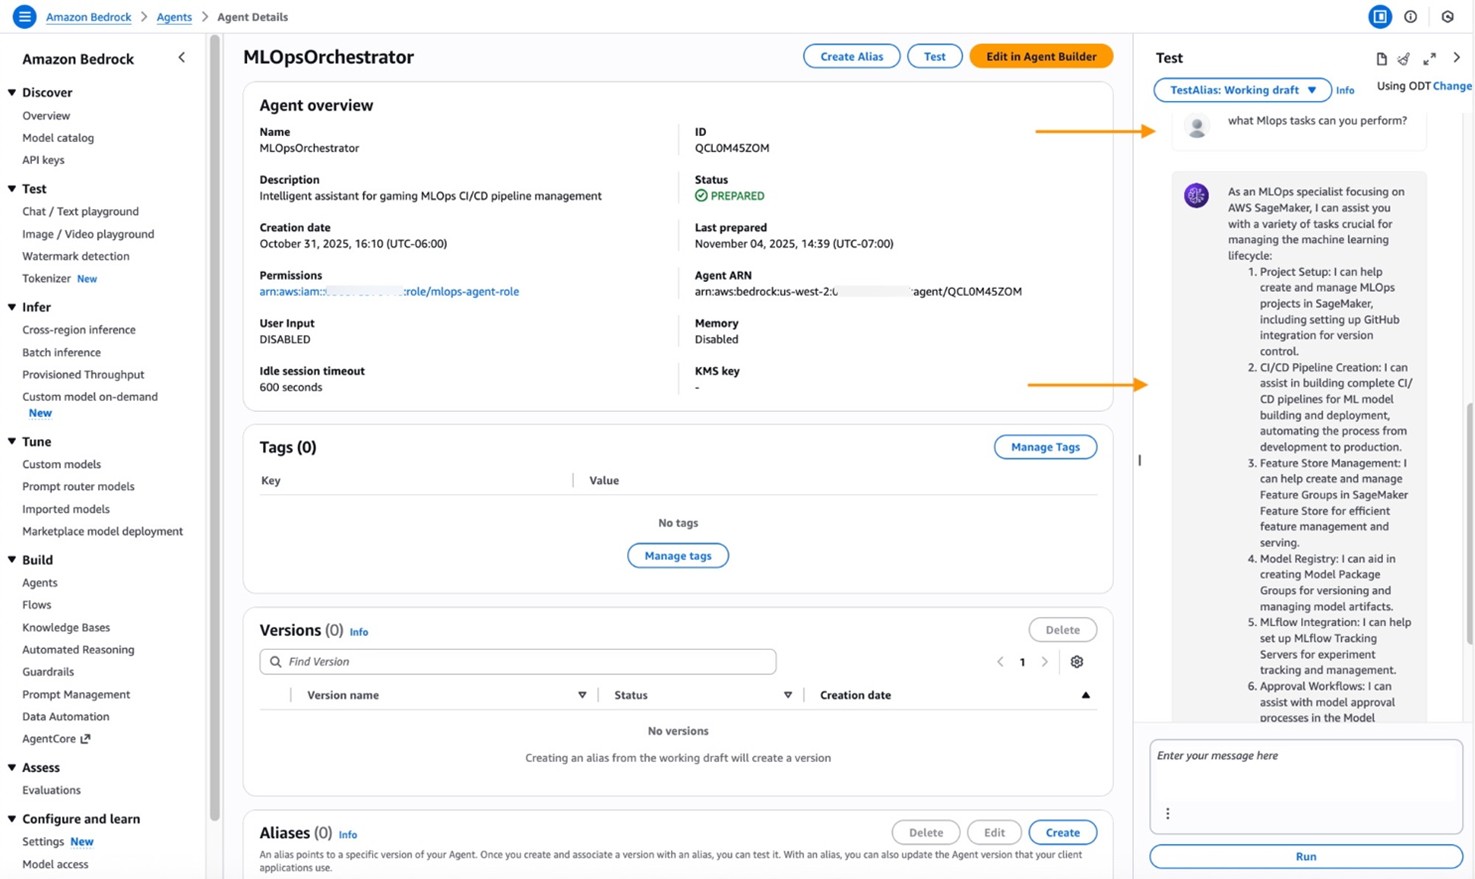
Figure 7: Show MLOps tasks.

  • Use the agent to create a Feature Store group for gaming analytics by using the following prompt:

Create Feature Store group named "player-churn-features" with feature description "player_id as string identifier, player_lifetime as number, player_churn as integer, time_of_day features as floats, cohort_id features as binary flags, event_time as event time feature" and description "Feature group for player churn prediction model containing player behavior and engagement metrics"

The Amazon Bedrock console showing the MLOpsOrchestrator agent overview page with a test conversation displayed. The page displays a breadcrumb navigation at the top showing "Amazon Bedrock" followed by "Agents" followed by "MLOpsOrchestrator". The left sidebar contains a navigation menu with sections including "Discover" (with Overview, Model catalog, API keys), "Test" (with Chat/Text playground, Image/Video playground, Watermark detection), "Infer" (with Cross-region inference, Batch inference, Provisioned Throughput), "Tune" (with Custom models, Prompt router models, Imported models, Marketplace model deployment), "Build" (with Agents, Flows, Knowledge Bases, Automated Reasoning, Guardrails, Prompt Management, Data Automation), "Assess" (with Evaluations), and "Configure and learn" (with Settings, Model access, User guide, Bedrock Service Terms). The main content area shows "Agent overview" with details including Name "MLOpsOrchestrator", ID "YJESAOSVXP", Description "AI agent for managing SageMaker MLOps CI/ CD pipelines", Status "PREPARED" with a green checkmark, Creation date "August 11, 2025, 16:02 (UTC-06:00)", Last prepared "September 05, 2025, 10:20 (UTC-06:00)", Permissions "arn:aws:iam::898167383251:role/ mlops-agent-role", Agent ARN "arn:aws:bedrock:us-west-2:accountid:agent/YJESAOSVXP", User Input "ENABLED", Memory "Disabled", Idle session timeout "3600 seconds", and KMS key (empty). Below that is a "Tags ( 0)" section showing "No tags" with a "Manage tags" button. At the bottom is a "Versions (0)" section and an "Aliases (0)" section. On the right side is a "Test" panel with "TestAlias: Working draft" dropdown and a chat interface showing a user message requesting to "Create Feature Store group named 'player-churn-features' with feature description 'player_id as string identifier, player_lifetime as number, player_ churn as integer, time_of_day features as floats, cohort_id features as binary flags, event_time as event time feature' and description 'Feature group for player churn prediction model containing player behavior and engagement metrics'". The AI response indicates "Feature group 'player-churn-features' has been successfully created!" and provides detailed configuration information including Record identifier, Event time feature, Storage type, Total features count, and current status. Orange arrows point to the Status field in the agent details and to the "No tags" section.

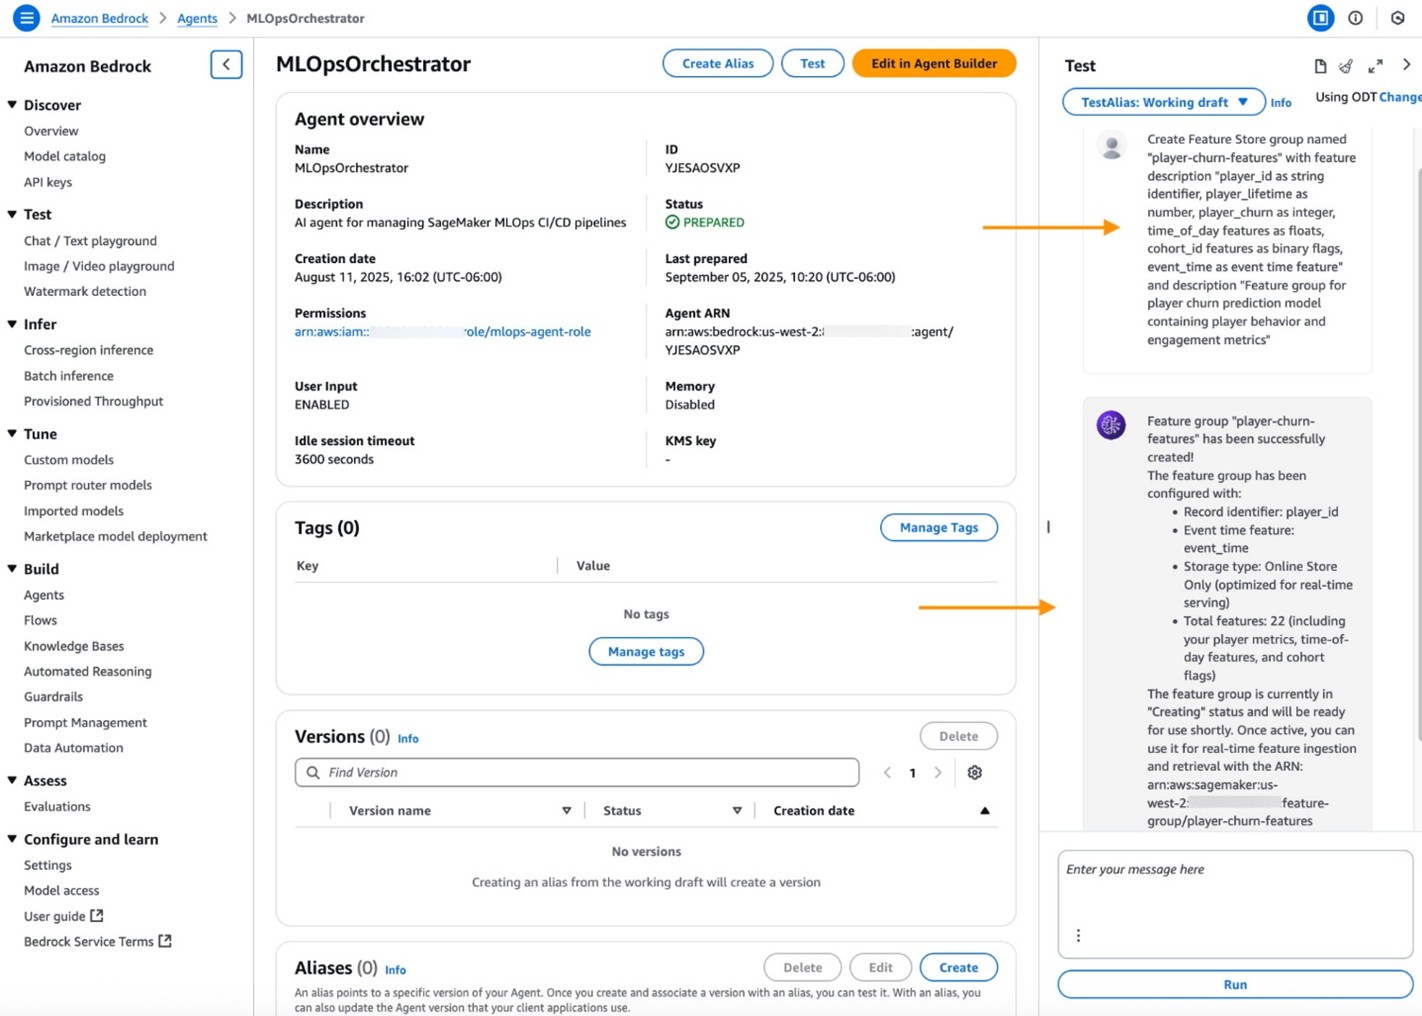
Figure 8: Create a feature store.

  • Next, Create an Amazon SageMaker AI managed MLflow tracking server by entering the following prompt. Use your account ID where indicated:

Create MLflow tracking server named "player-churn-tracking-server" with artifact store "s3://game-ml-artifacts-ACCOUNT_ID/mlflow/" and size "Medium" and role_arn "arn:aws:iam::ACCOUNT_ID:role/mlops-agent-role"

The Amazon Bedrock interface for an agent called "MLOpsOrchestrator" that manages SageMaker MLOps CI/CD pipelines. Key details from the interface include: The agent has ID YJESAOSVXP and is in PREPARED status It was created on August 11, 2025 and last prepared on September 5, 2025 User input is ENABLED with an idle session timeout of 3600 seconds The interface shows sections for Tags, Versions, and Aliases (all currently at 0) There's an MLflow tracking server named "player-test-tracking-server" being created (medium size), with an estimated creation time of 20-30 minutes The left sidebar shows the Amazon Bedrock navigation menu with categories like Discover, Test, Infer, Tune, and Build.

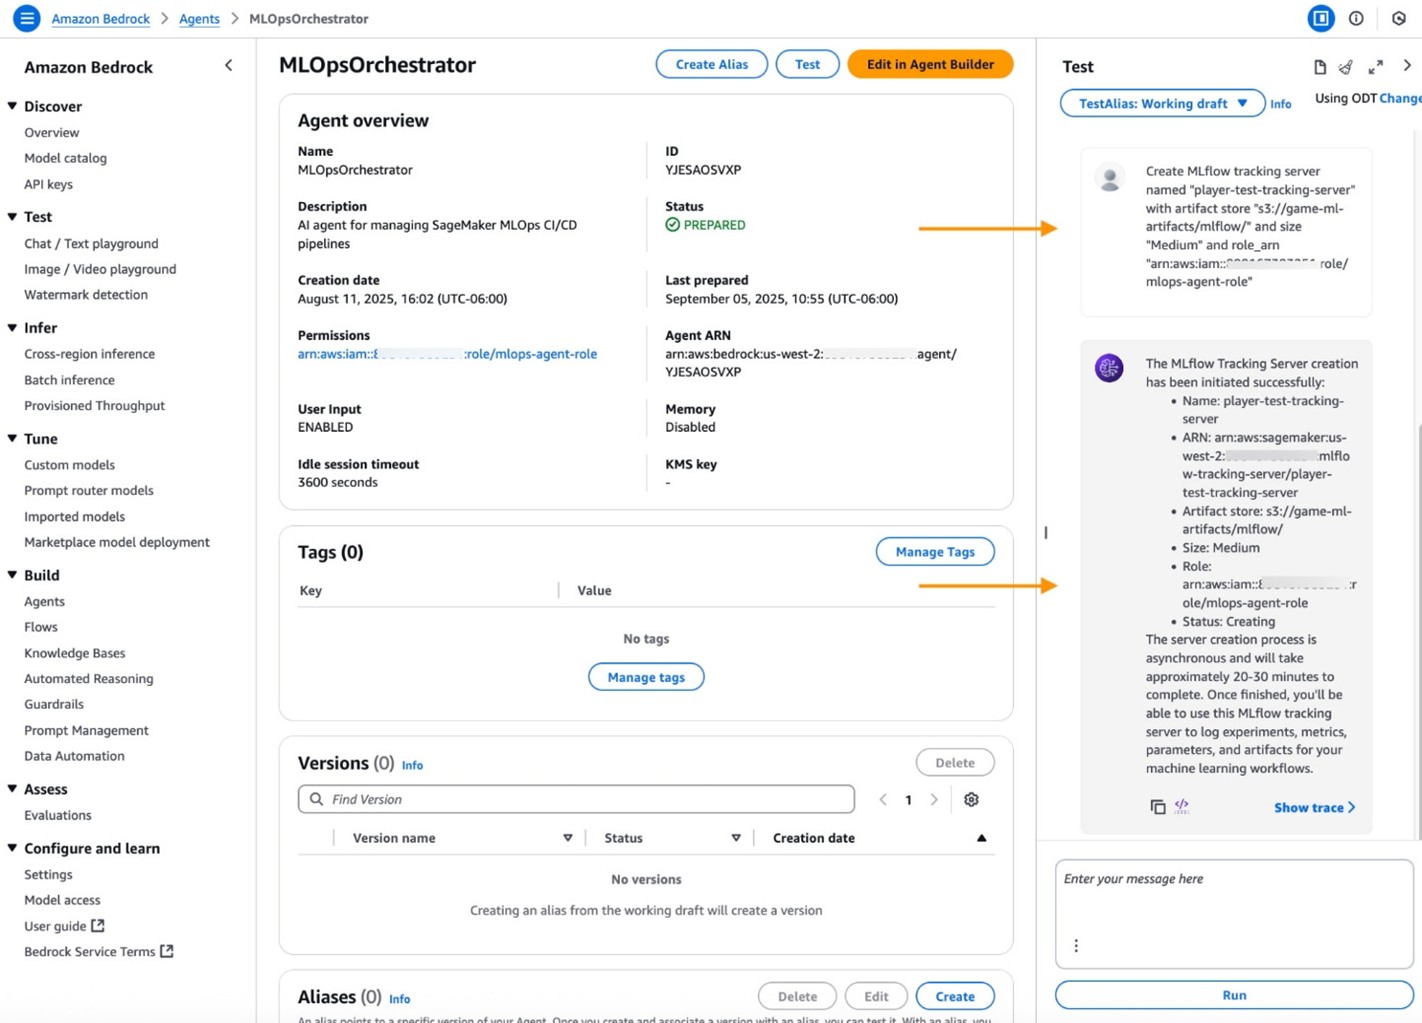
Figure 9 : Create a MLflow tracking server.

  • Use the following prompt to establish GitHub integration:

Create an AWS CodeConnection called "mlops-github" for GitHub integration

The Amazon Bedrock interface showing the MLOpsOrchestrator agent configuration page. It details the agent's status (PREPARED), relevant dates, and shows a test conversation about creating a GitHub integration connection that's in PENDING status with setup instructions. The interface includes navigation elements for managing, testing, and editing the agent.

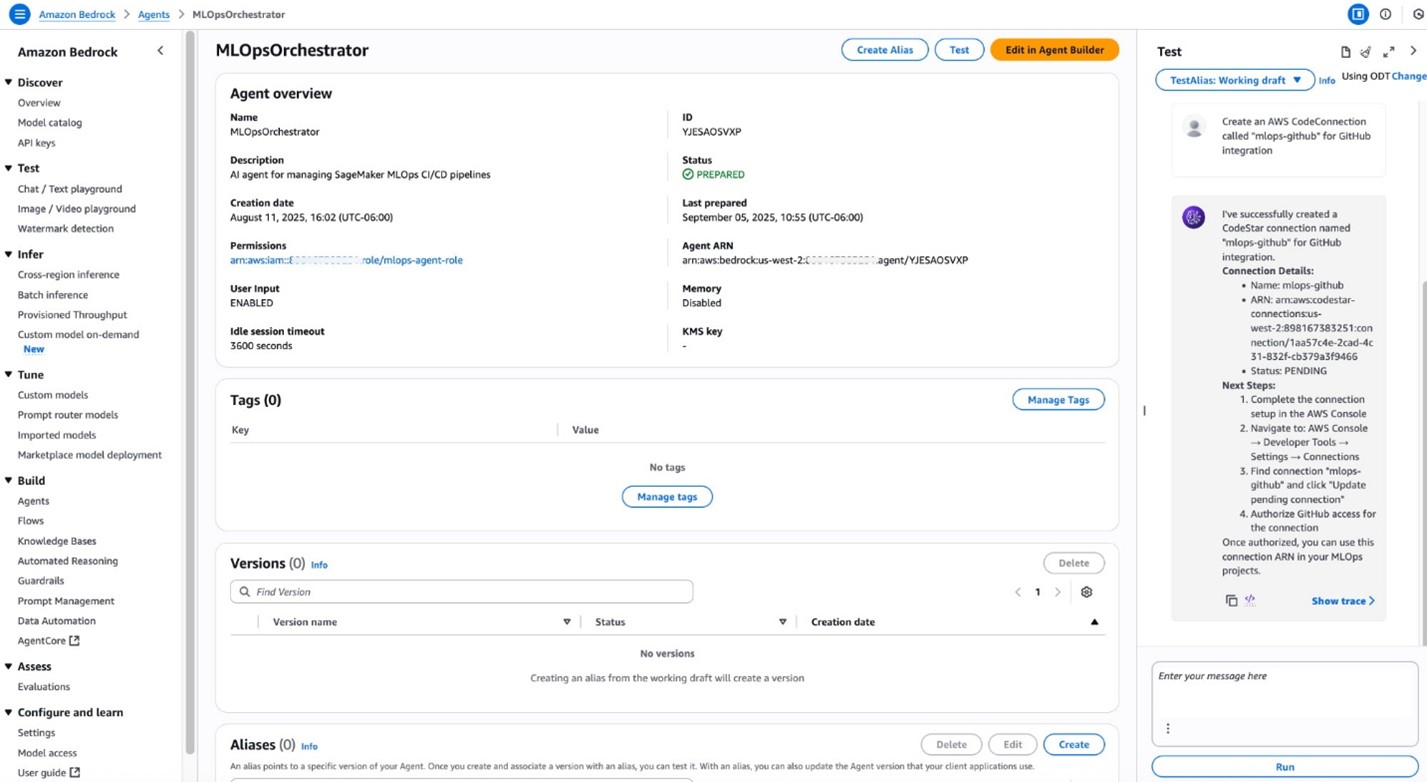
Figure 10: Create an AWS CodeConnection to GitHub.

  • To complete the AWS CodeConnection setup, select the created connection in the console and choose Update pending connection.
  • Select Install a new app.
  • You will be redirected to GitHub to authenticate and select repository access.
  • Choose Connect and the connection status will change from Pending to Available.

With supporting MLOps infrastructure created, navigate to the MLOpsOrchestrator agent in the AWS console.

  • Create an Amazon SageMaker AI MLOps project by using the following prompt:

Create an MLOps project named "mlops-player-churn" with GitHub username "your Github username", build repository "player-churn-model-build", deploy repository "player-churn-model-deploy", using connection ARN "your connection arn"

  • The MLOps project creates and executes an Amazon SageMaker AI pipeline. Copy the model package group name from the prompt response. The pipeline execution adds a model to the Amazon SageMaker AI Model Registry in Pending manual approval Approve the model by using the following prompt:

Approve model in model package group "your model package group name"

  • Create an MLOps CI/CD Pipeline by using the following:

Build a CI/CD pipeline for project "mlops-player-churn" with model build repository "gitUserName/player-churn-model-build", deploy repository “gitUserName/player-churn-model-deploy”, connection ARN "your connection arn", feature group "player-churn-features", S3 bucket "game-ml-artifacts-ACCOUNT_ID", MLflow server "your-mlflow-arn", and pipeline "player-churn-training-pipeline"

  • To verify and visualize the pipeline, in the console, navigate to AWS CodePipeline.
    • Select Pipelines in the left-hand navigation pane.
      • There will be two pipelines, one for build and another for deploy.
    • Select the link of the build project to view pipeline steps.
The AWS CodePipeline interface for a SageMaker test pipeline named "sagemaker-test-mlops-repo-population-v1-p-qpzcbzysztby-modelbuild". The pipeline has navigation breadcrumbs at the top and several action buttons including Edit, Stop execution, Create trigger, Clone pipeline, and Release change. The pipeline view displays two completed stages with green checkmarks: "Source" and "Build". Each stage shows a commit ID with "All actions succeeded" status. The Source stage shows ModelBuildWorkflowCode from GitHub, and the Build stage shows BuildAndExecuteSageMakerPipeline using AWS CodeBuild. The pipeline visualization shows an arrow connecting the two stages, indicating the workflow progression.

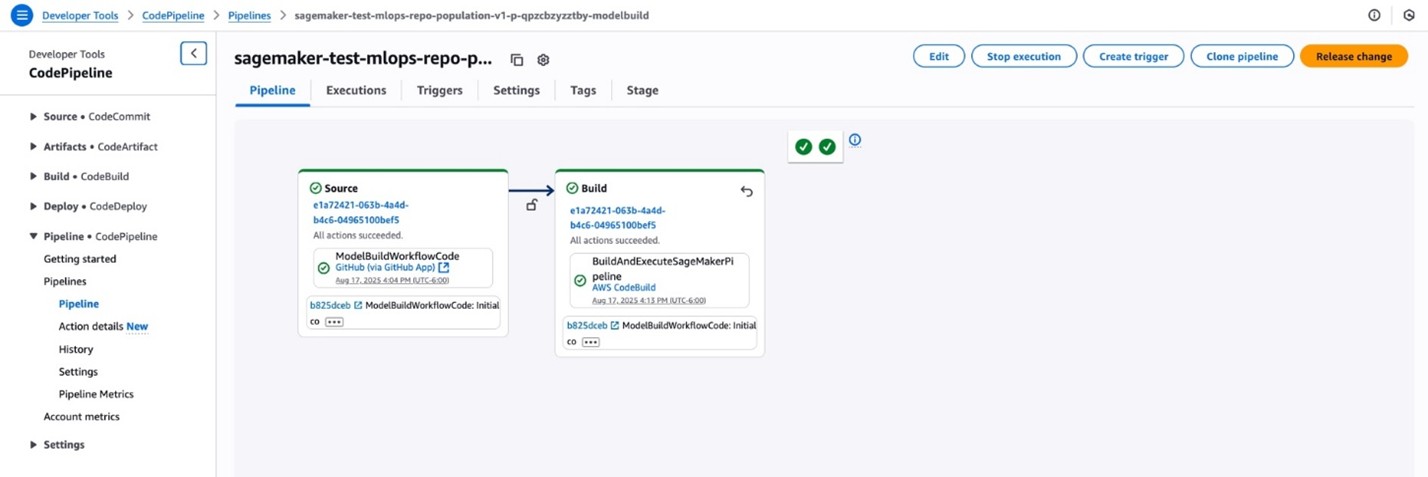
Figure 11: Build pipeline.

  • To deploy a production inference endpoint, navigate to the AWS CodePipelines deploy pipeline.
    • Select ApproveDeployment in the DeployStaging
The AWS CodePipeline console showing a deployment pipeline named "sagemaker-test-mlops-repo-p..." with a breadcrumb navigation at the top showing "Developer Tools" followed by "CodePipeline" followed by "Pipelines" followed by "sagemaker-test-mlops-repo-population-v1-p-qpxcbzyzrthy-modeldeploy". The page displays tabs for "Pipeline", "Executions", "Triggers", "Settings", "Tags", and "Stage" with "Pipeline" currently selected. At the top right are buttons for "Edit", "Stop execution", "Create trigger", "Clone pipeline", and "Release change". The pipeline visualization shows four main stages connected by arrows from left to right: "Source", "Build", "DeployStaging", and "DeployProd". Each stage has a green checkmark with a white checkmark inside indicating successful completion, except for the DeployStaging stage which shows a blue circle with an "i" information icon. The Source stage shows "4479a920-59a4-4000-b99b-a125b6490a3a" with "All actions succeeded" and contains "ModelDeployInfraCode" from "GitHub (via GitHub App)" dated "Aug 17, 2025 4:57 PM (UTC-600)". The Build stage shows the same execution ID with "All actions succeeded" and contains "BuildDeploymentTemplates" from "AWS CodeBuild" dated "Aug 17, 2025 4: 58 PM (UTC-600)". The DeployStaging stage shows "Succeeded: 2 In progress: 1" and contains "DeployResourcesStaging" from "AWS CloudFormation" dated "Aug 17, 2025 5:37 PM (UTC-600)", "TestStaging" from "AWS CodeBuild" dated "Aug 17, 2025 5:28 PM (UTC-600)", and "ApproveDeployment" showing "Manual approval" with a blue information icon. The DeployProd stage shows "e8d09b70-4865-44af-9d22-a1158122885a" with "All actions succeeded" and contains "DeployResourcesProd" from "AWS CloudFormation" dated "Aug 17, 2025 5:32 PM (UTC-600)". Each stage also displays a commit hash "7a477023" with "ModelDeployInfraCode: Initial co" and additional details.

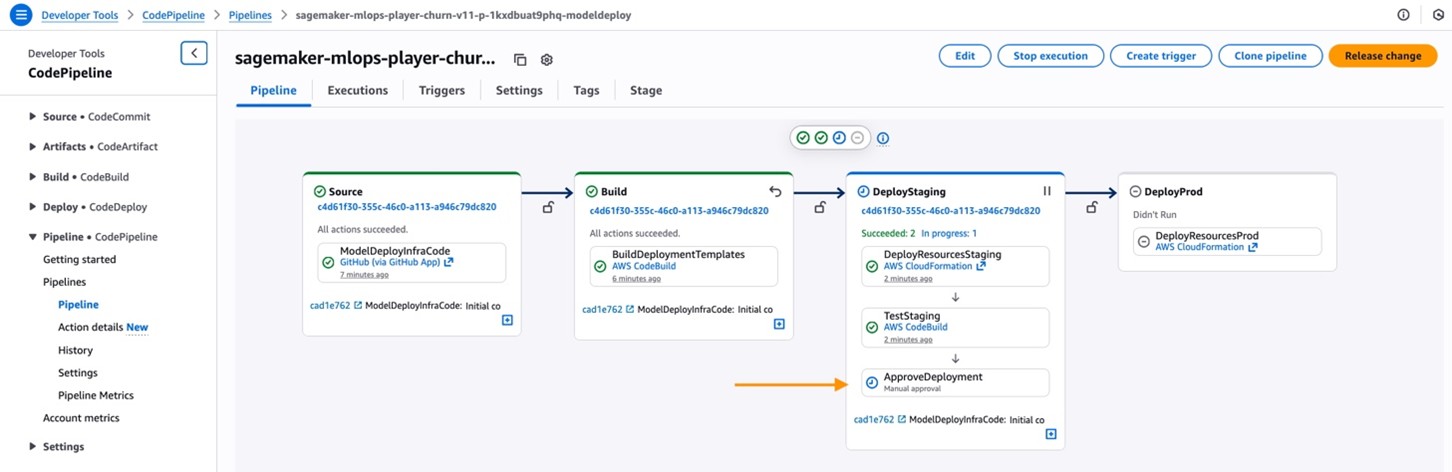
Figure 12: Deploy pipeline.

  • To trigger CI/CD pipeline execution, push any changed code to the model-build repository.

Using an Amazon Bedrock Agent, a complete MLOps model build, and deployment of a CI/CD pipeline, has been created. Try out additional agent prompts to experiment with the flexibility and function of the agent.

Amazon SageMaker Canvas can be used to connect to data sources (such as transactional databases, data warehouses, Amazon Simple Storage Service (Amazon S3)) or over 50 other data providers. SageMaker Canvas can be used to feature engineer data and as a data source for the MLOps model build and deploy pipeline.

Cleanup

To avoid ongoing charges, navigate to these AWS services in the console and terminate those resources.

A command line automated cleanup script is available to delete resources as well. The script uses resource tags to safely identify and remove all MLOps deployed resources. The script automatically removes all MLOps resources tagged with CreatedBy=MLOpsAgent. Run cleanup-by-tags.sh to terminate resources.

Conclusion

Building an intelligent MLOps CI/CD pipeline management system using Amazon Bedrock Agents represents an advancement in how gaming teams can approach machine learning operations. Throughout this walkthrough, we’ve demonstrated how to transform complex, multi-service MLOps workflows into streamlined, conversational interactions that reduce the barrier to entry for gaming analytics.

Contact an AWS Representative to find out how we can help accelerate your business.

Further reading

Building gaming MLOps pipelines with Amazon Bedrock Agents
Author: Steve Phillips