

Configure Amazon Q Business with AWS IAM Identity Center trusted identity propagation
IAM Identity Center is used by many AWS managed applications such as Amazon Q… Because Identity Center serves as their common reference of your users and groups, these AWS applications can give your users a consistent experience as they navigate AWS… With administrative APIs you can automate cr…
Amazon Q Business is a fully managed, permission aware generative artificial intelligence (AI)-powered assistant built with enterprise grade security and privacy features. Amazon Q Business can be configured to answer questions, provide summaries, generate content, and securely complete tasks based on your enterprise data. The native data source connectors provided by Amazon Q Business can seamlessly integrate and index content from multiple repositories into a unified index. Amazon Q Business uses AWS IAM Identity Center to record the workforce users you assign access to and their attributes, such as group associations. IAM Identity Center is used by many AWS managed applications such as Amazon Q. You connect your existing source of identities to Identity Center once and can then assign users to any of these AWS services. Because Identity Center serves as their common reference of your users and groups, these AWS applications can give your users a consistent experience as they navigate AWS. For example, it enables user subscription management across Amazon Q offerings and consolidates Amazon Q billing from across multiple AWS accounts. Additionally, Q Business conversation APIs employ a layer of privacy protection by leveraging trusted identity propagation enabled by IAM Identity Center.
Amazon Q Business comes with rich API support to perform administrative tasks or to build an AI-assistant with customized user experience for your enterprise. With administrative APIs you can automate creating Q Business applications, set up data source connectors, build custom document enrichment, and configure guardrails. With conversation APIs, you can chat and manage conversations with Q Business AI assistant. Trusted identity propagation provides authorization based on user context, which enhances the privacy controls of Amazon Q Business.
In this blog post, you will learn what trusted identity propagation is and why to use it, how to automate configuration of a trusted token issuer in AWS IAM Identity Center with provided AWS CloudFormation templates, and what APIs to invoke from your application facilitate calling Amazon Q Business identity-aware conversation APIs.
Why use trusted identity propagation?
Trusted identity propagation provides a mechanism that enables applications that authenticate outside of AWS to make requests on behalf of their users with the use of a trusted token issuer. Consider a client-server application that uses an external identity provider (IdP) to authenticate a user to provide access to an AWS resource that’s private to the user. For example, your web application might use Okta as an external IdP to authenticate a user to view their private conversations from Q Business. In this scenario, Q Business is unable to use the identity token generated by the third party provider to provide direct access to the user’s private data since there is no mechanism to trust the identity token issued by the third party.
To solve this, you can use IAM Identity Center to get the user identity from your external IdP into an AWS Identity and Access Management (IAM) role session which allows you to authorize requests based on the human, their attributes, and their group memberships, rather than set up fine-grained permissions in an IAM policy. You can exchange the token issued by the external IdP for a token generated by Identity Center. The token generated by Identity Center refers to the corresponding Identity Center user. The web application can now use the new token to initiate a request to Q Business for the private chat conversation. That token refers to the corresponding user in Identity Center, Q Business can authorize the requested access to the private conversation based on the user or their group membership as represented in Identity Center.
Some of the benefits of using trusted identity propagation are:
- Prevents user impersonation and protects against unauthorized access to user private data by spoofing user identity.
- Facilitates auditability and fosters responsible use of resources as Q Business automatically logs API invocations to AWS CloudTrail along with user identifier.
- Promotes software design principles rooted in user privacy.
Overview of trusted identity propagation deployment
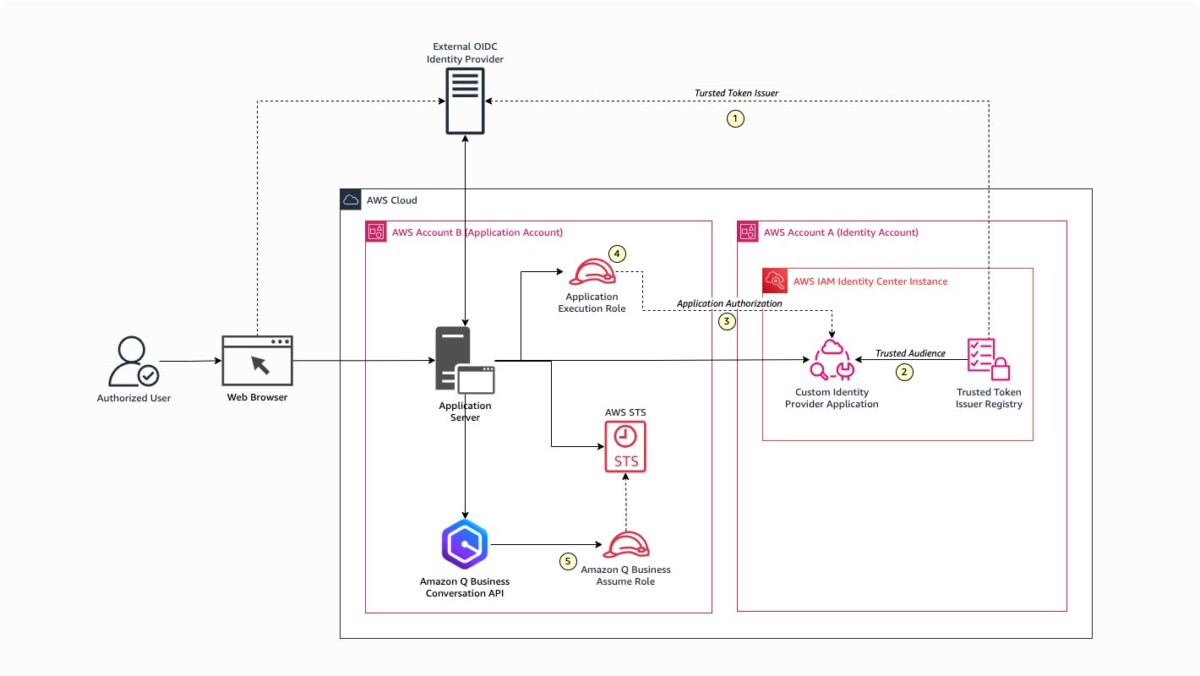
The following figure is a model of a client-server architecture for trusted identity propagation.

To understand how your application can be integrated with IAM Identity Center for trusted identity propagation, consider the model client-server web application shown in the preceding figure. In this model architecture, the web browser represents the user interface to your application. This could be a web page rendered on a web browser, Slack, Microsoft Teams, or other applications. The application server might be a web server running on Amazon Elastic Container Service (Amazon ECS), or a Slack or Microsoft Teams gateway implemented with AWS Lambda. Identity Center itself might be deployed on a delegated admin account or Identity Center (the Identity Account in the preceding figure), or could be deployed in the same AWS account (the Application Account in the preceding figure) where the application server is deployed along with Amazon Q Business. Finally, you have an OAuth 2.0 OpenID Connect (OIDC) external IdP such as Okta, Ping One, Microsoft Entra ID, or Amazon Cognito for authenticating and authorizing.
Deployment of trusted identity propagation involves five steps. As a best practice, we recommend that the security owner manages IAM Identity Center updates and the application owner manages application updates, providing clear separation of duties. The security owner is responsible for administering the Identity Center of an organization or account. The application owner is responsible for creating an application on AWS.
- The security owner adds the external OIDC IdP’s issuer URL to the IAM Identity Center instance’s trusted token issuer. It’s important that the issuer URL matches the
issclaim attribute present in the JSON Web Token (JWT) identity token generated by the IdP after user authentication. This is configured once for a given issuer URL. - The security owner creates a customer managed identity provider application in IAM Identity Center and explicitly configures the specific audience for a given trusted token issuer is being authorized to perform token exchange using Identity Center. Because there could be more than one application (or audience) for which the external IdP could be authenticating users, explicitly specifying an audience helps prevent an unauthorized applications from using the token exchange process. It’s important the audience ID matches the
audclaim attribute present in the JWT identity token generated by the IdP after user authentication. - The security owner edits the application policy for the customer managed identity provider application created in the previous step to add or update the IAM execution role used by the application server or AWS Lambda. This helps prevent any unapproved users or applications from invoking the
CreateTokenWithIAMAPI in Identity Center to initiate the token exchange. - The application owner creates and adds an IAM policy to the application execution role to allow the application to invoke a
CreateTokenWithIAMAPI on Identity Center to perform a token exchange and to create temporary credentials using AWS Security Token Service (AWS STS) . - The application owner creates an IAM role with a policy allowing access to the Q Business Conversation API for use with STS to create a temporary credential to invoke Q Business APIs.
You can use AWS CloudFormation templates, discussed later in this blog, to automate the preceding deployment steps. See the IAM Identity Center documentation for detailed step-by-step instructions on setting up trusted identity propagation. You can also use the AWS Command Line Interface (AWS CLI) setup process in Making authenticated Amazon Q Business API calls using IAM Identity Center.
Important: Choosing to add a trusted token issuer is a security decision that requires careful consideration. Only choose trusted token issuers that you trust to perform the following tasks:
- Authenticate the user who is specified in the token. Control the audience claim, a claim you configure as the user identifier.
- Generate a token that IAM Identity Center can exchange for an Identity Center-created token. Control the Identity Center customer managed application policy to add only IAM users, roles, and execution roles that can perform the exchange.
Authorization flow
For a typical web application, the trusted identity propagation process will involve five steps as shown in the following flow diagram.
- Sign-in and obtain an authorization code from the IdP.
- Use the authorization code and client secret to retrieve the ID token from the IdP.
- Exchange the IdP generated JWT ID token with the IAM Identity Center token that includes the AWS STS context identity.
- Use the STS context identity to obtain temporary access credentials from AWS STS.
- Use temporary access credentials to access Q Business APIs.
An end-to-end implementation of the identity propagation is available for reference in <project_home>/webapp/main.py of AWS Samples – main.py.

Sample JWT tokens
In the preceding authorization flow, one of the key steps is step 3, where the JWT ID token from the OAuth IdP is exchanged with IAM Identity Center for an AWS identity-aware JWT token. Key attributes of the respective JWT tokens are explored in the next section. An understanding of the tokens will help with troubleshooting authorization flow errors.
OpenID Connect JWT ID token
A sample JWT ID token generated by an OIDC OAuth IdP is shown in the following code sample. OIDC’s ID tokens take the form of a JWT, which is a JSON payload that’s signed with the private key of the issuer and can be parsed and verified by the application. In contrast to access tokens, ID tokens are intended to be understood by the OAuth client and include a handful of defined property names that provide information to the application. Important properties include aud, email, iss, and jti, which are used by IAM Identity Center to validate the token issuer, match the user directory, and issue a new Identity Center token. The following code sample shows a JWT identity token issued by an OIDC external IdP (such as Okta).
IAM Identity Center JWT token with identity context
A sample JWT token generated by CreateTokenWithIAM is shown in the following code sample. This token includes a property called sts:identity_context which allows you to create an identity-enhanced IAM role session using an AWS STS AssumeRole API. The enhanced STS session allows the receiving AWS service to authorize the IAM Identity Center user to perform an action and log the user identity to CloudTrail for auditing.
Automate configuration of a trusted token issuer using AWS CloudFormation
A broad range of possibilities exists to integrate your application with Amazon Q Business using IAM Identity Center and your enterprise IdP. For all integration projects, Identity Center needs to be configured to use a trusted token issuer. The sample CloudFormation templates discussed in this post focuses on helping you automate the core trusted token issuer setup. If you’re new to Amazon Q Business and don’t have all the inputs required to deploy the CloudFormation template, the prerequisites section includes links to resources that can help you get started. You can also follow a tutorial on Configuring sample web application with Okta included in the accompanying AWS Samples repository.
Note: The full source code of the solution using AWS CloudFormation templates and sample web application is available in AWS Samples Repository.
Prerequisites and considerations
- IAM Identity Center is deployed with users and groups provisioned.
- For information on enabling different IAM Identity Center instances, see Configure an IAM Identity Center instance.
- For tutorials on setting up users and groups, see the Identity CenterGetting started tutorials. The tutorials include syncing users and groups from Okta, Microsoft Entra ID, Google WorkSpace, Ping Identity, OneLogin, JumpCloud, and CyberArk.
- Amazon Q Business application integrated with Identity Center.
- For information on configuring a starter application see Creating a sample Amazon Q Business application.
- A web application that requires access to Q Business APIs.
- A sample web application is available in the AWS Samples – Webapp. Check the
READ.mdfile in the<project_home>/webappfolder for additional instructions to set up the sample.
- A sample web application is available in the AWS Samples – Webapp. Check the
- An external OIDC IdP is deployed.
- For instructions to set up an Okta OIDC application, see Create an OIDC Web App in the Okta Admin Console.
- For instructions to set up a Microsoft Entra ID OIDC application, see Register an application with the Microsoft identity platform. For platform type, select Web Applications and then select Web.
- For instructions to set up an Amazon Cognito user pool, see Create a new user pool.
- For instructions to set up an Amazon Cognito user pool, see Create a new user pool. To configure your web application to interact with a Cognito user pool, see User pool app clients. A sample CloudFormation template to set up a Cognito user pool and configure an app client is made available in the AWS Samples – Cognito CFN.
Template for configuring AWS IAM Identity Center by a security owner
A security owner can use this CloudFormation template to automate configuration of the trusted token issuer in your IAM Identity Center. Deploy this stack in the AWS account where your Identity Center instance is located. This could be in the same AWS account where your application is deployed as a standalone or account instance, or can be in a delegated admin account managed as part of AWS Organizations.
- To launch the stack, choose:

You can download the latest version of the CloudFormation template from AWS Samples – TTI CFN.
The following figure shows the stack input for the template

- The stack creation requires four parameters:
- AuthorizedAudiences: The authorized audience is an auto generated UUID by a third-party IdP service or a pseudo-ID configured by the administrator of the third-party IdP to uniquely identify the client (your application) for which the ID token is generated. The value must match the
audattribute value included in the JWT ID token generated by the third-party identity provider. - ClientAppExecutionArn: The Amazon Resource Name (ARN) of the IAM user, group or execution role that’s used to run your application, which will invoke Identity Center for token exchange and AWS STS service for generating temporary credentials. For example, this could be the execution role ARN of the Lambda function where your code is run.
- IDCInstanceArn: The instance ARN of the IAM Identity Center instance used by your application.
- TokenIssuerUrl: The URL of the trusted token issuer. The trusted token issuer is a third-party identity provider that will authenticate a user and generate an ID token for authorization purposes. The token URL must match the
issattribute value included in the JWT ID token generated by the third-party identity provider.
The following figure shows the output of the CloudFormation stack to configure a trusted token issuer with IAM Identity Center

The stack creation produces the following output:
- IDCApiAppArn: The ARN for the IAM Identity Center custom application auth provider. You will use this application to call the Identity Center
CreateTokenWithIAMAPI to exchange the third-party JWT ID token with the Identity Center token.
Validate the configuration
- From the AWS Management Console where your IAM Identity Center instance is located, go to the AWS IAM Identity Center console to verify if the trusted token issuer is configured properly.
- From the left navigation pane, choose Applications and choose the Customer Managed tab to see a list of applications as shown in the following figure. The newly created customer managed IdP application will be the same as the CloudFormation stack name. Choose application name to open the application configuration page.
- On your application configuration page, as shown in the following figure, verify the following:
- User and group assignments are set to Do not require assignments.
- Trusted applications for identity propagation lists Amazon Q and includes the application scope qbusiness:conversations:access.
- Authentication with the trusted token issuer is set to configured.

- Next, to verify trusted token issuer configuration, choose Actions on the top right of the page and select Edit configurations from the drop-down menu.

- At the bottom of the page, expand Authentication with trusted token issuer and verify:
- That your Issuer URL is selected by default and is listed under .
- The audience ID (Aud claim) is configured properly for the issuer URL, as shown in the following figure. Next expand Application credentials to verify if your application execution IAM role is listed.


Depending on your IAM Identity Center instance type, you might not be able to access the console customer managed applications page. In such cases, you can use the AWS CLI or SDK to view the configuration. Here is a list of useful AWS CLI commands: list-applications, list-application-access-scopes, get-application-assignment-configuration, describe-trusted-token-issuer, and list-application-grants.
Template for configuring your application by the application owner
To propagate user identities, your application will need to:
- Invoke the IAM Identity Center instance to exchange a third-party JWT ID token and obtain an Identity Center ID token
- Invoke AWS STS to generate a temporary credential with an IAM assumed role.
The application owner can use a CloudFormation template to generate the required IAM policy, which can be attached to your application execution role and the assumed role with the required Q Business chat API privileges for use with AWS STS to generate temporary credentials.
Remember to include the add-on policy generated to your application’s IAM execution role to allow the applications to invoke Identity Center and AWS STS APIs.
- To launch the stack, choose:
You can download the latest version of the CloudFormation template from AWS Samples – App Roles CFN.
The following figure shows the CloudFormation stack configuration to install IAM roles and policies required for the application to propagate identities

- The stack creation takes four parameters, as shown in the preceding figure:
- ClientAppExecutionArn: The ARN of an IAM user, group, or execution role that is used to run your application and will invoke IAM Identity Center for token exchange and AWS STS for generating temporary credentials. For example, this could be the execution role ARN of Lambda where your code is run.
- IDCApiAppArn: ARN for the IAM Identity Center custom application auth provider. This will be created as part of the trusted token issuer configuration.
- KMSKeyId: [Optional] The AWS Key Management Server (AWS KMS) ID, if the Q Business Application is encrypted with a customer managed encryption key.
- QBApplicationID: Q Business application ID, which your application will use to invoke chat APIs. The STS assume role will be restricted to this application ID.
The following figure shows the output of the CloudFormation stack to install IAM roles and policies required for the application to propagate identities.

The stack creation produces the following outputs:
- ClientAppExecutionAddOnPolicyArn: This is a customer managed IAM policy created with the required permissions for your application to invoke the IAM Identity Center
CreateTokenWithIAMAPI and call the STSAssumeRoleAPI to generate temporary credentials to call Q Business chat APIs. You can include this policy in your application IAM execution role to allow access for the APIs. - QBusinessSTSAssumeRoleArn: This IAM role will include the necessary permissions to call Q Business chat APIs, for use with the STS
AssumeRoleAPI call.
Validate the configuration
- From the AWS account where your application is deployed, open the AWS IAM console, verify if the IAM role for STS
AssumeRoleand the user managed IAM policy for the application execution role are created.- To verify if the IAM Role for STS
AssumeRole, obtain the role nameQBusinessSTSAssumeRoleArnstack output value, choose theRoles link on the left panel of the IAM console and use the search bar to enter the role name and shown in the following figure.

- To verify if the IAM Role for STS
- Choose the link to the role to open the role and expand the inline policy to review the permissions, as shown in the following figure.

- To verify if the IAM policy for add-on to an application execution role is created, obtain the IAM policy name from the
ClientAppExecutionAddOnPolicyArnstack output value, go the Policies in the IAM console, and search for the policy, as shown in the following figure.

- Choose the link to the policy name to open the policy and review the permissions, as shown in the following figure.


Update the application for invoking the Q Business API with identity propagation
Most web applications using OAuth 2.0 with an IdP will have implemented a sign-in mechanism and invoke the IdPs ID endpoint to retrieve a JWT ID token. However, before invoking Amazon Q Business APIs that require identity propagation, your application needs to be updated to include calls to CreateTokenWithIAM and AssumeRole to facilitate trusted token propagation.
The CreateTokenWithIAM API enables exchanging the JWT ID token received from the OIDC IdP with an IAM identity Center generated JWT token. The newly generated token is then passed on to AssumeRole API to create an identity aware temporary security credentials that you can use to access AWS resources.
Note: Remember to add permissions to your IAM role and user policy to allow invoking these APIs. Alternatively, you can attach the sample policy referenced by ClientAppExecutionAddOnPolicyArn that was created by the CloudFormation template for configuring your application.
A sample access helper method using get_oidc_id_token, get_idc_sts_id_context, or get_sts_credential is available in <project_home>/src/qbapi_tools/access_helpers.py (AWS Samples – access_helpers.py). An end-to-end sample implementation of the complete sequence of steps as depicted in the end-to-end authentication sequence is provided in <project_home>/webapp/main.py (AWS Samples – main.py).
Restrictions and limitations
Below are some common limitations and restrictions that you may encounter while configuring trusted token propagation along with recommendations on how to mitigate them.
Group membership propagation
Enterprises typically manage group membership in their external IdP. However, when using trusted token propagation, the web identity token generated by the external IdP is exchanged with an ID token generated by IAM Identity Center. Thus, when invoking the Q Business API from an STS session enhanced with Identity Center identity context, only the group membership information available for the user in Identity Center is passed to the Q Business API, not the group membership from the external IdP. To mitigate this issue, it’s recommended that all relevant users and groups are synchronized to Identity Center from the external IdP using System for Cross-domain Identity Management (SCIM). For more information, see automatic provisioning (synchronization) of users and groups.
Caching credentials to prevent invalid grant types
You can use a web identity token only once with the CreateTokenWithIAM API. This is to prevent token replay attacks, where an attacker can intercept a JWT and reuse it multiple times, allowing them to bypass authentication and authorization controls. Because it isn’t practical to generate a new ID token for every Q Business API, it’s recommended that the temporary credentials generated by a Q Business API session using AWS STS AssumeRole is cached and reused for subsequent API calls.
Clean up
To avoid incurring additional charges, make sure you delete any resources created in this post.
- Follow the instructions in Deleting a stack on the AWS CloudFormation console to delete any CloudFormation stacks created using templates provided in this post.
- If you enabled an IAM Identity Center instance, follow the instructions to delete your IAM Identity Center instance.
- Ensure you unregister or delete any IdP services such as Okta, Entra ID, Ping Identity, or Amazon Cognito that you have created for this post.
- Finally, delete any sample code repositories you have cloned or downloaded, and any associated resources deployed as part of setting up the environment for running the samples in the code repository.
Conclusion
Trusted identity propagation is an important mechanism for securely integrating Amazon Q Business APIs into enterprise applications that use external IdPs. By implementing trusted identity propagation with AWS IAM Identity Center, organizations can confidently build AI-powered applications and tools using Amazon Q Business APIs, knowing that user identities are properly verified and protected throughout the process. This approach allows enterprises to harness the full potential of generative AI while maintaining the highest standards of security and privacy. To get started with Amazon Q Business, explore the Getting started guide. To learn more about how trusted token propagation works, see How to develop a user-facing data application with IAM Identity Center and S3 Access Grants.
About the Author
 Rajesh Kumar Ravi is a Senior Solutions Architect at Amazon Web Services specializing in building generative AI solutions with Amazon Q Business, Amazon Bedrock, and Amazon Kendra. He is an accomplished technology leader with experience in building innovative AI products, nurturing the builder community, and contributes to the development of new ideas. He enjoys walking and loves to go on short hiking trips outside of work.
Author: Rajesh Kumar Ravi