

Faster multiplayer hosting with containers on Amazon GameLift Servers
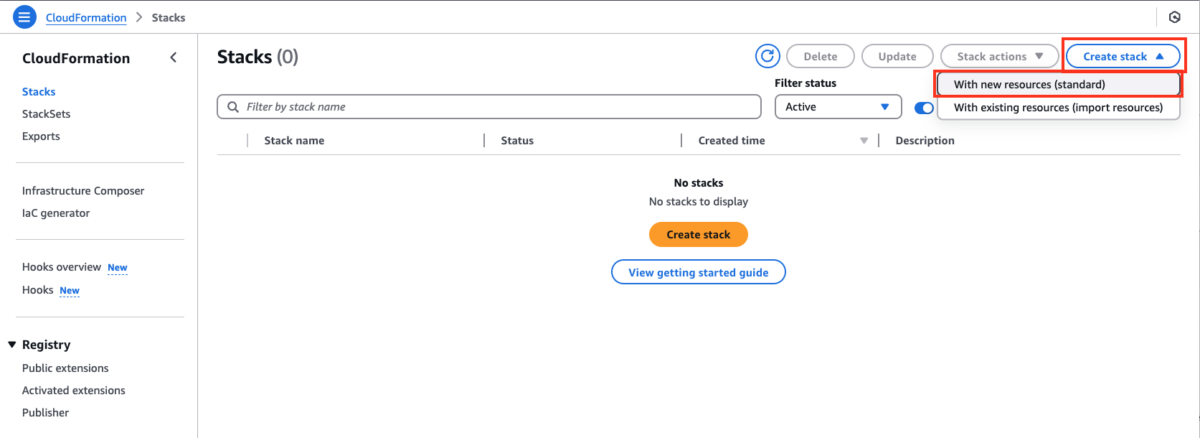
Figure 1: Create Stack in AWS CloudFormation console… Figure 2: Upload the CloudFormation template… Figure 3: Enter the stack name and parameters… Figure 4: Acknowledge IAM resource creation… Figure 5: Submit the stack creation… This CloudFormation stack will cr…
Amazon GameLift Servers, a global multiplayer hosting solution, added support for container fleets in 2024. This feature enables customers to run containerized game servers at global scale. To make onboarding to container fleets streamlined for customers, we launched the Amazon GameLift Servers Containers Starter Kit Solution.
The solution allows you to take any existing game server build, and host it on containers on Amazon GameLift Servers. You don’t need to install any tools locally, as the build and deployment are automated on Amazon Web Services (AWS) CodeBuild. The solution comes with an automatically configured SDK wrapper that integrates with the Amazon GameLift Server SDK. This allows you to take your existing Unreal, Unity, or other game server build, and get started with Amazon GameLift Servers quickly and efficiently. You can begin implementation right away and extend to additional features at your own pace.
Deploying the Containers Starter Kit
The solution is hosted in the Amazon GameLift Servers Toolkit. You first need to either download the toolkit directly from the GitHub repository, or clone it with a git client running the following command:
git clone https://github.com/aws/amazon-gamelift-toolkit.git
There are four steps to get started:
- Get your Linux game server build ready. This can be any Unreal, Unity, or other game server binary.
- Deploy the provided AWS CloudFormation template in the AWS Management Console. The template contains the Amazon GameLift Servers container fleet and the build automation tools.
- Copy your game server build to the starter kit, and set your port and game server binary name.
- Upload your game server as a zip file to Amazon Simple Storage Service (Amazon S3), and run build on the AWS CodeBuild project.
In our example we will go through each step using an Unreal Engine 5 game, however, you can apply this approach to any game client and server combination.
Step 1: Get your game server build ready
First, create a standard dedicated server Linux build from your Unreal project. In the example we have one created for the Unreal third-person template. You can read about setting up dedicated servers and cross-compile toolchain in Unreal Engine documentation to learn more. This approach works just as well with Unity Linux server builds, or any Linux game server binary you have written in any language.
Step 2: Deploy the Amazon GameLift Servers containers fleet and deployment pipeline
Deploy the AWS CloudFormation template fleet_deployment_pipeline.yml file in the AWS Management Console. Open the CloudFormation Management console, and select Create stack. From the dropdown menu select With new resources (standard).

Figure 1: Create Stack in AWS CloudFormation console.
Within the Specify template area select Upload a template file, then select Choose file, and upload the fleet_deployment_pipeline.yml file. Finally, select Next.

Figure 2: Upload the CloudFormation template.
The default parameter values work for standard Unreal networking, which defaults to port 7777 and uses the UDP protocol. If you made any changes to the networking configuration, or want to use a different instance type, memory, and vCPU requirements, you can do that here. For a standard Unreal server build, enter a Stack name and select Next.

Figure 3: Enter the stack name and parameters.
Acknowledge that you’re creating AWS Identity and Access Management (IAM) resources, and select Next.

Figure 4: Acknowledge IAM resource creation.
On the final page, select Submit to start the stack creation.

Figure 5: Submit the stack creation.
This CloudFormation stack will create the following resources:
- An Amazon GameLift Servers Container Fleet with one region configured
- An AWS CodeBuild project that is used to build and deploy your container images
- An S3 bucket that is used for uploading your game server builds for CodeBuild
Step 3: Copy your game server build to the starter kit project
Copy the contents of your Unreal Linux game server build to the ServeBuild folder (see Figure 6).

Figure 6: ServerBuild contents.
In the wrapper.sh located in the root folder, set the SERVER_BINARY_PATH and the PORT variables to match your game server build.

Figure 7: Set PORT and SERVER_BINARY_PATH.
Create a zip file called gameserver.zip including all files and folders from the root of the containers-starter-kit folder. Make sure to zip the following contents instead of the top-level folder:
- SDKGoWrapper folder
- ServerBuild folder
- Dockerfile
- wrapper.sh

Figure 8: zip file contents.
Step 4: Upload your game build to Amazon S3 and deploy
Go to the CloudFormation console, select Stacks, and open the MyGamePipeline stack.

Figure 9: Select the MyGamePipeline stack.
Open Outputs and click on the Value link for the Key GameServerBuildBucket to open a new tab.

Figure 10: Open the S3 bucket for the game server build.
Select Upload.

Figure 11: Upload the game server build.
Drag and drop the gameserver.zip file into the upload area and select Upload.

Figure 12: Drag and drop the build.
Using the S3 Management Console for uploads is slower than using the AWS Command Line Interface (AWS CLI). For most game server builds this is not an issue. For larger builds, you can follow the instructions in the Readme to upload with AWS CLI for a much faster result.
Next, go back to CloudFormation and open the Value link for GameServerCodeBuildProject in a new tab.

Figure 13: Open the AWS CodeBuild project.
Select Start Build.

Figure 14: Start the build.
You can see the output of the build process in real time on this page. It will download the gameserver.zip file, set up the Amazon GameLift Go Server SDK wrapper. Build your container image and push it to Amazon Elastic Container Registry (Amazon ECR). It will then create or update the Container Group Definition with the new container version and update your Amazon GameLift Servers fleet with the new build.
Testing your deployment
The deployment will take a few minutes to complete, after which your container fleet becomes active. Go to the Amazon GameLift Servers console and select Managed Containers, then select Fleets from the subset of options for that area. Click on the ID link to select the MyGameFleet fleet to open it.

Figure 15: Open the fleet.
Open CloudShell from the bottom left of the screen and wait for your CloudShell environment to become active. Then run the following command with your Fleet ID to test creating a session on the fleet:
aws gamelift create-game-session --fleet-id <YOURFLEETIDHERE> --maximum-player-session-count 2

Figure 16: Create a game session.
You receive an IP and a Port in the response, which you can pass on to your Unreal game client with the console command open ip:port. In our third-person sample game, this would log the player into the created game session. Typically, the game sessions are created in your game backend, and the session information is passed on to clients as they request a game session. You can expand your implementation with Amazon GameLift FlexMatch for managed global matchmaking.
Viewing game session logs
By default, container fleets deliver the game server output to Amazon CloudWatch Logs. Open the CloudWatch console and select Log groups. Select the Log group for your container fleet by clicking its link.

Figure 17: Open the log output.
Now, open any of the Log streams for your fleet to review the output. You will see that the output is configured in the starter kit to push both the output of your game server as well as the output of the SDK wrapper to the same stream. This can help you debug any issues with your deployment.

Figure 18: Select a log stream.
Terminating your game sessions
Typically, you will configure your game server so that once players have joined, the game will start, and there’s eventually a point when it ends. At this point you can just exit the game server process. The wrapper script will take care of terminating the game session, which will be immediately replaced with a new one.
If you want to terminate a game session manually, you can do that by opening Game sessions on your container fleet, selecting the circle to the left side of the Game session ID you want to terminate, and selecting Terminate.

Figure 19: Terminate the game session.
The starter kit wrapper supports normal game session shutdown, which will invoke a callback on the game server. The callback is received by the SDK wrapper, which will immediately terminate your game server process too.
In the pop-up window questioning you about the if you want to terminate the game session, select Normal game session shutdown, and select Confirm. This will immediately terminate your session, and you can see the CloudWatch log output reflect a new session being immediately started to replace the old one.

Figure 20: Confirm game session termination.
Next steps
Once you’re familiarized with the service, you can start customizing the deployment automation to your needs, or move the scripts to your own CI/CD tooling. You can customize the CloudFormation template to add more regions, set up automatic scaling of your fleets and more. And later on, if you want to integrate with the full Amazon GameLift Server SDK, the Containers Starter Kit Readme in the GitHub repository will guide you through the minor changes to do that as well.
Conclusion
It’s important for game developers to be able to get started with global game server hosting easily. This allows you to focus on features instead of infrastructure. In this blog we covered how you can quickly get started with Amazon GameLift Servers container fleets using any existing game server build. The solution includes a deployment pipeline to automate your game server updates, as well as a built-in sidecar process that manages all communication to the Amazon GameLift service. Altogether, this solution helps reduce the effort required to get started with game server hosting.
Get started today with Amazon GameLift Servers for multiplayer game server hosting. We’re looking forward to see the games you build. Contact an AWS Representative to know how we can help accelerate your business.
Further reading
- Leverage fully-managed containers to host multiplayer games at global scale on Amazon GameLift
- Amazon GameLift achieves 100 million concurrently connected users per game
- Local testing to cloud deployment: development workflows in Amazon GameLift
- Hybrid game server hosting with Amazon GameLift Anywhere
Author: Juho Jantunen