

How to deploy an Amazon OpenSearch cluster to ingest logs from Amazon Security Lake
sudo su wget https://aws-blogs-artifacts-public…zip wget https://aws-blogs-artifacts-public…Many customers use Amazon Security Lake to automatically centralize security data from Amazon Web Services (AWS) environments, software as a service (SaaS) providers, on-premises workloads, and c…
Many customers use Amazon Security Lake to automatically centralize security data from Amazon Web Services (AWS) environments, software as a service (SaaS) providers, on-premises workloads, and cloud sources into a purpose-built data lake in their AWS accounts. With Security Lake, customers can choose between native AWS security analytics tools and partner security information and event management (SIEM) and analytics solutions to streamline security investigations.
Amazon OpenSearch Service natively integrates with Security Lake to enable customers to perform interactive log analytics and searches across large datasets, create enterprise visualization and dashboards, and perform analysis across disparate applications and logs. With Amazon OpenSearch Security Analytics, customers can also gain visibility into the security posture of their organization’s infrastructure, monitor for anomalous activity, detect potential security threats in real time, and initiate alerts to pre-configured destinations.
In part one of this two-part blog post, I show you how to plan and deploy an OpenSearch Service cluster that ingests logs from Security Lake to facilitate real-time monitoring with OpenSearch Security Analytics. This will include considerations about instance choice and storage. Then, I will show you how to set up an OpenSearch Ingestion pipeline to ingest logs and data expiration rules to expire logs after a set period of time.
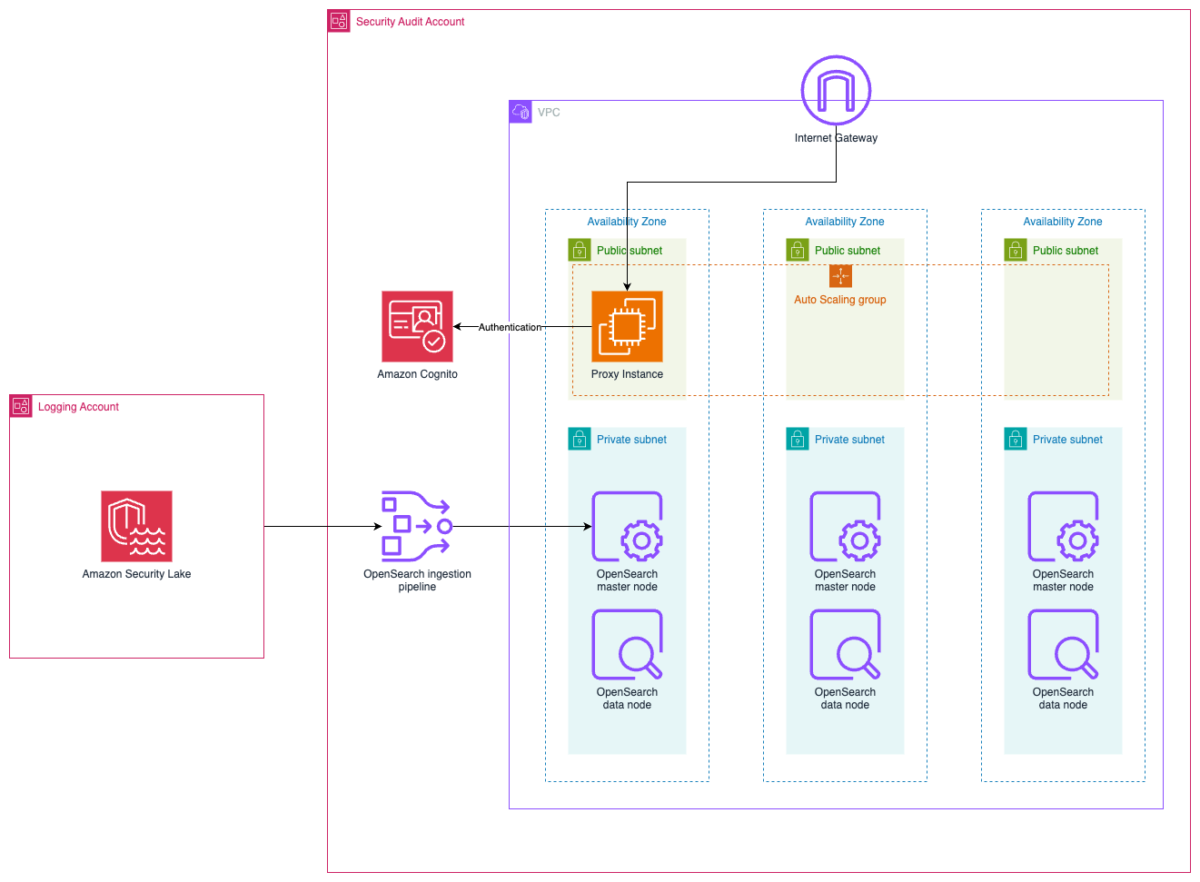
The architecture diagram in Figure 1 shows the completed architecture of the solution. The OpenSearch Service cluster is deployed within a virtual private cloud (VPC) across three Availability Zones and ingests logs from Security Lake using an OpenSearch Ingestion pipeline. The cluster is accessed through a public facing proxy hosted on an Amazon Elastic Compute Cloud (Amazon EC2) instance and authentication to the cluster is managed with Amazon Cognito.

Figure 1: Solution architecture
Prerequisites
Security Lake should already be deployed. For details on how to deploy Security Lake, see Getting started with Amazon Security Lake. You will need AWS Identity and Access Management (IAM) permissions to manage Security Lake, OpenSearch Service, Amazon Cognito, and EC2 and to create IAM roles to follow along with this post.
Deciding instances for the OpenSearch Service master and data nodes
First, determine what instance type to use for the master and data nodes. For workloads that generate less than 100 GB of logs per day, we recommend using 3x m6g.large.search master nodes and 3x r6g.large.search for the data nodes. The number of data nodes and master nodes should be a multiple of three. You can start small and scale up or scale out later. For more information about deciding the size and number of instances, see the blog post Get started with Amazon OpenSearch Service. Note the instance types that you have selected.
Configuring storage
To determine how much storage is needed, you need to plan your data strategy. With Security Lake acting as your primary long-term log storage, you don’t need to store as much data in OpenSearch. We recommend storing around 30 days of data in OpenSearch. This allows you to react to and investigate the most immediate security events while optimizing storage costs for older logs.
The next step is to determine the volume of logs generated by Security Lake. You can get this information from the AWS Management Console for Security Lake in the Security Lake delegated administrator account, on the Usage screen. Select the Last 30 days as the range of usage. Add the total actual usage for the last 30 days for the data sources that you intend to send to OpenSearch. If you have used Security Lake for less than 30 days, you can use the Total predicted usage per month instead. Divide this figure by 30 to get the daily data volume.

Figure 2: Select range of usage
To determine the total storage needed, multiply the data generated by Security Lake per day by the retention period you chose, then by 1.1 to account for the indexes, then multiply that number by 1.15 for overhead storage. Some example calculations are shown in the following table:
| Data generated by Security Lake (GB) | Multiplied by the number of days to store | Multiplied by indexes | Multiplied by overhead space | Total storage needed (GB) |
| 10 | 30 | 1.1 | 1.15 | 379.5 |
| 50 | 30 | 1.1 | 1.15 | 1897.5 |
| 200 | 15 | 1.1 | 1.15 | 3795 |
Take the total amount of storage you need and divide it by the number of nodes you have to determine the amount of Amazon Elastic Block Store (Amazon EBS) storage you need per node. Round that number up to the nearest whole number. You can increase the amount of storage after deployment when you have a better understanding of your workload. Make a note of this number. The following table shows storage per node based on the previous calculations.
| Total data (GB) | Number of nodes | Storage per node (GB) |
| 379.5 | 3 | ~127 |
| 1897.5 | 6 | ~317 |
| 3795 | 12 | ~317 |
Where to deploy the cluster?
If you have an AWS Control Tower deployment or have a deployment modelled after the AWS Security Reference Architecture (AWS SRA), Security Lake should be deployed in the Log Archive account. Because security best practices recommend that the Log Archive account should not be frequently accessed, the OpenSearch Service cluster should be deployed into your Security Tooling account. While you can deploy an OpenSearch Service cluster in the same account as Security Lake, it isn’t a best practice.
Your cluster should be deployed in the same AWS Region as your Security Lake roll-up Region. If you have more than one roll-up Region, choose the Region that has the largest volume of logs.
Deploy the solution
To deploy the solution, you will use a CloudFormation template to deploy the OpenSearch Service cluster. After deployment, you will configure an OpenSearch Ingestion pipeline to ingest logs from Security Lake, and set up object expiration.
To deploy the OpenSearch cluster:
- To deploy the CloudFormation template that builds the OpenSearch service cluster, choose the following Launch Stack button.

- In the CloudFormation console, make sure that you are in the same Region as your Security Lake roll-up Region. Enter a name for your stack and enter the instance type and AWS EBS volume size that you noted earlier. For SearchEngineVersion, select the most recent one available.

Figure 3: Add stack details
- Choose Next and Next to proceed to the Review and create page.
- Check the acknowledgements in the Capabilities section and choose Submit to begin deploying the resources.
- It will take 20–30 minutes to deploy the multiple nested templates. Wait for the main stack (not the nested ones) to achieve CREATE_COMPLETE status before proceeding to the next step.
- Go to the Outputs pane of the main CloudFormation stack. Open the DashboardsProxyURL value in a new tab.

Figure 4: The stacks in the CREATE_COMPLETE state with the relevant outputs highlighted
Note: Because the proxy relies on a self-signed certificate, you will get an insecure certificate warning. You can safely ignore this warning and proceed. For a production workload, you should issue a trusted private certificate from your internal public key infrastructure or use AWS Private Certificate Authority.
- You will be presented with the Amazon Cognito sign-in page. Sign in with the CognitoUser and CognitoPassword details found in the Outputs pane in the CloudFormation console. After changing your password, you will be sent to the OpenSearch dashboard.


To ingest logs from Amazon Security Lake:
- Go to the OpenSearch console and select the cluster that was created by the CloudFormation template. Choose the Security configuration tab and choose Edit.
Figure 5: Edit the security configuration
- Under Fine-grained access control, ensure that Enable fine-grained access control is selected and select Create master user. Enter a username and password for this user and keep it secure. You will use this to upload the component and index templates later.
Figure 6: Configure fine-grained access control
- On Access Policy, change the Domain access policy to Only use fine-grained access control. If an Access policy will be cleared window appears, choose Clear policy.
Figure 7: Select the access policy
- Choose Save changes.
- Follow the instructions from the blog post Generate security insights from Amazon Security Lake data using Amazon OpenSearch Ingestion starting from Create an Amazon Security Lake subscriber to set up the Security Lake subscriber.
- You need to use your proxy to complete the Install templates and dashboards for Amazon Security Lake data section of the post. Go to the Amazon EC2 console and select the checkbox next to the instance with dashboards-proxy in its name. Choose Connect.

Figure 8: Selecting the proxy instance to connect to
- Choose Connect to connect to the proxy instance with Session Manager, a capability of AWS Systems Manager.
Figure 9: Connecting to the instance with Session Manager
- Run the following commands to download the templates to your proxy.
- You can follow the rest of the instructions in the blog post to finish setting up the OpenSearch Ingestion pipeline, which will enable OpenSearch to ingest logs from Security Lake.


To expire stale findings
After your OpenSearch cluster is ingesting data, you need to configure it to expire stale data.
- Choose the menu icon (three stacked horizontal lines) on the top left and select Index Management in the Management section.

Figure 10: Navigating to the Index Management page in the OpenSearch console
- Choose Create policy and select JSON editor. Enter a name for the policy and paste the following JSON into the Define policy window. Choose Auto Indent to make it more readable.
- Choose Create.

This policy automatically deletes indices after 30 days and is automatically applied to new indices created by data from Security Lake. You can select the policy to change its configuration using the visual editor.
Clean up
To avoid unwanted charges, delete the OpenSearch Ingestion pipeline, the main CloudFormation template (not the nested stacks), and disable Security Lake.
Conclusion
In this post, you learned how to plan an OpenSearch deployment with Amazon OpenSearch Service to ingest logs from Amazon Security Lake. You determined the size of your OpenSearch Service cluster and deployed it into a VPC. You then set up an OpenSearch Ingestion pipeline to ingest data from Security Lake and deployed a script to expire stale data. Through this, you created the infrastructure needed to use OpenSearch Service as a threat detection tool. In part 2, I will show you how to set up the Security Analytics detector to generate alerts to security findings in near-real time.
If you have feedback about this post, submit comments in the Comments section below. If you have questions about this post, contact AWS Support.
Author: Kevin Low