

Training AI models for skill-based matchmaking using Amazon SageMaker AI
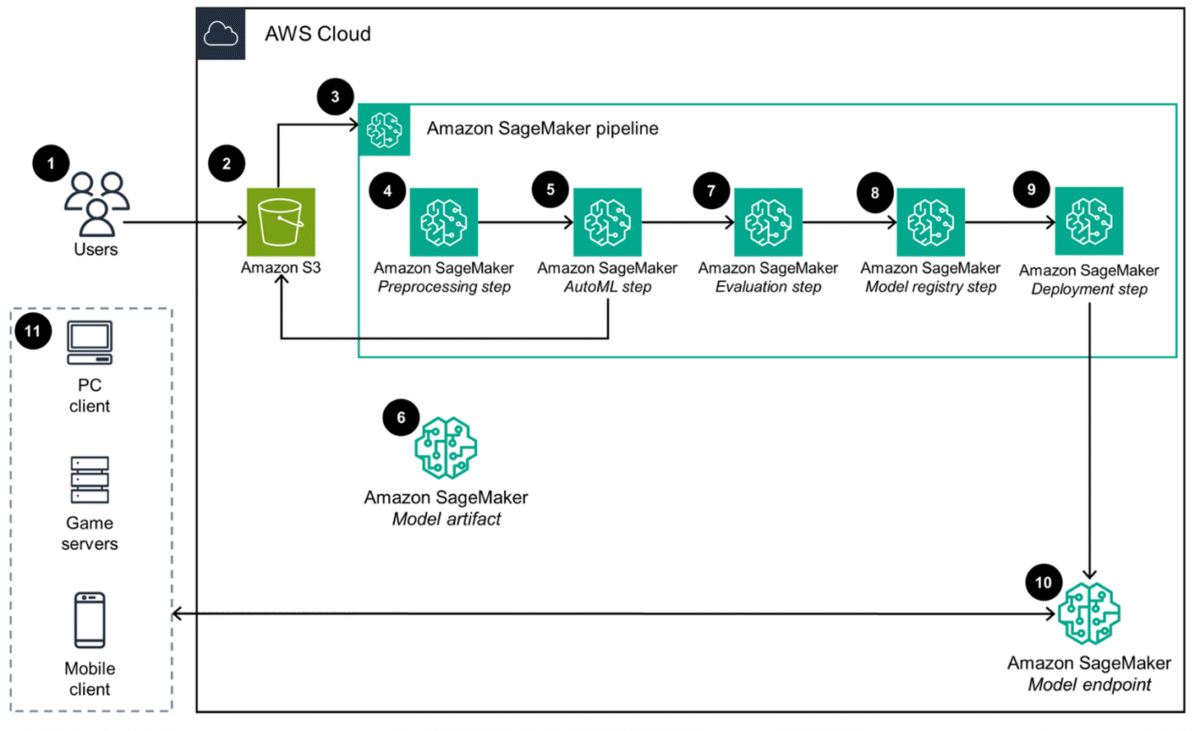
Figure 1: Architecture diagram of the Guidance for AI-Driven Player Insights on AWS… Figure 2 shows the architecture you will be implementing in this blog… Figure 2: Matchmaking workflow using matchmaking simulator… Figure 3: Matchmaking workflow as part of a game backend… …
In competitive multiplayer games, skill-based matchmaking is crucial for creating fun and competitive games. Determining player skill today is difficult due to the vast array of metrics games record (such as hits, misses, assists, time played, level, and more), making it challenging to determine which factors are most indicative of skill. Instead of manually creating algorithms to determine player skill, machine learning (ML) techniques (particularly supervised learning) can automatically identify patterns across game metrics to produce more accurate skill ratings. These ML-derived ratings enable more balanced matchmaking, ultimately enhancing player satisfaction and engagement.
In this first part of our two-part blog series, we’ll show you how to use Amazon SageMaker AI to quickly create and deploy an automated ML pipeline. Amazon SageMaker AI provides the capabilities to build, train, and deploy ML and foundation models, with fully managed infrastructure, tools, and workflows. The model and pipeline we build will produce a value that is a more reflective and precise rating of each player’s skill.
To accomplish this task, we will be building upon the Guidance for AI-Driven Player Insights on Amazon Web Services (AWS). The following architecture diagram for the guidance shows how game studios can leverage this low-code solution to quickly build, train, and deploy high-quality models that predict player skill using historic player data. Operators just upload their historic player data to Amazon Simple Storage Service (Amazon S3). This invokes a complete workflow to extract insights, select algorithms, tune hyperparameters, evaluate models, and deploy the best performing model for your dataset to a prediction API orchestrated by Amazon SageMaker Pipelines.

Figure 1: Architecture diagram of the Guidance for AI-Driven Player Insights on AWS.
Figure 2 shows the architecture you will be implementing in this blog. The diagram shows the flow of how a player’s matchmaking request is handled. The matchmaking request triggers Amazon API Gateway, invoking an AWS Lambda function which receives the relevant player data from Amazon DynamoDB. The data is then passed to the Amazon SageMaker AI endpoint, which runs an inference produce to the more holistic skill value used by Amazon GameLift FlexMatch in the matchmaking process.

Figure 2: Matchmaking workflow using matchmaking simulator.
The following architecture diagram shows how you will implement this solution in an actual game by connecting FlexMatch to an Amazon GameLift Servers queue. This triggers GameLift Servers to place or spin up game servers for the newly created matches.

Figure 3: Matchmaking workflow as part of a game backend.
Walkthrough
Prerequisites
For this walkthrough, you should have the following prerequisites:
- An AWS account with IAM permissions (administrative access) to create and use a SageMaker AI Domain.
- A code editor
- To download the data file, you will be using for this tutorial, choose PlayerStats.csv. In the GitHub repository you can choose the “Download raw file” option, as shown in Figure 4.

Figure 4: PlayerStats.csv download page.
- Optional: If you would like to replace the code files, we will be modifying throughout this tutorial rather than modifying the code line by line, choose the following links to download each of the files choosing the “Download raw file” option:
- The prerequisites found in the Guidance for AI-driven player insights on AWS GitHub repository.
SageMaker AI domain setup
- Open the SageMaker AI console.
- Under the left side menu, choose Domains.
- Choose Create domain.

Figure 5: Amazon SageMaker domain dashboard.
- Select the Quick Setup option and choose Set up.

Figure 6: Amazon SageMaker domain creation.
Access the Amazon SageMaker Studio dashboard
- Select the domain you created in the previous section.

Figure 7: Amazon SageMaker domain selection.
- Under the User profiles section select the Launch dropdown button located next to the profile you want to use. Select SageMaker Studio will open in another tab. Leave this tab open, we will be coming back to this in a later section.

Figure 8: Domain user profiles.
Deploy the AI driven player insights solution
Follow the deployment steps provided by the AWS AI-Driven Player Insights repository linked in the prerequisites section of this blog. You will need to deploy the solution using your own device if you do not have access to an AWS Cloud9 development environment. Follow the Deployment Steps up to Step 5 within the guide.
Understanding AI-driven player insights on AWS
Traditionally, developing effective machine learning models requires data science experience since builders must determine appropriate data pre-processing methods. These were based on metric relationships, selecting optimal machine learning algorithms, and establishing model performance evaluation strategies. With this solution you will no longer need extensive machine learning experience to build and deploy machine learning models. Instead, you will leverage the feature Amazon SageMaker Autopilot.
Amazon SageMaker Autopilot automates the complete process of building, training, tuning, and deploying machine learning models. Amazon SageMaker Autopilot analyzes your data, selects algorithms suitable for your problem type, and preprocesses the data for training. It also handles automatic model training, and performs hyper-parameter optimization to find the best performing model for your dataset. To accelerate the process of training and deploying machine learning models as data changes over time, our solution provides a pre-defined machine learning pipeline. The pipeline triggers the entire process and model deployment from the moment your data is uploaded to your S3 bucket.
This solution requires a player statistics dataset. The dataset should include relevant performance metrics for your game and the current skill rating used for matchmaking. For this tutorial, we will use the following PlayerStats.csv you downloaded in the prerequisites section.
Preparing the machine learning pipeline for linear regression
The AI-driven player insights machine learning pipeline, by default, is configured for predicting player churn with an output of “True” or “False”. Since the output value for this example refers to categorical data with discrete outcomes, this is set up for a classification problem. In our tutorial, we are looking to output numeric data for a player’s “Skill”. Since we are looking at supervised learning for numeric data with continuous outcomes, we need to modify this pipeline for linear regression, the most common supervised learning model for predicting numeric data.
- In your preferred code editor, open the /player-insights/constants.py file and replace its contents with the following (Be sure to replace the values for SM_DOMAIN_ID and REGION to your own specific values.):
- Since we will be training a linear regression model, we will need to change the evaluation to Mean Squared Error (MSE). Replace the /player-insights/evaluation.py main function with the following code:
- Open the /player-insights/workflow.py. Here we are adjusting the machine learning pipeline to use the MSE metric for evaluation rather than the F1 score (since F1 score is used for classification problems). To do this, we will modify the failure step defined on line 227 to send a message indicating the MSE is less than the specified threshold and being used rather than the F1 score.
- Note, you will also need to modify the conditional step defined at line 259 in this same file to use the MSE metric for evaluation instead of the weighted F1 score.
- Verify that the cloud development kit (CDK) deployment correctly synthesizes the proper AWS CloudFormation templates, to make sure your changes are updated in the stack, by executing the following command in your terminal:
cdk synth
- Deploy your modified solution by executing the following command in your terminal:
cdk deploy - Locate the S3 bucket, created by the CloudFormation template, by opening the AWS CloudFormation console. Choose the PlayerSkills-Stack.

Figure 9: CloudFormation stack.
- On the right side of your console screen, you will see a tab labeled Outputs. Select the Outputs tab, and take note of the value for the key, DataBucketName.

Figure 10: CloudFormation stack outputs.
- Open the Amazon S3 console, and choose the bucket that has the name you noted in the previous step. Choose Upload.

Figure 11: Amazon S3 object upload.
- Choose Add files, choose the csv file you downloaded in the prerequisites, and choose Upload. This will trigger your machine learning pipeline to begin. Training and model deployment will take roughly 30 minutes to be completed.

Figure 12: Amazon S3 object upload – adding files.
Check pipeline completion progress
- Navigate back to the tab you have with the SageMaker Studio page open. Within the left side menu choose Pipelines.

Figure 13: Amazon SageMaker Studio home page.
- Choose the PlayerSkills-AutoMLPipeline and choose your most recent execution.

Figure 14: Amazon SageMaker pipeline.

Figure 15: Amazon SageMaker pipeline executions.
- After the execution is completed, you will see a graph showing the steps of the pipeline and their results.

Figure 16: Amazon SageMaker pipeline execution details graph.
Test your machine learning model
- Once training and model deployment is completed successfully, there is an Amazon SageMaker AI endpoint that will be created. Locate the Amazon SageMaker AI endpoint by navigating to Amazon SageMaker AI in the AWS Management Console. On the left side menu, under the Inference section, choose the Endpoints option. The name of the endpoint in this tutorial is PlayerSkills-Endpoint. Note the name of your created endpoint, you will be referring to this later.

Figure 17: Amazon SageMaker AI endpoint.
- To test the newly created model and endpoint, you can replace /player-insights/assets/examples/churn_inference.py file lines 23-25 with the following code:
- Rename the file name of churn_inference.py to skill_inference.py.
- To run the script, in your command line, navigate to the /player-insights/assets/examples directory and run the script with the following commands:
cd assets/examples
python3 skill_inference.py --endpoint-name PlayerSkills-Endpoint
- If the script runs successfully, it will return a response that is a value between 0-1 of the endpoint’s output, as shown in Figure 16. Changing the values entered in the previous step, Step 2, will change the output values.

Figure 18: Example output from skill_inference.py.
Cleaning up
You’ll be using what you deployed in this blog in the second part of this series, so we won’t clean this up yet. We’ll show you how to clean up any resources you’ve deployed in the next blog.
In the second part of this series, we’ll show you how to use the newly determined “Skill” value in conjunction with Amazon GameLift FlexMatch. Amazon GameLift FlexMatch will handle the logic of matchmaking players while giving you, the developer, a way to adjust which matches are created through a rules-based syntax called FlexMatch rule sets.
Conclusion
We showed how to deploy a solution for AI-driven player insights on AWS, and how to build a ML model to more holistically infer a player’s Skill value. Based on what makes a player skillful within your game, you can choose what in-game factors that the ML model uses to determine player skill. This results in a more precise player skill that you can use to create balanced and competitive matches.
Contact an AWS Representative to know how we can help accelerate your business.
Further reading
Author: Christina Defoor